Content
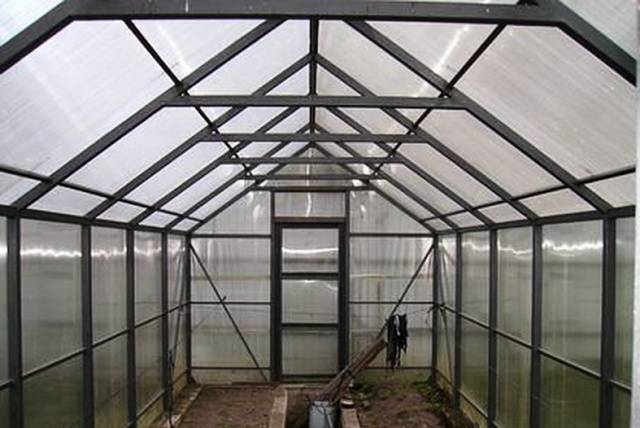
The frame is the basic structure of any greenhouse. It is to it that the cladding material is attached, be it film, polycarbonate or glass. The durability of the structure depends on the material used for the construction of the frame. Frames are made of metal and plastic pipes, wooden bars, corners. However, a galvanized profile that meets all construction requirements is considered more popular for greenhouses.
Pros and cons of using a galvanized profile in the construction of a greenhouse
Like any other building material, a galvanized profile has its advantages as well as disadvantages. Most of all, the material receives positive reviews from summer residents. In particular, this is reasoned by the following points:
- Any amateur without construction experience can assemble a greenhouse frame from a profile. From the tool you only need a jigsaw, an electric drill and a screwdriver. Most of all this can be found in the back room of every owner. As a last resort, you can cut parts from the profile with an ordinary metal file.
- A big plus is that galvanized steel is less susceptible to corrosion, it does not need to be painted and treated with an anti-corrosion compound.
- The greenhouse frame from the profile turns out to be light. If necessary, the entire assembled structure can be moved to another place.
- The cost of a galvanized profile is several times less than a metal pipe, which is very beneficial to any summer resident.
On sale now there are ready-made greenhouses from a galvanized profile in disassembled form. It is enough to buy such a designer and assemble all the details according to the scheme.
Usually the greenhouse frame is attached to the foundation with dowels. In the absence of a concrete base, the frame is fixed to pieces of reinforcement hammered into the ground with a step of 1 m.
The disadvantage of a galvanized profile can be considered a low bearing capacity relative to a metal pipe. The bearing capacity of the profile frame is maximum 20 kg / m2... That is, if more than 5 cm of wet snow accumulates on the roof, the structure will not support such a weight. That is why most often the profile frames of greenhouses are made not with a pitched roof, but with a gable or arched roof. On this form, precipitation is less retained.
As for the absence of corrosion, this concept is also relative. The profile does not rust quickly, like a regular metal pipe, as long as the zinc plating remains intact. In those areas where the galvanized coating was accidentally broken, over time the metal will corrode and will have to be painted.
What is omega profile
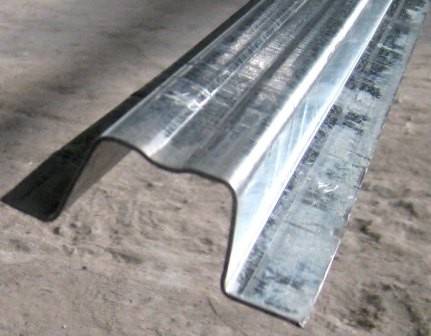
Recently, a galvanized "omega" profile has been used for the greenhouse. It got its name from a bizarre shape reminiscent of the Latin letter "Ω". The omega profile consists of five shelves. Many firms produce it in different sizes according to the individual order of the consumer. Omega is often used in the construction of ventilated facades and roof structures. Due to the simple installation of the profile with their own hands and increased strength, they began to use it in the manufacture of the frame of greenhouses.
Due to its shape, the "omega" can carry more weight than a regular profile. This increases the bearing capacity of the entire greenhouse frame. Among the builders, "omega" received another nickname - the hat profile. For the production of "omega" metal is used with a thickness of 0.9 to 2 mm. The most popular are products with a wall thickness of 1.2 mm and 1.5 mm. The first option is used in the construction of weak, and the second - reinforced structures.
Assembling the profile frame of the greenhouse
Having decided to improve your home area with a greenhouse made of a galvanized profile, it is better, of course, to give preference to "omega". Before buying material, it is imperative to draw up an accurate drawing of all structural details and the greenhouse diagram itself. This will simplify the process of future construction and will allow you to calculate the required number of profiles.
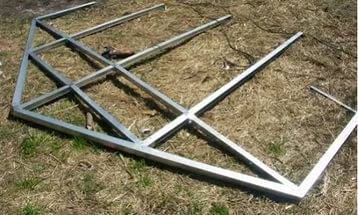
Manufacturing of end walls
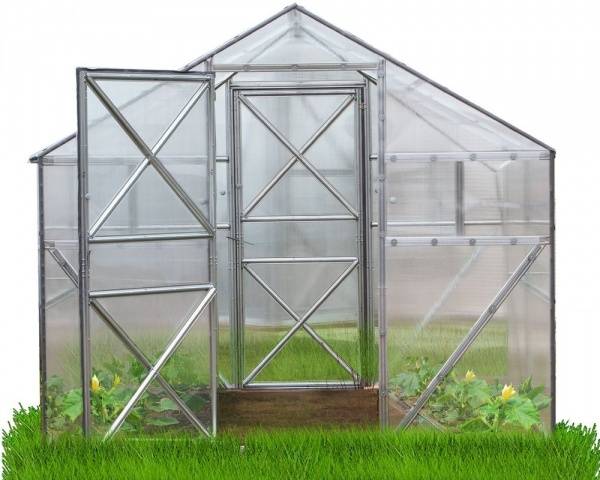
It should be noted right away that if an "omega" profile is chosen for the greenhouse frame, then it is better to make a gable roof. Arched structures are difficult to bend on their own, moreover, the "omega" breaks when bent.
The end walls define the shape of the entire frame. To make them of the correct shape, all the parts are laid out on a flat area. Any flaw in the design will entail a skew of the entire frame, to which it will be impossible to fix polycarbonate.
Further work is performed in the following order:
-
A square or rectangle is laid out from the profile segments on a flat area. The choice of shape depends on the size of the greenhouse. Immediately you need to mark where the bottom and top of the resulting frame will be.Attention! Before fastening the parts into one frame, measure the distance between opposite corners with a tape measure. For a regular square or rectangle, the difference in the length of the diagonals should not exceed 5 mm.

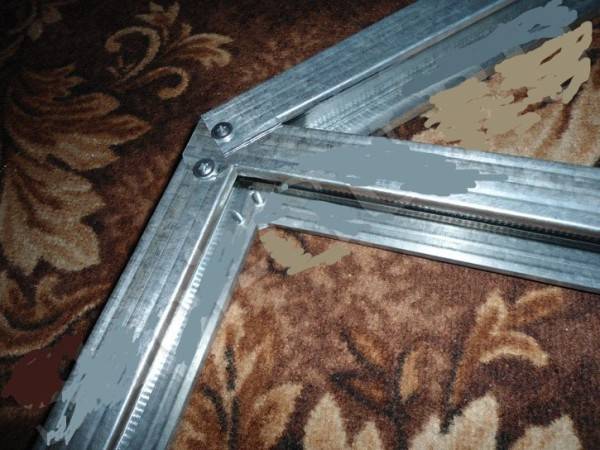
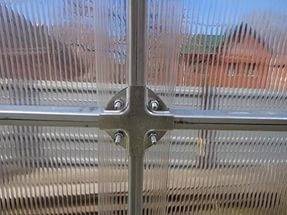
- Galvanizing is quite soft and does not require additional drilling to tighten the screws. The ends of the frame parts are inserted into each other and simply pulled together with at least two self-tapping screws at each corner. If the frame is loose, the connections are additionally reinforced with self-tapping screws.
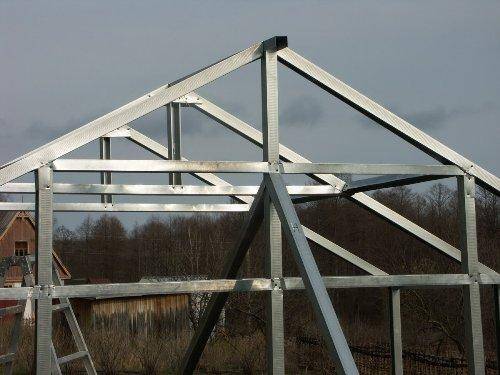
- From the center of the upper frame element, a perpendicular line is marked, denoting the ridge of the roof. Immediately you need to measure the distance from the top, that is, the ridge, to the adjacent corners of the frame. It should be the same. Further, these two distances are summed up and the length of the profile is measured according to the result obtained, after which they are sawed off with a hacksaw or jigsaw. In the resulting workpiece, the side shelves are sawed strictly in the center and the profile is bent in the same place, giving it the shape of a gable roof.
-
The resulting roof is fixed to the frame with self-tapping screws. To strengthen the structure, the corners of the frame are diagonally reinforced with stiffeners, that is, the sections of the profile are screwed obliquely. The rear end wall is ready. According to the same principle, the front end wall of an identical size is made, only it is supplemented with two vertical posts forming the doorway.Advice! The door frame is assembled according to the same principle from the profile, only it is better to do this after making the doorway in order to avoid errors in dimensions.
- After finishing the work with the end walls, cut pieces of the profile and, having cut in the center, bend additional skates, the same size as they did for the end walls. Here you need to accurately calculate the number of skates. The width of polycarbonate is 2.1 m, but such spans will sag and snow will fall through them. It is optimal to install the skates at a step of 1.05 m. It is not difficult to calculate their number along the length of the greenhouse.

The last thing to prepare before assembling the frame is 4 pieces of profile the size of a greenhouse. They are needed to fasten the end walls together.
Assembling the profile frame of the greenhouse
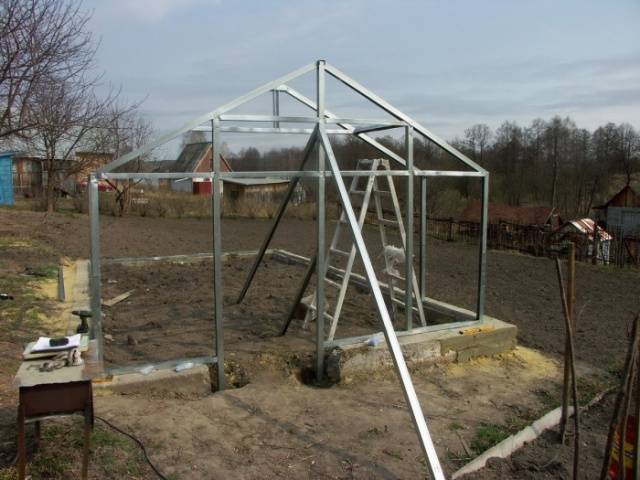
The assembly of the frame begins with the installation of both end walls in their permanent place. To prevent them from falling, they are propped up with temporary supports. The end walls are connected with prepared 4 long profiles.The upper corners of the opposite walls are fastened with two horizontal blanks, and the same is done with two other blanks, only at the bottom of the structure. The result is the still fragile frame of the greenhouse.
On the lower and upper newly installed horizontal profiles, marks are made every 1.05 m. In these places, the rack-mount stiffeners of the frame are attached. Prepared skates are fixed to the same racks. The ridge element is installed last at the very top along the length of the entire greenhouse.
Reinforcement of the frame with additional stiffeners
The finished frame is strong enough to withstand moderate wind and rainfall. If desired, it can be additionally reinforced with stiffeners. Spacers are made from pieces of a profile, after which they are fixed diagonally, reinforcing each corner of the frame.
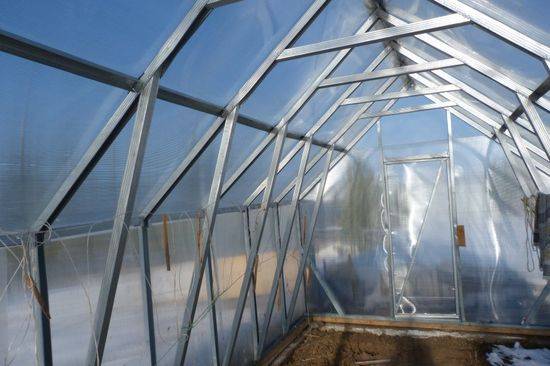
Polycarbonate sheathing
Sheathing the frame with polycarbonate begins with attaching the lock to the profile, at the joints of the sheets. The lock is simply screwed on with self-tapping screws with rubber gaskets.

It is optimal to start laying polycarbonate from the roof. The sheets are inserted into the grooves of the lock and screwed to the profile with self-tapping screws with plastic washers.
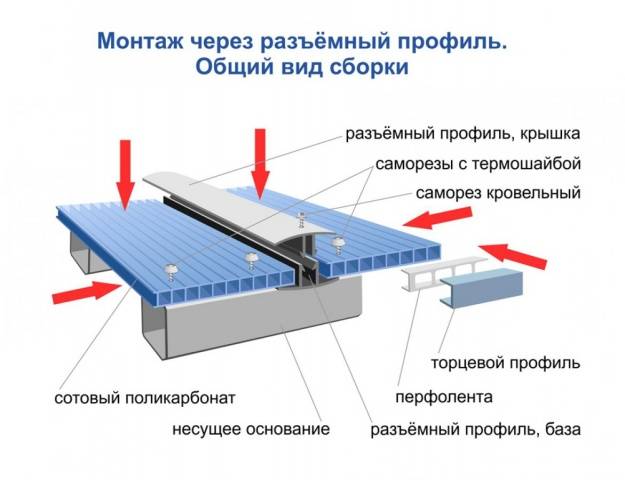
All polycarbonate sheets should be evenly pressed against the frame with self-tapping screws. It is important not to overdo it so that the sheet does not crack.
After fixing all the sheets, it remains to snap the top cover of the lock and remove the protective film from the polycarbonate.
The video shows the manufacture of a greenhouse frame from a profile:
The greenhouse is completely ready, it remains to do the internal arrangement and you can grow your favorite crops.


