Content
After the completion of the construction of the greenhouse, it is still impossible to talk about its readiness for growing vegetables. The building must be equipped inside, and the convenience of growing crops, as well as the yield indicator, depends on how this is done. Now we will consider how to equip a greenhouse inside. polycarbonateto use space efficiently and still get a good harvest.
Important nuances of the internal arrangement of the greenhouse
When the question of how to properly equip the internal greenhouse space becomes relevant, you immediately need to decide on the method of growing crops. The layout of the entire room depends on where the plants grow on the garden bed or shelves.
There are several main points that require attention at the initial stage of arranging a greenhouse:
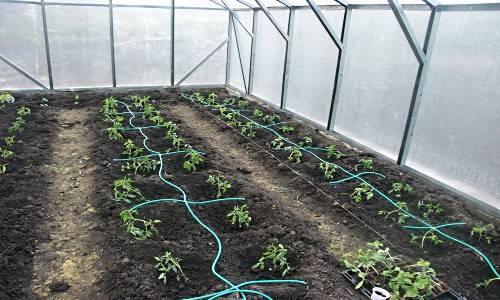
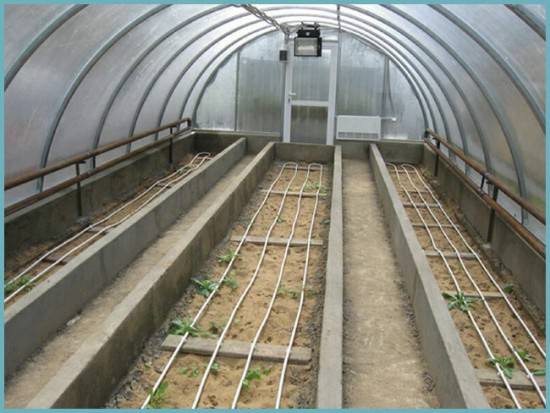
- Watering - this is the first thing that plants cannot do without. It is necessary to start doing internal watering at the initial stage of the arrangement. First of all, the points of water intake are prepared. Usually 1 point is enough, but if the area of the greenhouse is large, it is reasonable to make several points. It is important to immediately decide on the future irrigation system. Drip irrigation is considered the most effective.

- When equipping a greenhouse, it is important to take care of ventilation... Without access to fresh air, not a single plant is capable of developing normally. In a polycarbonate greenhouse, it is very easy to make sections that open for ventilation. The location of the vents is provided even before the sheathing of the greenhouse frame with polycarbonate.
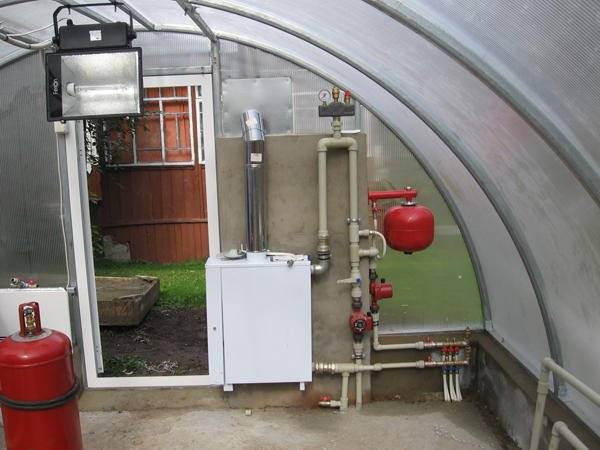
- The following attention needs to be paid heating... Polycarbonate greenhouses can be used for growing vegetables in winter. You can equip the heating system in different ways: from the simplest installation of a potbelly stove, heat gun, infrared heater to complex installation of water heating or underfloor heating. When choosing one of the heating systems, one must take into account that almost all of them are aimed at heating the air, and only a warm floor is able to warm up the greenhouse soil. Underfloor heating is laid under all beds and drainage. It is imperative to put thermal insulation under the thermal circuit. Better if it comes with a foil reflector. Such a layer prevents heat from passing into the soil and directs it upward to heat the soil in the garden bed.
- A greenhouse with lighting from ordinary incandescent lamps is a regular equipped barn. Plants will develop poorly in this light due to the absence of blue in the luminescence spectrum. It is optimal to use LED, gas-discharge or fluorescent lamps for lighting polycarbonate greenhouses.

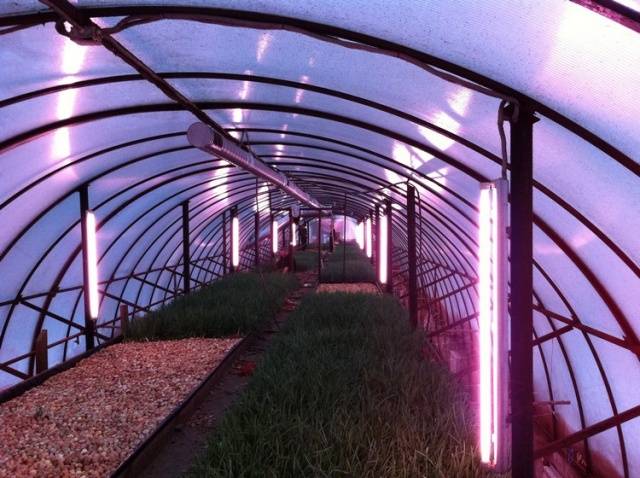
The video tells about lamps for lighting greenhouses:
When all these important points have been thought out, you can proceed to the next stage of the arrangement. This implies making shelves, shelving, partitions and other structures.
Greenhouse insulation methods
It is very good to make heating in a greenhouse, but its effectiveness depends on how well the insulation of the building itself is performed. After all, a large loss of heat will cost the owner a penny, plus during severe frosts the heating system may not cope with heating the greenhouse and the plants will simply die.
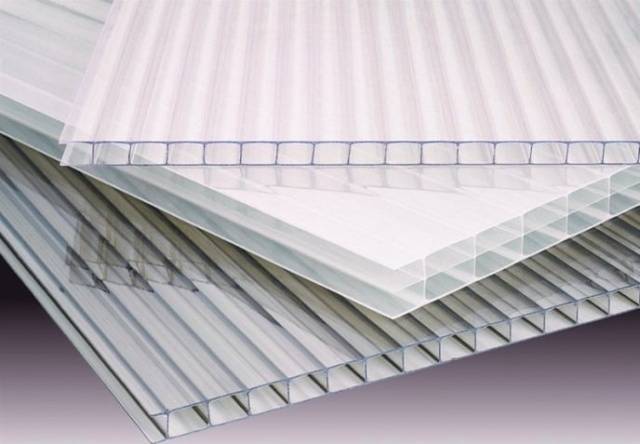
Since polycarbonate sheathing has been chosen for the greenhouse, this is already the first step in keeping warm. The transparent honeycomb sheet is characterized by minimal heat loss compared to polyethylene film. However, during the fastening of polycarbonate, one cannot save on rubber seals. Thanks to them, the possibility of heat escape through the cracks of the joints is excluded.
Heat preservation must be taken care of at the initial stage of greenhouse construction. First of all, it is required to insulate the foundation itself. The foundation is laid no shallower than the depth of soil freezing. For the construction of the foundation, adobe blocks treated with concrete mortar and polymer mastic have proven themselves perfectly. The upper part of the foundation is covered with roofing material, and from the inside, it is insulated with foam and a 400 mm layer of sand.
Heat in the soil itself can only be kept in a properly made bed. It must be raised by at least 400 mm. An electric heating cable buried along the rows gives a good effect.
The video tells about the insulation of a polycarbonate greenhouse:
Arrangement of greenhouses with racks
A polycarbonate greenhouse allows you to grow some crops on racks. This is very convenient, since the double space saving allows you to get more crops. Racks, regardless of the material from which they are made, have an impressive weight. After all, many containers with soil are placed on the shelves. The stability of the structure can only be provided by a concrete floor. For small seedling growing racks it will be enough to lay out the floor with old bricks or slabs.
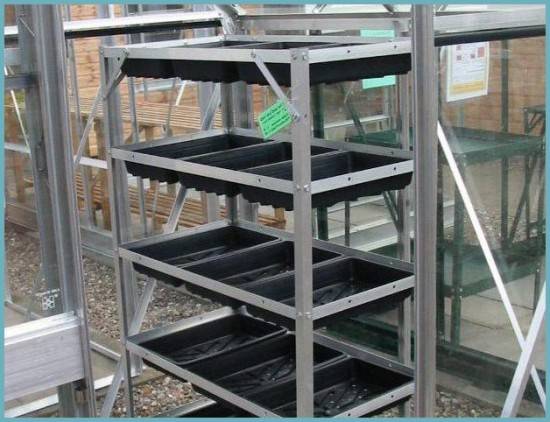
For the manufacture of the shelves themselves, wooden blanks treated with an antiseptic, as well as metal pipes, profiles, corners are suitable. The dimensions of the structure are determined individually according to needs. It is reasonable to select the height of the rack in relation to the growth of the owner. The top shelf should be at eye level so that the grower can reach the plant without a stand. It is allowed to make high shelves for storing various inventory.
The number of shelves on a rack in a standard 2 m greenhouse depends on its intended use. Usually 3 or 4 shelves are left for growing crops. Here it is necessary to be guided by the height of the plants so that their top does not rest against the higher shelf. A rack equipped for growing seedlings can consist of 6 shelves.
Plants growing on shelves should receive a maximum of light; for this, racks are placed along the walls. If they are in rows, then a minimum passage width of 500 mm must be maintained. Racks on wheels have proven themselves quite well. They allow you to periodically unfold the plants with different sides to the transparent wall of the greenhouse.
Installation of partitions in the greenhouse
The partition is not a basic construction, but its use is justified when growing poorly adjacent crops. For the manufacture of partitions, they usually take the same material that was used for sheathing the frame of the greenhouse - polycarbonate. To have access to both parts of the greenhouse and to ventilate it, a door is made in the partition. If the building is a checkpoint, that is, with doors at both ends, the partition can be made deaf. In this case, you can simply stretch the PET film.
Pantry arrangement
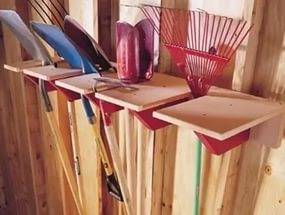
If the size of the greenhouse allows you to set aside a small room for a pantry, do not neglect this. After all, a tool is constantly needed for work.It is not very convenient to carry shovels, hoes, watering cans from the barn every time, and by placing them in the pantry, the necessary tool will always be at hand. It is enough to fence off a small room to install a wooden rack with shelves and cells in it.
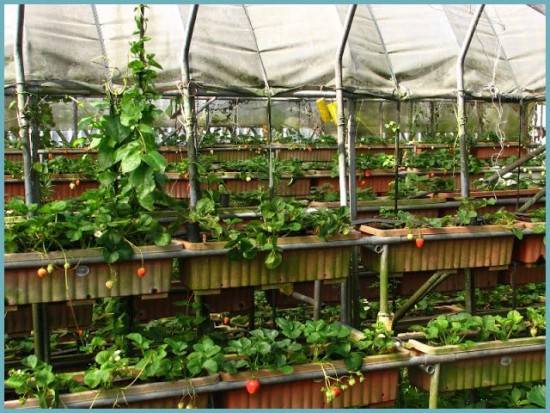
Beds and paths in the greenhouse
To access the ridges, you need to take care of the tracks. Their number and layout depend on the shape and size of the greenhouse. For example, for a rectangular structure measuring 2X6 m, it is sufficient in the center between the beds of 1 track with a width of 400 mm. Then the width of the beds on both sides of the path will be 800 mm. Such dimensions allow you to conveniently care for plants.

In large greenhouses, there may be 2, 3 or more lanes between the beds. Usually the paths are paved with any hard material: brick, crushed stone, tiles, etc. The hard surface will not sag from moisture and slip.
The standard height of the beds from the path level is 300–400 mm. Fences made of boards fixed with wooden stakes will help keep the edges of the beds from spilling soil onto the path. Instead of boards, the beds are fenced with curbs, bricks or any other available material.
The arrangement of the beds begins with laying the film. It will serve as a hydro-barrier, conserve heat and retain moisture in the soil. A drainage layer is poured on top of the film, and only then the turn comes to the soil. The soil is chosen fertile, suitable in composition for growing a particular crop. In the future, the soil will have to be fed with mineral and organic fertilizers.
The video tells about the arrangement of the greenhouse:
That is, in general, all the main stages of arranging a polycarbonate greenhouse. Every vegetable grower has the right to equip the building at his own discretion, the main thing is that the cultivation of crops is comfortable and gives a positive result.


