Content
The functionality and design of greenhouses is no different from greenhouses. All of them are intended for growing vegetables and seedlings. The only difference between the hiding places is the size. Greenhouses are large structures that are permanently installed on a foundation. In the presence of heating, vegetables can be grown in winter. The greenhouse is a smaller copy of the greenhouse and is most often used for early planting of seedlings or growing vegetables in the summer in cold regions. Making greenhouses for summer cottages is much easier than building a large greenhouse. We will now talk about choosing a place to install a shelter, developing a drawing, making a frame.
The optimal location for the shelter for the garden
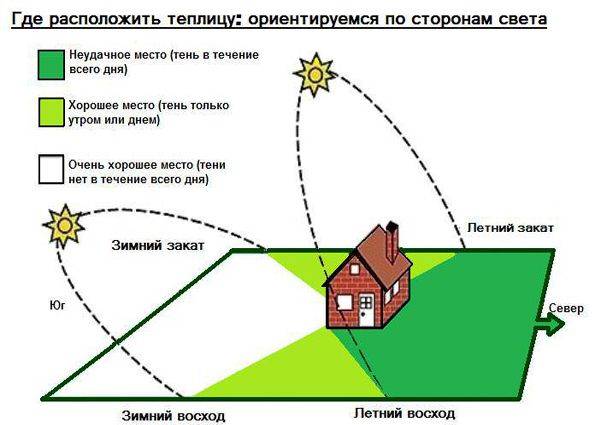
Among inexperienced summer residents, there is an opinion that such a simple design as a greenhouse can be installed anywhere on your site. The easiest shelter option is to stick arcs into the ground and stretch the film on top. But what is the essence of a greenhouse? Inside, the room temperature, optimal for seedlings, should be maintained around the clock. The microclimate is influenced by the location of the shelter:
- Some summer cottages may not even be suitable for installing greenhouses. Shelters are located on a flat and dry place. Difficult terrain and flooded areas are an obstacle to the construction of a greenhouse.
- A place with good lighting is chosen for the installation of the shelter. Shady areas under trees or other obstructions will not work. The sun should fall on the greenhouse during the day so that inside the hiding place was warm.
- It is good when the built greenhouse will be blown by cold winds a little. If the site allows you to put a shelter up and down, then its length is better to turn to the south. This arrangement ensures that the entire shelter is well lit.
- A high location of groundwater can lead to increased dampness inside the greenhouse. The water will stagnate, bloom, which will lead to the death of seedlings. The problem can be solved only by arranging drainage.
Following these simple rules will help you get a good harvest from seedlings grown in a greenhouse.
Heating methods
Before you build a greenhouse with your own hands, you need to think about how to maintain the optimum temperature inside. Plants love consistency. If there are frequent temperature fluctuations under the shelter, the seedlings will inhibit growth. Heat-loving and capricious plants may even die.
There are several ways to heat greenhouses:
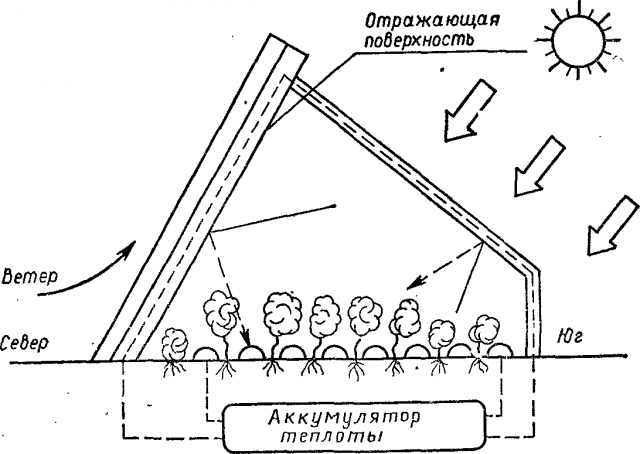
- A free and easy way of heating is carried out using the energy of the sun. The rays penetrate through the greenhouse film cover, warming the plants and the ground during the day. Warmed soil serves as a source of heat at night. Solar heating is used by most vegetable growers. However, this method of generating heat is unstable. The heat accumulated by the soil is not enough for the whole night. In the morning, a strong drop in temperature is observed inside the greenhouse.

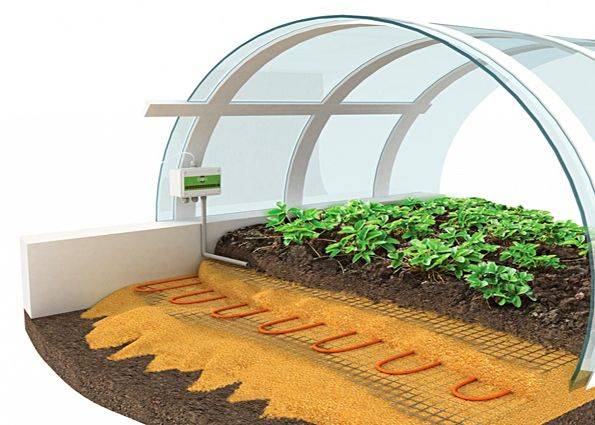
- The electric heating method is based on laying the heating cable in the ground. Such shelters are equipped permanently due to the complexity of manufacturing. The laying of the greenhouse begins with backfilling of a gravel cushion 20 mm thick. A layer of sand 30 mm thick is poured on top and the heating cable is spread with a snake.All this is covered with a 50 mm layer of sand, after which the finished cake is covered with a metal mesh or sheet iron. Such protection will prevent damage to the cable when digging the beds. Plus electric heating in the constant maintenance of room temperature inside the shelter, regardless of weather conditions. The disadvantage is the high cost of materials and unnecessary electricity bills.
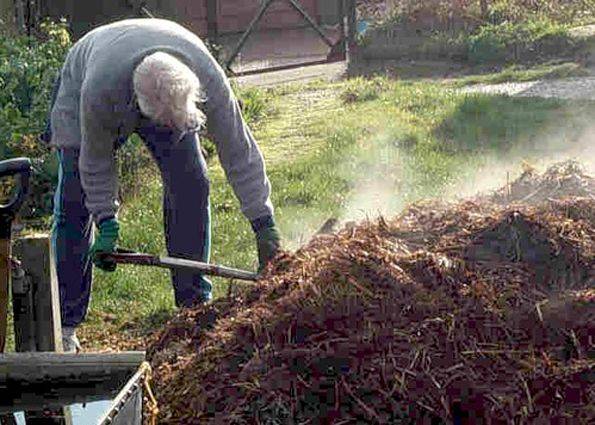
- The middle ground between the two methods of shelter heating is the use of biofuel. In order to build such a greenhouse with your own hands at home, the bottom of the garden bed is made with a deepening. Manure, vegetation, straw, in general, all organic matter are poured there. The process of biodegradation produces heat from waste, which is fairly simple and free, but does not allow you to regulate the amount of heat generated. With a strong increase in air temperature in the greenhouse, periodic ventilation is performed.
What materials and what shape can you build a greenhouse
To understand how to build a greenhouse, you need to figure out what it consists of. The frame serves as the basis of the shelter. It depends on the complexity of the design whether the finished shelter will be stationary or portable.
So, the simplest frames are installed from arcs. More complex structures are built from wooden or metal blanks, window frames. Several materials are used as cladding:
- Plastic wrap is the most demanded material for shelter, but it usually lasts for 1-2 seasons. Reinforced polyethylene will last longer.
- The ideal option for shelter is a non-woven fabric. The material is sold in different weights. The canvas is not afraid of the sun's rays and, if treated with care, will last for several seasons.
- Stationary frames made of wood or metal can be sheathed with polycarbonate, plexiglass or plain glass. Such cladding will cost more, and the glass option can be dangerous due to the fragility of the material.
Now we will look at the photo with our own greenhouses, made from different materials. Maybe one of the shelter designs will appeal to you too.
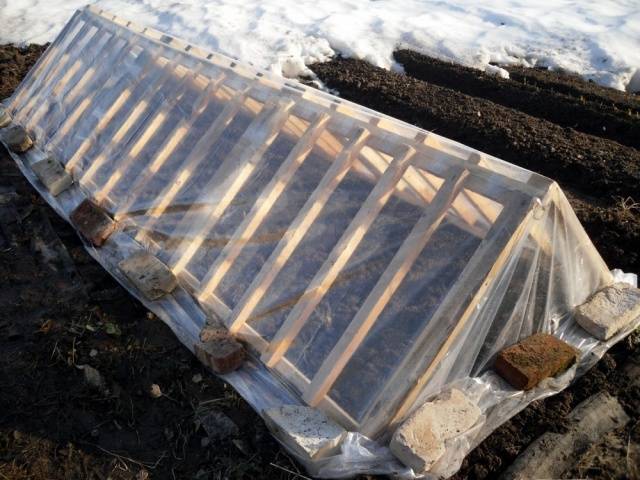
Arc shelter

The appearance of the greenhouse resembles a tunnel. Its circuit does not contain complex connectors. The shelter frame is made of arcs bent in a semicircle. The more you install them in one row, the longer the shelter will turn out. Arcs are made from any plastic pipe with a diameter of 20–32 mm. The stronger the pipe, the larger the radius of the arc can be made. They are fastened to the ground with the help of wooden pegs or put on hammered pieces of reinforcement. For the strength of the tunnel shelter, the arcs can be connected to each other with a transversely laid pipe.
Stronger than an arc will be obtained from a steel bar 6–12 mm thick. If you put the rod into a flexible hose, it will be protected from corrosion.
If desired, ready-made shelter arcs can be purchased at the store. At the summer cottage, they will only have to be installed on the site of the garden.
Cover the arc frame with a film. From below it is pressed to the ground with boards or bricks. It is allowed to use a non-woven fabric instead of a film.
In the video, you can see the device of the arc greenhouse:
Collapsible shelter made of wooden lattices
Looking at the photo of a greenhouse made of wooden lattices, we can conclude that this is the same tunnel, only more reliable. Lattices are knocked down from a wooden slat. Moreover, they can be made in small sections connected by bolts. A wooden frame of this design is easy to assemble, and also quickly disassembled for storage.
The greenhouse made of wooden lattices is durable, not afraid of strong gusts of wind.Here, plexiglass or polycarbonate may be suitable as cladding, but there will be difficulties in accessing plants. We'll have to make the opening sections on the hinges. The easiest way is to use a traditional cover made of film or non-woven fabric.
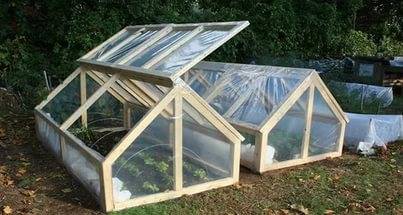
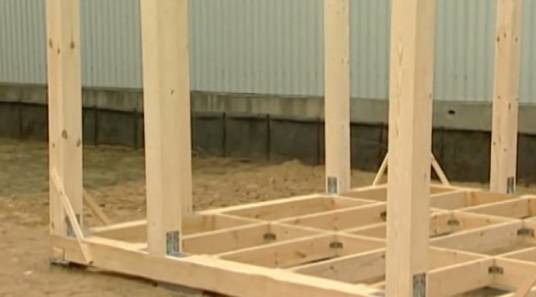
Stationary greenhouse made of wooden beams

Stationary greenhouses for summer cottages are convenient because they do not need to be assembled and disassembled every year. The wooden frame constantly stands in its place, it is enough just to prepare the soil in the garden, and you can plant seedlings. By design, such a shelter already resembles a small greenhouse. A base is equipped under a wooden frame. The foundation is poured from concrete, laid out from blocks, asbestos pipes are vertically buried or a wooden box from a thick bar is knocked down. Each summer resident chooses the best option for himself.
The frame of the shelter is knocked down from a wooden beam with a section of 50x50 mm. The roof of stationary greenhouses is made openable in order to have access to plants. Wood frame sheathing film is not the best choice. It will have to be changed every season. It is better to glaze the frame, sheathe it with plexiglass or polycarbonate. In extreme cases, a non-woven fabric is suitable.
Greenhouse with a metal frame

Stationary greenhouses are made with a metal frame. A collapsible design on a bolted connection is rarely done due to the complexity of manufacturing the connecting nodes. Usually, the frame is simply welded from a pipe, angle or profile. The frame turns out to be quite heavy and requires the arrangement of a concrete base.
Plexiglass or polycarbonate is suitable as a shelter. You can sew covers from reinforced polyethylene or non-woven fabric. Clasps are provided on the covers to access the plants.
Using old window frames to make a greenhouse
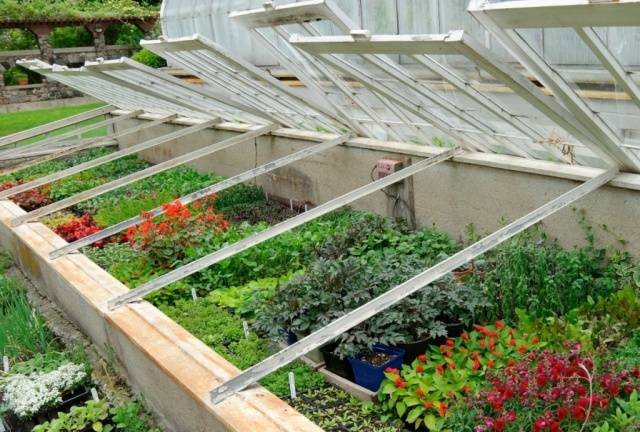
After installing plastic windows on a country house, you should not throw away old wooden frames. They will make a great greenhouse. It should be noted right away that the structure will turn out to be heavy and a solid foundation will be equipped for it. The easiest way to make the foundation is from cinder blocks or bricks laid without mortar. I build a greenhouse made of wooden frames as a free-standing structure or adjacent to a house. In the second option, there is no need to build a fourth wall.
A box is installed on the prepared foundation from a bar, and one of the side walls is made higher. The slope will allow you to equip the drainage of rainwater from the windows. Lintels are installed inside the wooden box, and window frames are attached directly to them. It is better to open the windows from yourself, then in front of the greenhouse free access to the plants is provided.
Greenhouse scheme with a recess
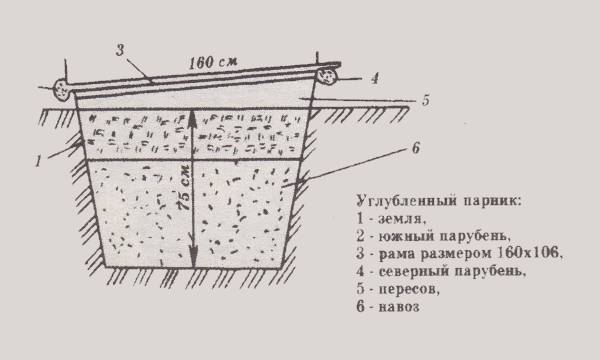
The above-ground part of the greenhouse with a depression can be any. Although more often it is made in the form of an inclined protrusion from the ground. A feature of this design is the arrangement of the garden itself, which allows you to preserve the internal heat of the earth.
At the site of the future greenhouse, a layer of soil up to 400 mm deep is removed. The bottom of the pit is covered with slag or expanded clay. A box is knocked down from a wooden beam along the perimeter of the pit, fertile soil is poured and an upper shelter of any type is organized.
According to the diagram presented in the photo, you can see a similar design of a greenhouse with a recess for biofuel. The principle of arrangement is the same, only a hole for organic matter will have to be dug deeper.
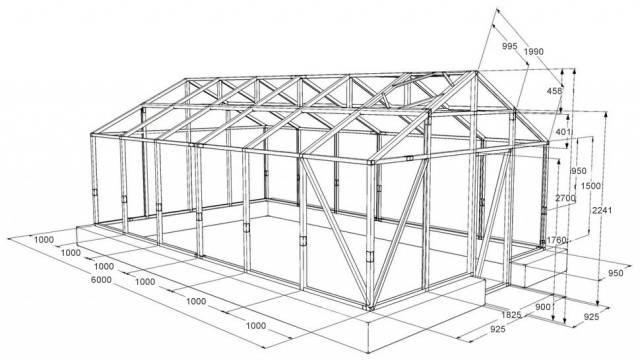
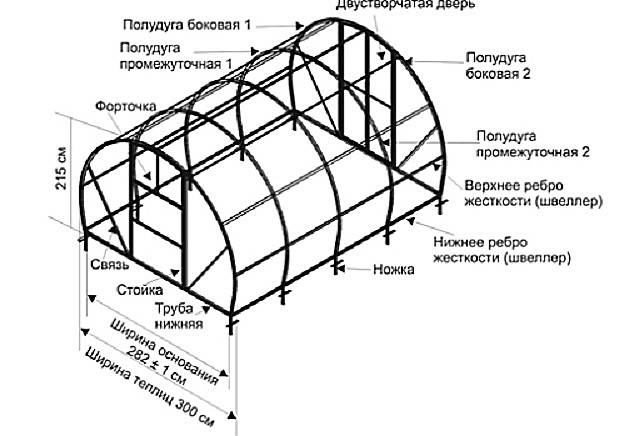
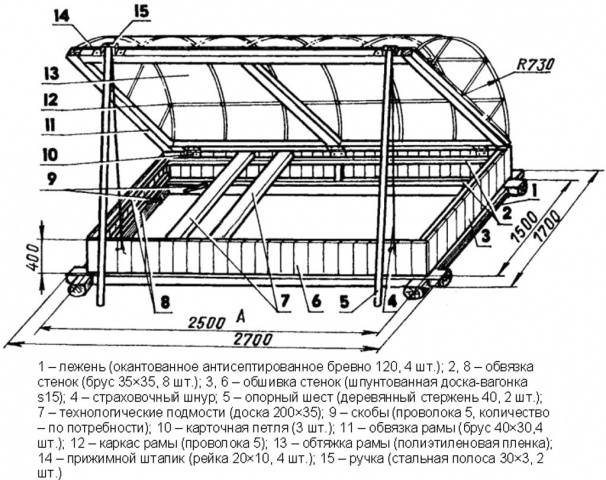
Stationary greenhouse drawings
It is quite difficult to draw drawings of stationary greenhouses with your own hands, without having experience in this matter. For acquaintance, we present several simple schemes. Dimensions are shown as an example. They can be changed at your discretion to obtain a frame of the required dimensions.
Making a stationary greenhouse from a board
Now, with a simple example, we will consider how to make a greenhouse with our own hands from a board 150 mm wide and 25 mm thick. Let's take the running size of a wooden house 3x1.05x0.6 m.
We get acquainted with the procedure for conducting work:
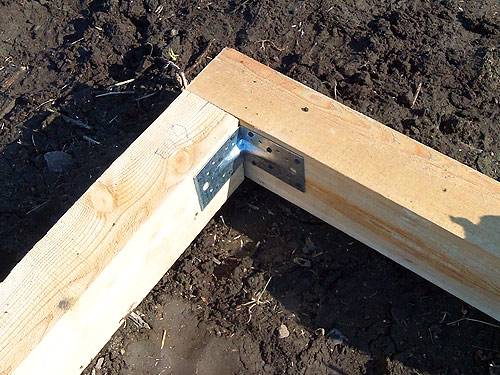
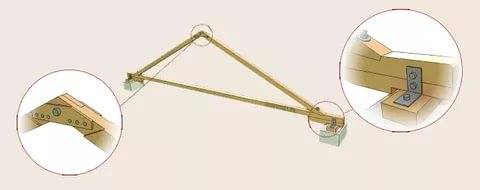
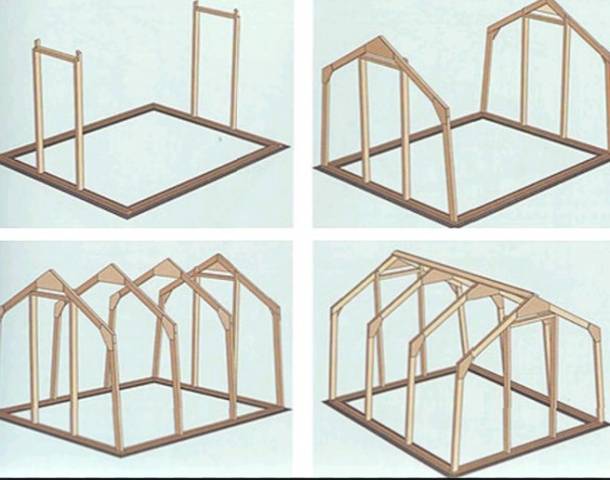
- To make the wooden frame of the greenhouse, two long shields measuring 3x0.6 m are knocked down from the boards. These will be the side walls. For the upper and lower horizontal lintels, only solid boards with a length of 3 m are used. Vertical wooden racks are cut into a length of 0.6 m. A rectangular side wall of the greenhouse is laid out of the blanks on a flat piece of ground, and knocked down with nails. For the neat connection of wooden blanks, nails can be replaced with self-tapping screws.
- The same principle is used to make two smaller shields for the end walls. In our example, the size of the boards is 1.05x0.6 m. A rectangular box is assembled from the finished four wooden boards. To fasten them, you can use bolts or overhead metal corners and self-tapping screws.
- Next, they start making rafters. For this example, take six boards 0.55 m long.One end is sawn at an angle of 60aboutand the other is 30about... Workpieces are laid out in pairs on the ground. You should get three rafters of a gable roof in the shape of a house. Between themselves, the resulting wooden squares are reinforced with a jumper.
- The finished rafters are fixed to the assembled rectangular box, and the roof begins to form. One solid board 3 m long connects the rafters to each other at the very top. A ridge is formed in this place. Below from the ridge, the rafters can be knocked down with short boards. They are only needed to secure the cladding material.
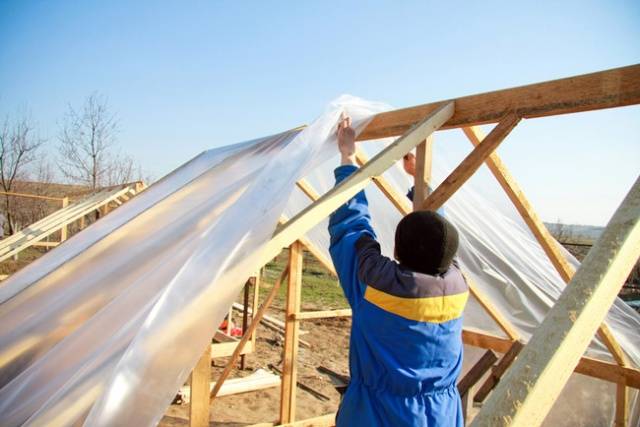
The finished wooden frame is treated with a protective impregnation, after which they proceed to sheathing with any material they like, whether it be a film or non-woven fabric.
The video shows different options for summer cottages:
A greenhouse in the country is an important structure. It will take a minimum of money and time to make it, and the shelter will bring maximum benefits.


