Content
It is difficult for any person to do without a cellar, because you need to store supplies for the winter somewhere. Owners of private yards resolve this issue quickly. And what should the residents of multi-storey buildings do? You can't make a cellar in an apartment. You can store food in the country, but you will have to go to get them from time to time. Now we will look at how to make a cellar on the balcony of your own apartment. Let it be small, but a month's supply will fit in it.
Cellar under the balcony of the first floor
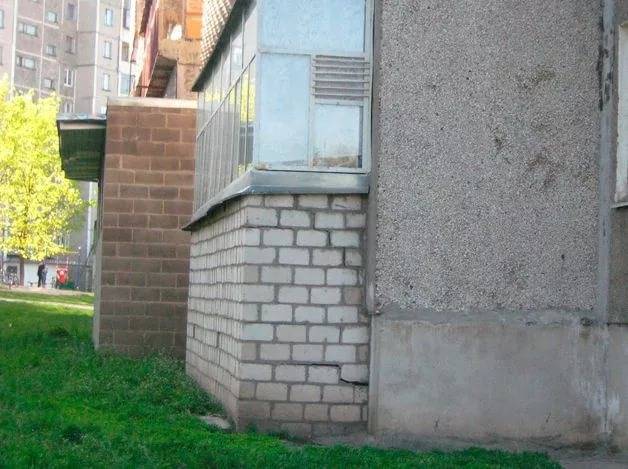
In terms of building a cellar on the balcony, the residents of the first floor were the most fortunate. They can use not a tiny place inside the building for storage, but dig a full-fledged basement under the house. More precisely, a plot of land located under the balcony slab is used for the cellar.
So what is such a structure? There is a small but empty piece of land under the balcony slab. Here they dig a hole, where the cellar itself will be located. Walls are laid out along the perimeter of the pit made of brick. They do not end at ground level, but support the balcony slab from below. This makes it possible to organize the entrance to the cellar from the street through the doors. If there is no such desire, a hatch is cut into the floor of the balcony. He will play the role of entrance doors.
Where it is better to make the entrance is a personal matter. Through a hatch on the balcony you can get into the cellar directly from the apartment. A person does not have to go outside in bad weather to get food. In addition, the absence of doors from the street side reduces the chance of thieves entering the vault. The disadvantage of the internal entrance is the inability to use the free space for your own purposes. Let's say you can install a table with chairs on the balcony to organize a seating area or make a summer bedroom. The arrangement of the internal entrance excludes this possibility, since the hatch must open. In general, everything is clear with this, now we turn to the construction of the cellar itself.
The process of erecting a storage under the first floor balcony consists of the following steps:
- Do-it-yourself construction of a cellar on the balcony begins with marking the territory. That is, on the ground, it is necessary to design the dimensions of the balcony slab. Four pegs are driven in at the corners. To check the accuracy of the projection, a plumb line is lowered from each corner of the balcony slab. Its weight must match exactly with each hammered peg.
- The stakes are tied together with a cord. Now the contours of the future structure have turned out. According to this marking, the sod soil is removed with a bayonet shovel to a depth of 25 cm. Now we need to check the accuracy of the projection again, align the corners, and then continue excavation.
- There is little space under the balcony, so sometimes the owners try to increase the volume of the cellar due to its depth. That is, the deeper the pit, the more shelves can be attached to its walls. This is a personal matter, but digging a pit deeper than 2 m is undesirable due to the possibility of flooding by groundwater.
- The bottom of the finished pit is leveled, after which a 15 cm layer of sand is poured, moistened with water, and thoroughly rammed. Any waterproofing material is spread on top of the sand, wrapping 20 cm of its edges on the walls. It can be a film, roofing felt or a membrane specially designed for these purposes.
- A reinforcing frame is connected from rods with a diameter of 6–10 mm. You should get a mesh with cells of about 10x10 cm. Beacons are installed on top of the waterproofing, a reinforcing mesh is laid on the lining, after which the entire bottom is poured with concrete. For hammering the concrete mortar, cement of the M-400 brand is used, and clean sand without clay impurities. The ratio of cement / sand is 1: 3.
- The concrete bottom is given time to harden for at least a week. Further, they are engaged in waterproofing the walls. The material is cut into pieces, one edge is pressed down with a load on the surface of the pit, and the other end is lowered to the very bottom. The edges of the waterproofing of the bottom and walls must overlap.
- Now the crucial moment of laying the walls has come. The solution is prepared the same as used for concreting the bottom. Laying bricks begins from the corners, gradually moving along the walls. It is important not to forget about dressing the seams, and every third row is reinforced with reinforcement. A maximum mortar thickness of 2 cm is allowed between the bricks.
- The laying of the walls is continued until the top row is closed with the edges of the balcony slab. If the entrance to the cellar is from the street, then a doorway is provided on the front wall. In the last row of brickwork, a ventilation pipe is embedded. A protective cap is put on top of the air duct so that precipitation and birds do not fall into the cellar.
At this point, the cellar room under the balcony is considered completed, but it is too early to use it. There is still a lot of improvement work ahead.
Thermal waterproofing of the cellar
So, we looked at how to make a cellar on the balcony with our own hands, and now it needs to be brought to mind. The floor inside the balcony consists of reinforced concrete slabs. Before laying any covering, waterproofing is laid on the concrete. You can simply stick roofing material on the bituminous mastic or put a membrane. Insulation is placed on top of the waterproofing. For these purposes, polystyrene foam is best suited. The next layer is vapor barrier, and only then any floor covering is laid.
If a cellar entrance is provided on the balcony, the edges of the hatch should not protrude beyond the floor covering. Laz can, in general, be hidden from view by trimming it from above with the same material.
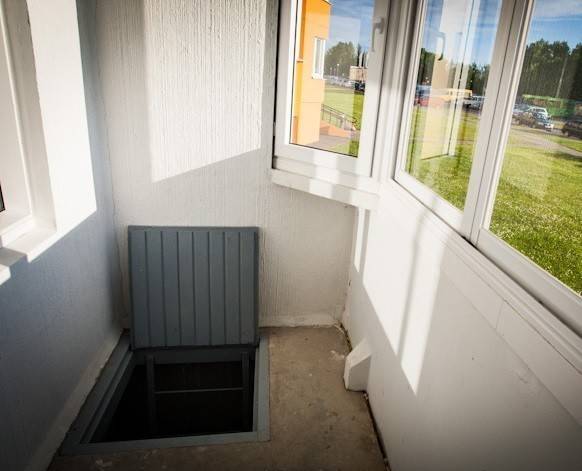
In the video, the device of the basement hatch:
Inside, the balcony is insulated with foam. Plates are attached to the walls and ceiling, after which they are sewn up with clapboard. Only the brick walls of the cellar, extending from the ground to the balcony slab, remained not insulated. They can be left in this state, but it is better to also glue them over with foam. In winter, the insulated wall will not let the frost into the cellar, and in the summer - the heat. That is, thanks to the foam, the same temperature will be constantly maintained inside the cellar under the balcony.
For wall insulation, foam sheets with a thickness of 30-50 mm are suitable. Each slab is glued to the wall with foam, then, for reliability, it is fixed with plastic dowels with a wide head. From above, the foam can be decorated with plaster "Bark beetle".
At the end of these works, the interior arrangement of the cellar under the balcony remains. The walls, in the place where you have to go down to the storage, are plastered or revetted with clapboard. Inside the cellar, shelves from a board impregnated with an antiseptic are attached, and lighting is also carried out.
In the video, a variant of the cellar on the balcony:
Other options for cellars on the balcony
The cellar under the first floor balcony is good. And what solution can be found for the residents of the apartments located above? Now we will consider several options for making a cellar on the balcony with our own hands without burying it in the ground.
Cellar container on the balcony
The easiest way to make a cellar on the balcony is to make a container for storing food. It should be noted right away that this storage option is appropriate only for a warm balcony. Otherwise, in severe frosts, vegetables and preserves may freeze.
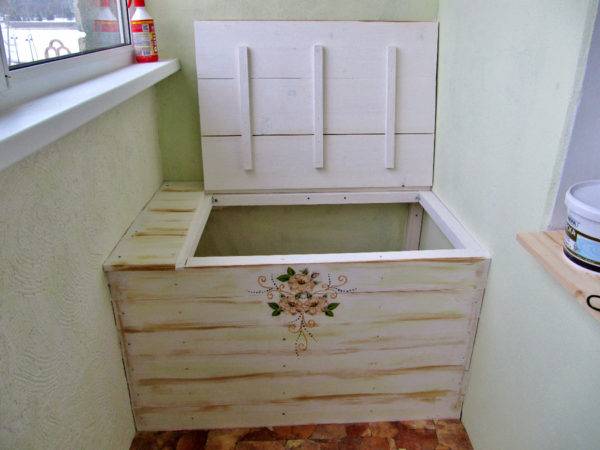
So, the cellar-container is a regular box with a lid, resembling a chest. Let's figure out how to do it yourself:
- First, they are determined with the dimensions of the container. To do this, you need to think about where the cellar will be located. It is best to place the container across the balcony at the far side wall from the doors. Now you need to measure the width of the room to determine the length of the cellar. The height and width of the container is calculated based on personal preference.
- For the manufacture of a cellar, you will need a bar with a section of 40x50 mm. The frame of the box will be made from it. As a cladding, an edged board 20 mm thick or a chipboard, OSB plate is used.
- Blanks for the frame are cut from the timber. You should get 8 pieces of short bars that go to the sides, and 4 long crossbars. The frame is connected with self-tapping screws and metal linings. If the container is not made mobile, then the frame of the rear and two side walls, as well as the lower frame, are fixed with dowels to the concrete body of the balcony.
-
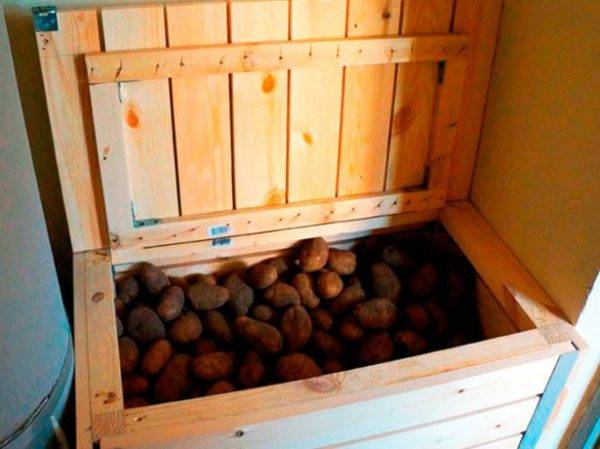
The bottom of the container cellar is covered with a board. It is important to nail it down leaving gaps so that ventilation is provided inside the storage. If chipboard or OSB boards are used for cladding, then perforation is made at the bottom.

- Further, according to the same principle, all the side parts of the frame are sheathed. Perforation can only be made at the top of the back or side of the drawer. The front side of the cellar is sheathed without gaps.
- For a lid, a frame is knocked down from a bar. In size, it should fit inside the container. The lining will act as a limiter so that the cover does not fall through. The frame is attached with hinges to the frame of the back wall of the cellar. Now it remains to sheathe the lid, attach the handle, and the container is ready.
For aesthetics, it is advisable to paint the cellar-container on the balcony. You can use oil paints or varnish.
Cellar-thermos on the balcony
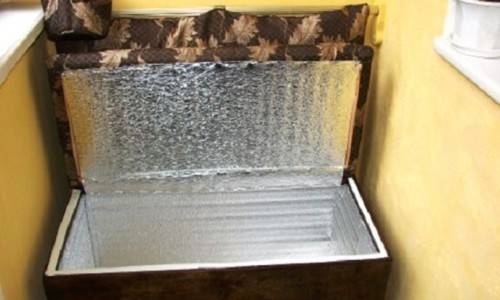
The principle of creating a thermos cellar on the balcony is similar to the manufacture of a container. The only difference is the use of insulation. Such a cellar can be installed even on a cold balcony, although if severe frosts are observed in winter, then it is better not to risk it.
So, we start making a thermos cellar on the balcony:
- For work, you will need all the same timber. The frame is knocked out of it. But it is better to sheathe it with plywood, chipboard or OSB, so that there are no gaps even in the floor.
- When the frame is sheathed on the outside, the inside is pasted over with 20 mm thick foam or expanded polystyrene plates. Insulation from the inside of the box is covered with plywood sheets. Additionally, from the inside, all walls of the cellar can be pasted over with foamed polyethylene foam.
- The end of the manufacture of the thermos cellar is the design of the lid. It is collected in the same way as it was done for the container. Only again insulation is glued inside, and plywood sheathing is stuffed upstairs.
A thermos cellar installed on the balcony will keep a constant temperature inside for a long time. From this, the products will always be fresh and will last for a long time.
Option for arrangement on the balcony of the cellar with thermal insulation and heating
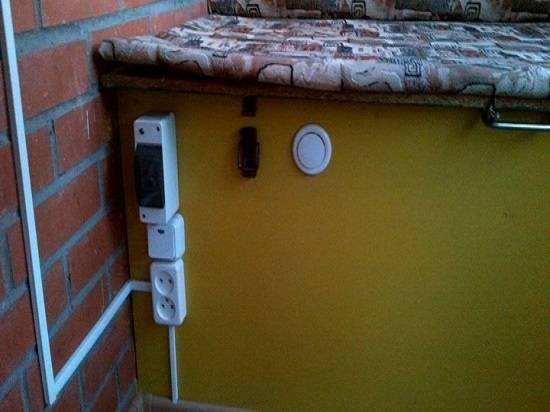
This type of cellar can be installed on any unheated balcony. Even if it is -30 on the streetaboutC, the food inside the storage will never freeze. The whole secret lies in the electric heating, but first things first.
So, we start building a cellar on a cold balcony:
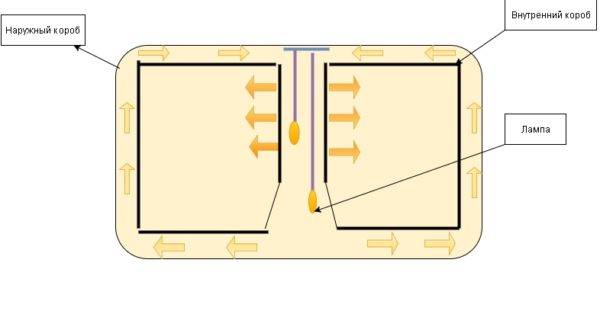
- The first thing to do is to build a thermos cellar. However - this will only be the outer shell of the repository.
- Inside the thermos cellar, another smaller box is made of thin plywood, after which it is perforated. A gap of about 2 cm should remain between the walls of the two boxes. This air space is needed for heat circulation.
- One large hole is cut in the inner box, where the pipe is inserted. Its diameter should be sufficient for two conventional incandescent bulbs. They must be spaced apart from each other, and the pipe itself must be secured with spacers for reliability.
Conclusion
The principle of operation of a cellar with thermal insulation and heating is shown in the diagram.The included lamps emit heat, which circulates through the air space between the two boxes, and enters the store through the perforations.
Let a small cellar turn out on the balcony, but it will allow you to stock up on vegetables and canning for a couple of weeks, or even a whole month.


