Content
- 1 A variety of sandboxes with a lid
- 2 Where is the best place to install a children's sandbox with a lid?
- 3 Choosing a material for assembling a children's sandbox with a transforming lid
- 4 We draw up a detailed diagram of a children's sandbox with a lid
- 5 The procedure for making a sandbox with a lid
- 6 Making a children's sandbox look aesthetically pleasing
Playing in the sandbox is a favorite pastime for all kids. As soon as the beloved child began to walk on his own, his mother buys him scapula, molds for cakes, and takes him out to play in the yard. However, such summer fun can be spoiled by an unpleasant moment. Public sandboxes are not covered with anything, from this they become the object of attention of yard animals, where they arrange a toilet. It is understandable that it is difficult to solve this problem in playgrounds located among apartment buildings. But if children's entertainment is set up in a private courtyard, then the best option would be a children's sandbox with a lid that protects the sand from uninvited guests.
A variety of sandboxes with a lid
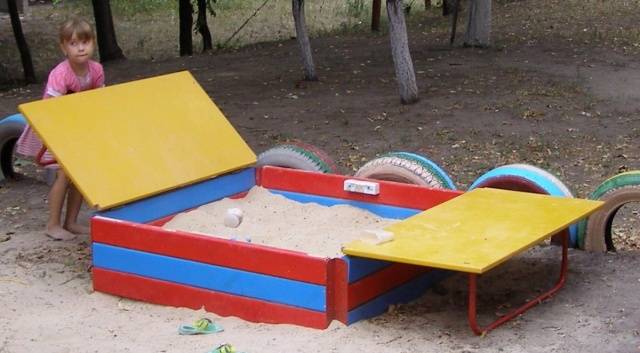
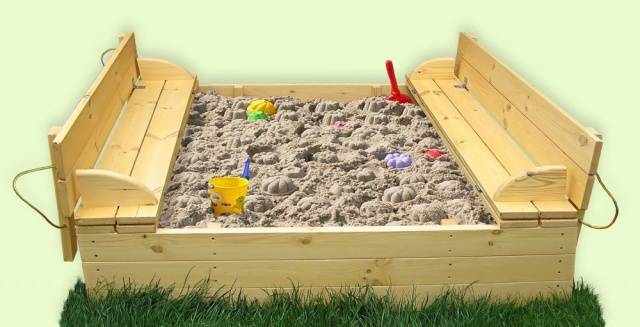
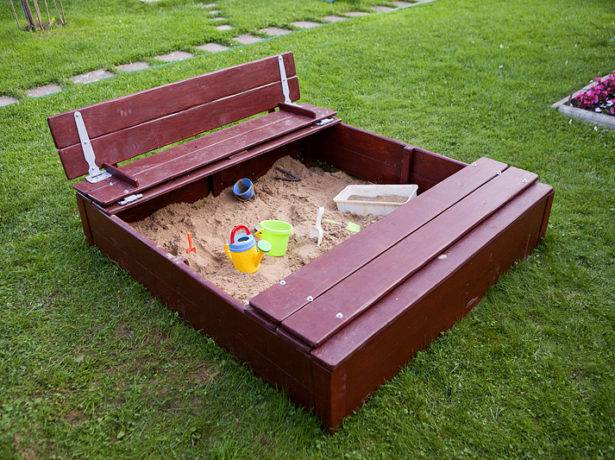
It's not so difficult to build children's sandboxes with a lid with your own hands. In extreme cases, you can give preference to the store model. When self-made, the most popular is the wooden structure. Natural material lends itself well to processing. Usually a sandbox is made of rectangular shape, and a shield is knocked down from the boards as a cover. Parents, who do not like to dwell on standard solutions, build a structure in the form of a car, boat or a fairy-tale character. Even the cover for the sandbox is not easy. The shield is assembled from individual segments held together by loops. When you open such a lid, you get two comfortable benches with a back.
It is quite simple for a child to organize a sandbox from old tires. To do this, take one large tire, cut a strip from the side to the very tread, and the resulting box is covered with sand. Small tires make sandboxes in the form of flowers or other unusual shapes. To make them, the tires are cut into two or three segments, after which they are sewn with wire, sometimes tightened with a bolt connection. The cover for these sandboxes is usually a tarp.
The store plastic sandbox attracts children with bright colors. There are one-piece bowls and collapsible designs in various sizes. The first type of sandbox is usually made in the form of animals and other representatives of the fauna. For example, a product in the shape of a turtle or a ladybug is very convenient to use. The lower torso serves as a container for sand, and the shell makes an excellent lid. Collapsible sandboxes consist of separate modules, which allows you to assemble a box of the desired size and shape. Usually such structures are sold without a bottom and a cover, but can be completed with a tarpaulin.
Where is the best place to install a children's sandbox with a lid?
If a sandbox has a cover, even a roof, does not mean that it can be installed anywhere in the yard. A playground made in the courtyard should be located in a well-visible, but not heavily wind-blown place. Otherwise, the sand will constantly fly into the child's eyes. It is optimal to arrange a children's sandbox with a transforming lid so that part of it is illuminated by the sun, and the other half is shaded. Such a place happens near a spreading tree or a tall building.If a children's sandbox with a lid can only be installed in a sunny area, you will have to take care of the construction of a canopy.
Choosing a material for assembling a children's sandbox with a transforming lid
Today we will look at how a sandbox with a bench cover is made with our own hands, we will look at the drawing of important nodes in the photo, but first we will talk about choosing the right materials.
Let's start with the box and lid. You cannot make a similar design for children from plastic on your own. There are options from PET bottles, old plastic window sills and other junk, but a child is unlikely to like such a sandbox. As for the tires, this is not a bad option. However, organizing normal benches with a back that transforms into a lid will not work due to the irregular shape of the sandbox. We need a rectangular box, and make it better from a board. Blanks are ideal for price and quality from pine. Planks made of oak or larch will last longer, but they are more expensive and hardwood is more difficult to process.
When building a children's sandbox with a lid, you will need a piece of moisture-resistant but porous material. For these purposes, agrofibre or geotextile is suitable. The material is used to separate the soil from the sand, preventing them from mixing. The porous structure will allow moisture to enter the soil. Due to the material, they will not grow in the middle of the sand weeds, and earthworms will not creep out of the ground.
It is important to pay attention to the quality of the filler. Store-bought sand is considered ideal. He went through several stages of cleaning and processing, up to grinding the sharp corners of the grains of sand. This filler is ideal for plastic sandboxes, as it does not scratch the walls of the box. When buying sand, it is advisable to look at the documents indicating the origin of the goods. Better yet, open the bag and feel the contents. High-quality sand is characterized by excellent flowability, has one shade and does not stick to dry palms.
A do-it-yourself children's sandbox made of boards in a suburban area is usually filled with quarry or river sand. Previously, it is sifted from stones, as well as various debris. If the sand contains a lot of dust impurities, it will constantly stick to the baby's hands and stain his clothes. Before use, such a filler must be rinsed with water and then dried well.
We draw up a detailed diagram of a children's sandbox with a lid
The layout of a sandbox with a lid is not so complicated to develop a detailed project during its construction. Craftsmen often adjust the dimensions of all workpieces during the assembly process. It will be difficult for a parent building a children's structure for the first time, therefore, for review, we suggest looking at the drawings of the box and the folding cover of the bench.
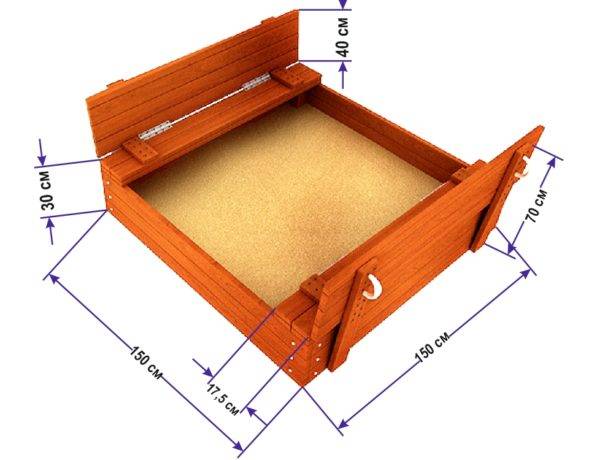
First, in the photo, we will consider the scheme of the sandbox itself. We will take the classic version 1.5x1.5 m as a basis. This sandbox will be enough for three children to play. The height of the sides of the box is optimal to make about 30 cm. It can be slightly higher or lower, the main thing is that the child can easily step over the fence.
When determining the height of the sides, it is important to remember that the lid of the children's sandbox will fold out into two benches. An optimal distance is provided between the seat and the filler so that the child can comfortably hang the legs.
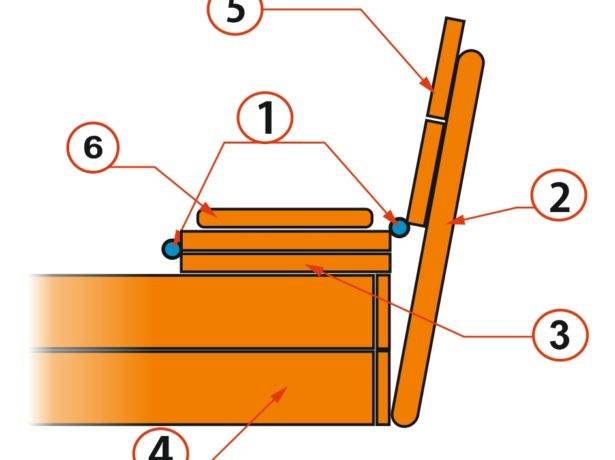
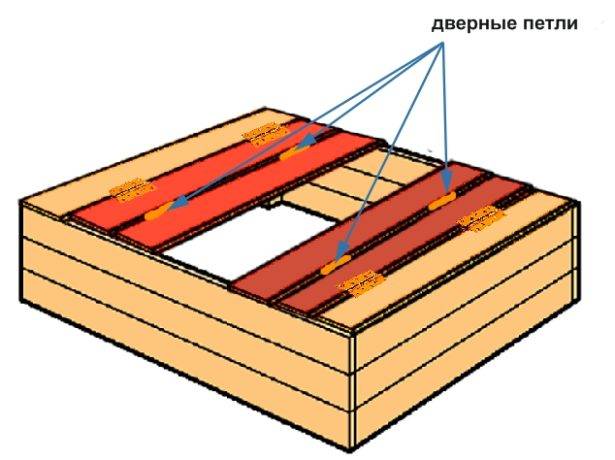
Next, consider the cover of a children's sandbox that folds out into two benches. The photo shows a diagram of the structure unfolded.The cover consists of two halves, each of which has three independent elements. The dimensions are selected exclusively for a box with dimensions of 1.5x1.5 m.
In the photo, the number 4 indicates the box. We know its size. Number 3 indicates the bench seat with a width of 17.5 cm. There are two such elements on the bench. The backrest of the bench, which is the third module of the folding cover, is designated by number 5. Its width is 40 cm. Numbers 2 and 6 indicate the backrest stops, the latter additionally playing the role of handrails. Number 1 indicates the hinges connecting the folding modules. The element under the number 3 is fixed, and is fixed capitally to the sides of the box.
The procedure for making a sandbox with a lid
Now, for a visual acquaintance with the manufacture of a children's sandbox, an instruction with a step-by-step assembly of all elements will be offered. All actions are accompanied by a photo describing the work being carried out.
So, armed with a tool, we start building a children's sandbox with a folding lid:
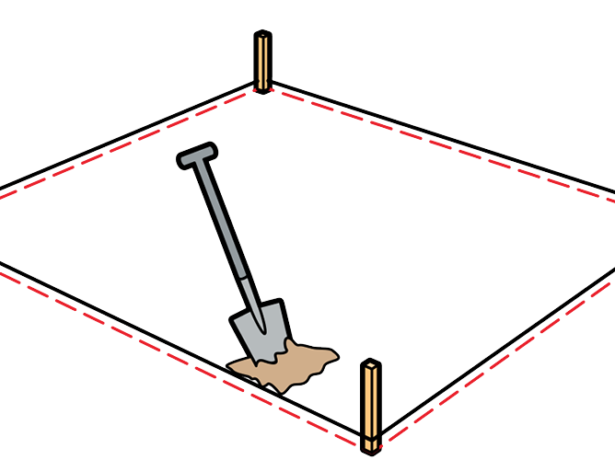
- On the selected site for the construction of a children's sandbox, markings are applied. Since the box has a square shape, it is better to determine the boundaries of the structure with stakes driven into the ground. It is enough to place four of them in the corners, and pull the cord between them. Using a tape measure or an ordinary non-stretching rope, measure out the same diagonals between opposite corners to get an even square.

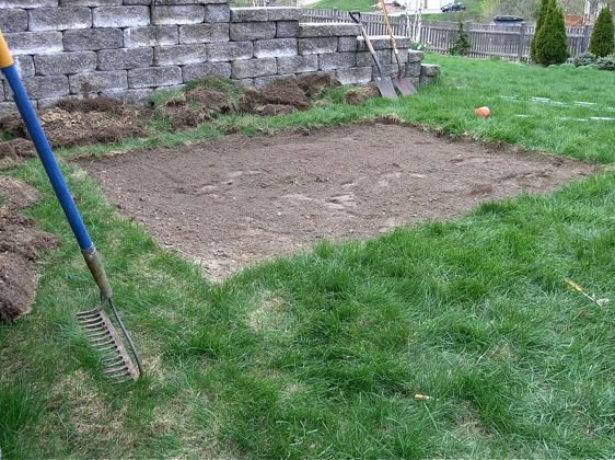
- With the help of a bayonet and a shovel, a sod layer of soil is removed in the marked area. You should get a square indentation of up to 30 cm. Removing the sod will prevent weeds from growing under the bottom of the children's sandbox, as well as rotting grass residues.
- The bottom of the dug hole is leveled with a rake. Loose soil is lightly tamped. Next, they make a mixture of sand with gravel or fine gravel, after which it is poured onto the bottom of the pit 10 cm thick. Thanks to the drainage layer, rainwater from the sand will be absorbed into the ground by accident. This can happen through a cover that you forgot to close. A similar 50 cm wide pillow can be made around the sandbox. Then, after the rain, there will be no puddles around the box.
- Eight holes are dug along the perimeter of the pit. Four of them are located at the corners, and four more - in the center of the sides. Box racks will be installed here. The holes are dug up to 40 cm deep and 15 cm in diameter.The bottom of the holes is covered with a similar mixture of sand and gravel 5 cm thick.
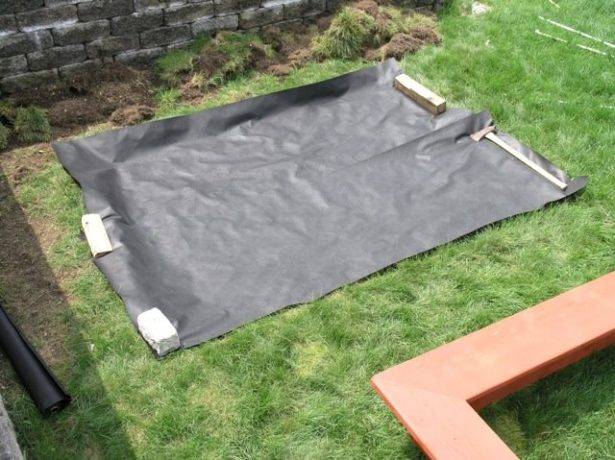
- Making a children's sandbox begins with preparing the bottom of the pit. Previously, it was already covered with a drainage layer, now it is necessary to cover it with geotextiles or dense agrofiber. Sometimes for these purposes a black film is used, perforated with a nail for drainage. You can do this, but this is not the best option. Moisture in cavities without holes will linger and mold will develop.
- A children's sandbox box is made of edged boards. But before that, all the blanks are carefully processed with sandpaper or a grinder. To fasten the boards, you will need eight bars with a section of 5x5 cm and a length of 70 cm. Of these, supports will be obtained at the corners of the box and the center of the sides. The length of the bars was chosen on the basis that 30 cm will go to join the fence boards, and 40 cm will go into the dug holes.
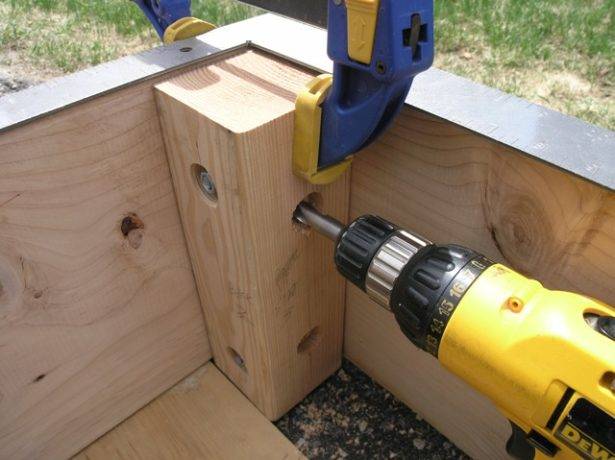
- You can connect the boards to the bars with nails, screws or bolts. When using the latest hardware, it is necessary to make sure that there are no protruding nuts and bolt heads on the surface. For this, hardware is selected with a length slightly less than the thickness of the blanks to be joined. Through holes are drilled with a thin drill, according to the diameter of the threaded part of the bolt. Then, take a drill slightly thicker than the diameter of the nut and the head of the hardware and drill small recesses on the finished holes. The end result is a bolted joint hidden in the wood.
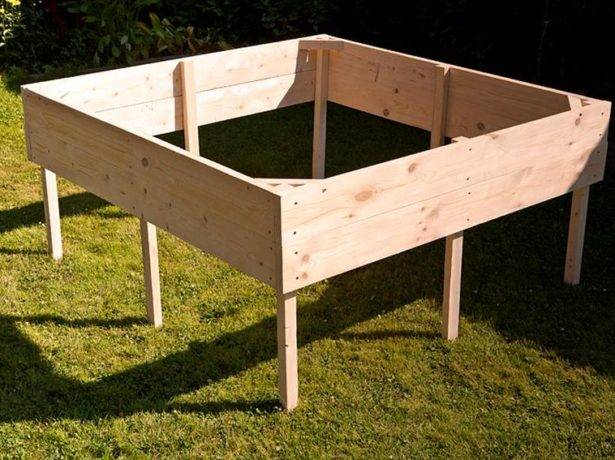
- In the end, you should get a structure with eight legs, as in this photo. At this stage, the wood is treated with an antiseptic, and the protruding supports - with bitumen mastic.
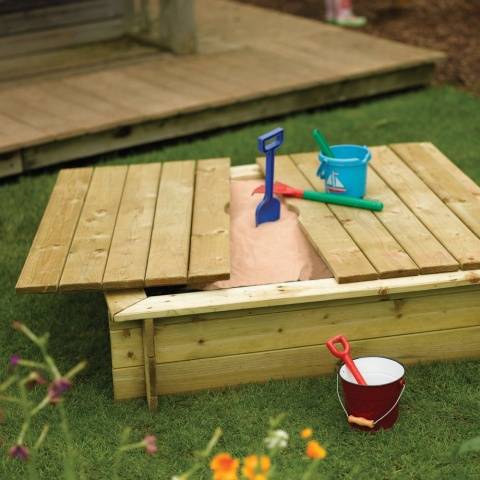
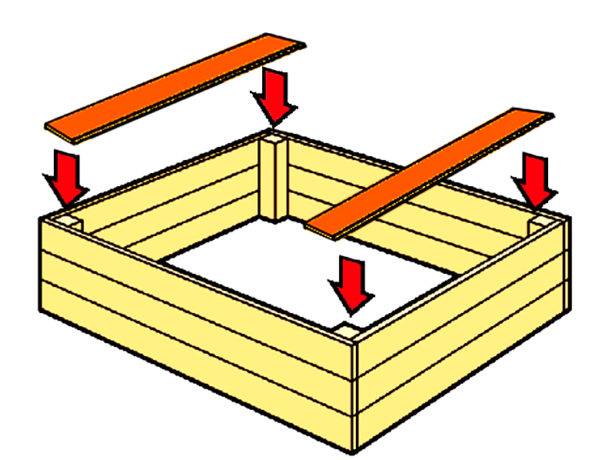
- The box is ready, now we are starting to make a bench, which, when folded, will play the role of a cover for a children's sandbox. So, we take a board 17.5 cm wide. Its length should be a couple of centimeters more than the width of the box so that the lid can completely close the sandbox. The board is fixed flat with self-tapping screws to the end of the side of one of the sides of the box. In this example, for convenience, we consider the process of making one bench. The exact same design is done on the opposite side of the box. As a result, you get a cover of two folding halves.
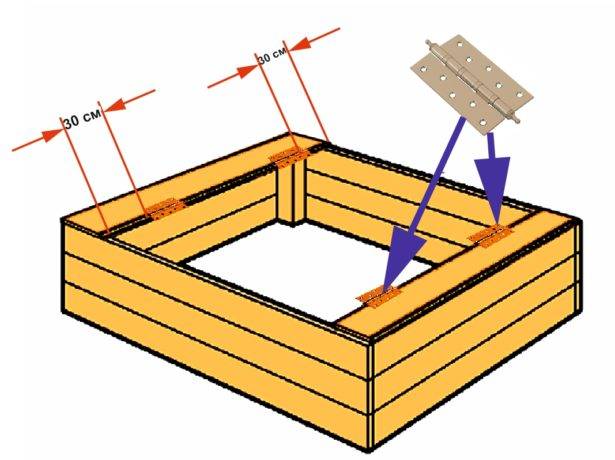
- Two loops are attached to the fixed board from above with self-tapping screws. In this case, about 30 cm recede from the edge of the workpiece.
- At the next stage, a board of the same size is taken. Screw it to the hinges with self-tapping screws. It turned out the first folding element of the bench. Now two more loops are fixed to it, only from below.
- Now it's time for the back of the bench. A 40 cm wide board is fixed to the hinges. The result is a bench of three planks, hinged from the outside and from the inside.
- To the back of the back of the bench, two limiters are attached from the rails. In the unfolded state of the lid, they will rest on the side of the children's sandbox. Two more restraints are attached to the seat base. They will prevent the backrest from falling forward, plus they will play the role of handrails.

When the benches are ready on both sides of the box, the children's sandbox is installed in its place. To do this, the racks are lowered into the prepared holes, after which they are tamped tightly with soil. The holes can be concreted, but in the future, the children's sandbox will be difficult to remove from the ground.
The video demonstrates the manufacture of a bench cover on a children's sandbox:
Making a children's sandbox look aesthetically pleasing
So, we looked at how to make a sandbox with a folding lid with your own hands. The design is ready, now it needs to be brought to mind. The entire surface of a children's sandbox with a lid is checked for burrs. This is especially true for benches and box ends. If sharp corners are detected, additional grinding is performed, then these places are again treated with an antiseptic.
To give a children's sandbox with a lid an aesthetic look and protect the wood from moisture, the structure is painted with oil or acrylic paint. It is advisable to give preference to bright colors in order to attract the attention of the child.


