Content
It is impossible to imagine a private courtyard without a utility room. Even if construction is just beginning on an empty site, they first try to put up a utility block. It is equipped with essential premises: a toilet, a shower, a storage room for storing tools. If it is already decided to get down to work, then it is optimal to build a 3x6 shed with a pitched roof, which in the future can be divided into three rooms.
Design features of a shed with a pitched roof
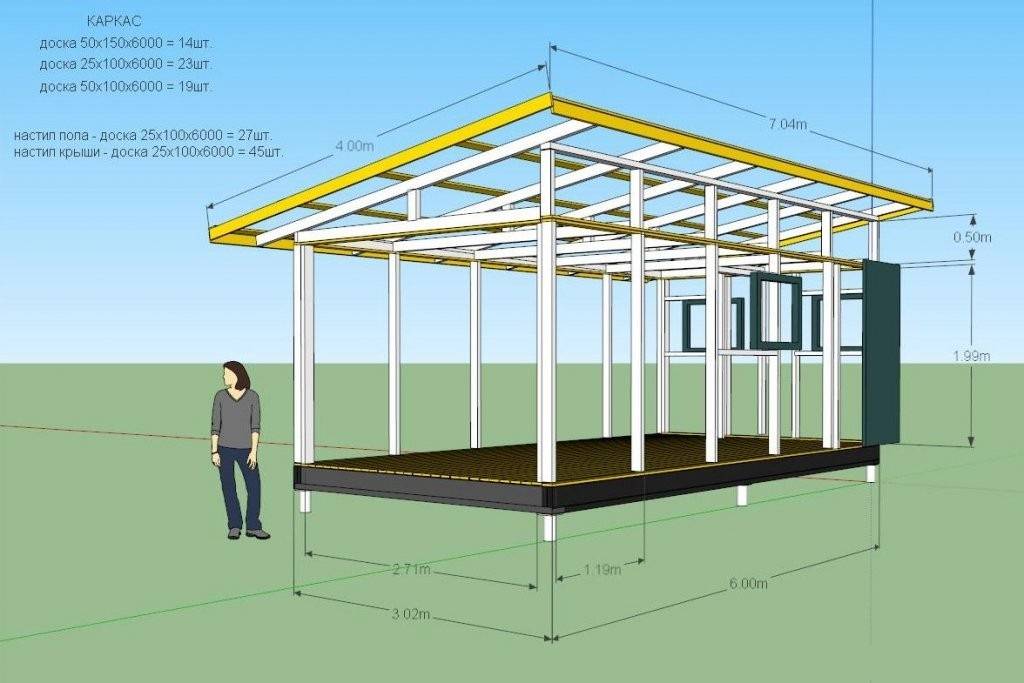
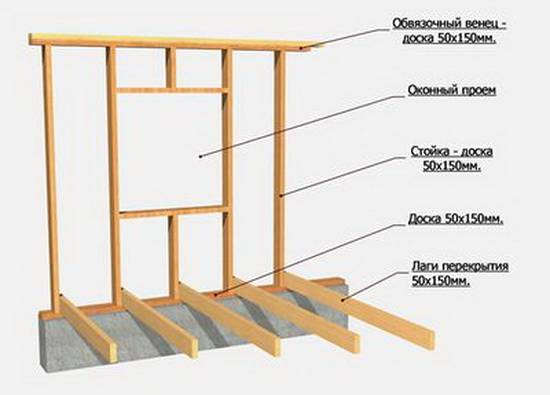
The photo shows a drawing of a shed with a pitched roof. In this project, the optimal dimensions of the frame structure were taken - 3x6 m. In such a shed there is enough space to organize a shower, toilet and a summer kitchen. Typically, such projects are designed so that each room has a separate entrance.
If you put two partitions inside a 3x6 m utility block, you get three rooms 2x3 m.For a summer kitchen, such an area is ideal, but there will be a lot of it for a toilet and shower. Here the project can be slightly modified. By reducing the area of the shower and toilet, it will turn out to make a fourth room, which will serve as a woodshed or storage room for things.
When drawing up drawings frame shed you can use ready-made examples taken from the Internet. In the photo, we presented another version of the utility block with a pitched roof.
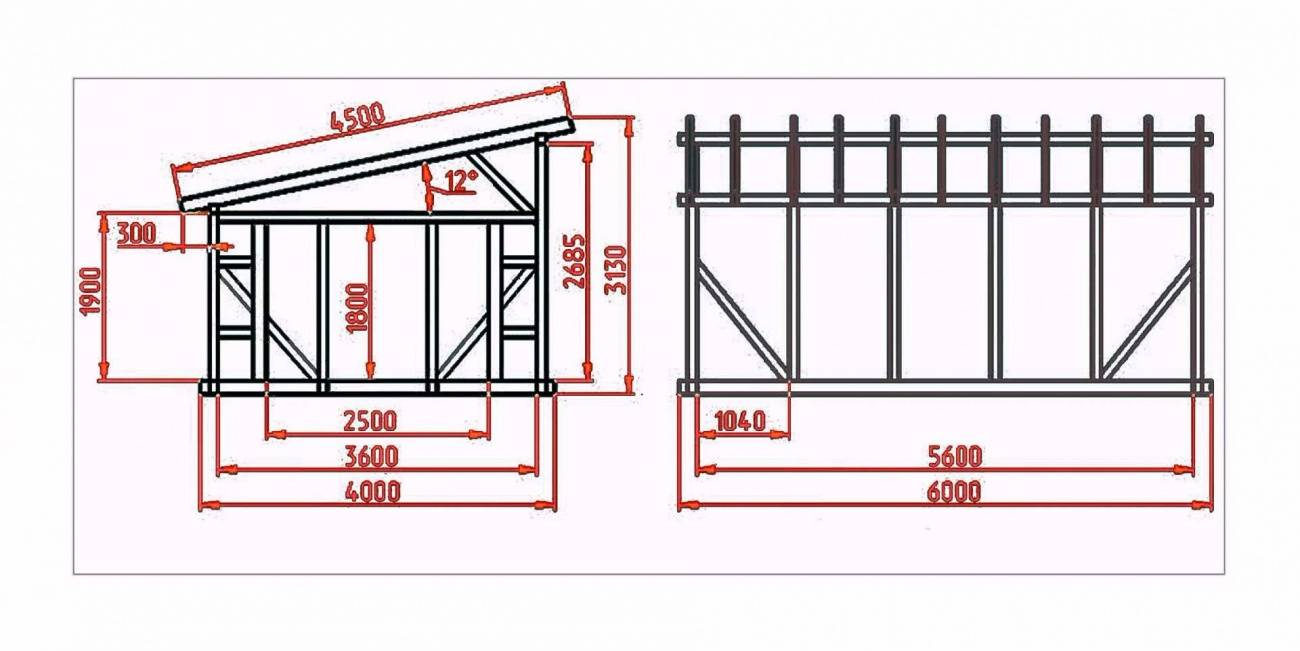
Now let's see why a pitched roof is more suitable for a frame shed. Let's start with the simplicity of the design. For any roof, you need to make rafters. If the frame of the shed is made so that the front wall is 60 cm higher from the back, then the floor beams will fall under a slope. They will replace the rafters. Plus, when constructing a pitched roof, there is no need to equip a ridge. The photo shows the drawings of the roof, according to which you can see its structure.
With regard to other roof structures, it is possible to stop only on a gable roof. Its advantage lies in the ability to organize the attic space. However, the construction of such a structure for an inexperienced person is not within the power of due to the complexity of the rafter system. A flat roof requires the arrangement of reliable waterproofing, since a lot of precipitation accumulates on it. An elaborate roof is built to decorate the building. The barn is a utility room, and this roof option will look strange. As you can see, the single-pitched version has some advantages, and it is better to stop at such a roof structure.
The procedure for performing work when erecting a frame shed
When the project with the drawings is in your hands, you can begin to build with your own hands a frame shed with a pitched roof on the selected site.
Determining the type of foundation
Not only residential buildings, but also any sheds are built on the foundation. Let's start with him. The most reliable base is a concrete tape.

Such a base will reliably protect the frame shed from moisture. However, on peat and sedimentary ground, the tape will be ineffective. Here, preference is given to screw piles. So, the weight of the frame shed is small, so it is enough to equip a shallow base:
- On the site where the frame shed will be built, dig a trench 40-50 cm deep. You can take a smaller width - about 30 cm.Make a pillow in the trench by filling in a layer of sand with gravel 10-15 cm thick. Cover the bottom and side walls with sheets of roofing material.
- The next step is to make a reinforcing frame. It is tied from rods 12-14 mm thick. Use a knitting wire to connect the elements. A gap of 5 cm is provided between the reinforcing frame and the walls of the trench.
- The concrete tape must protrude at least 10 cm above the ground. To do this, install formwork around the plank trench. For high foundation heights, reinforce the top boards with props.
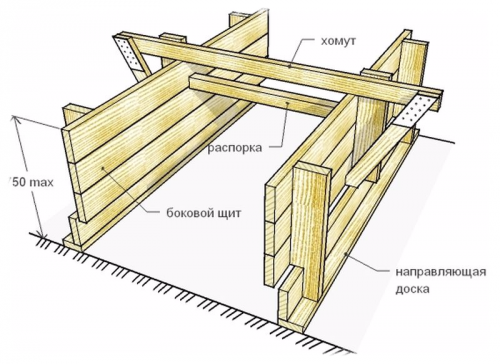
It is better to pour concrete in one day to get a monolithic tape. The construction of a shed with a pitched roof begins no earlier than two weeks later.
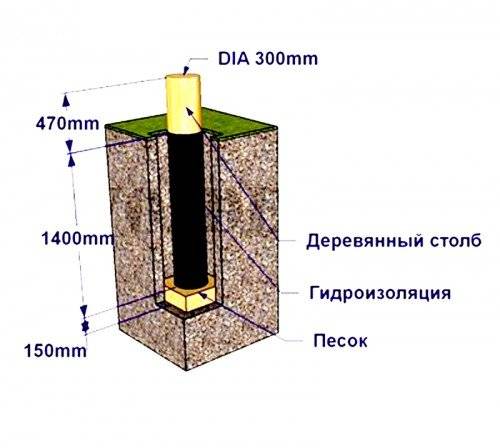
A budget option for a frame shed is a foundation made of oak or larch logs. To make it, select round timber with a minimum thickness of 30 cm and a length of 2 m. Carefully cover each log with bitumen. It is optimal to apply 3-4 coats. While the bitumen is not frozen, wrap the lower part of the post with two layers of roofing material. Wrap only the part of the log that will be in the ground.
Dig a hole 1.5 m deep under each pillar.Pour 10 cm of sand at the bottom. Install the pillars so that their part about 50 cm high protruding from the ground is at the same level. Tamp the gap around the logs with soil or fill with concrete.
Of all the foundation options for a frame shed, a columnar base is most often chosen. The process of making it is similar to installing supports from logs:
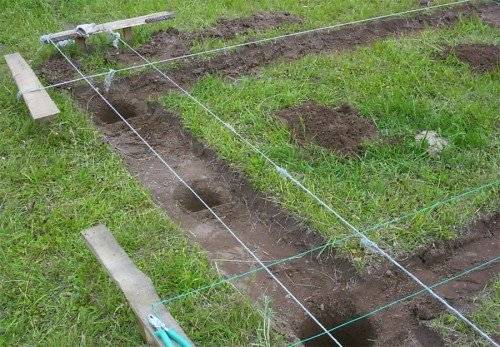
- First, on the site, using stakes and a cord, mark the dimensions of the future barn. At a step of 1.5 m, dig holes about 80 cm deep. They must be in the corners, as well as in places where partitions are provided inside the shed according to the project.

- Place a 15 cm layer of sand or gravel inside each hole. Lay the pillars out of red brick on concrete mortar. You can use cinder block or concrete blocks.
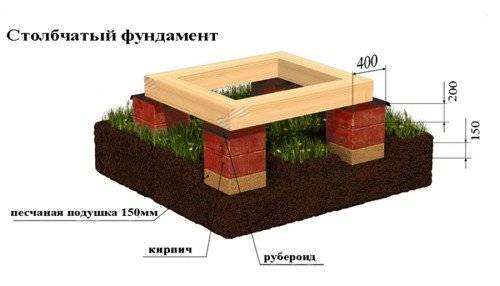
After building all the pillars, process them with bitumen. Waterproofing will prevent dampness from breaking down the brick. Cover the gaps between the posts and the walls of the holes with earth.
Phased erection of the barn frame
So, it's time to find out how to build a shed with your own hands using frame technology. Let's look at all the stages of work:
- We start by covering the foundation with two layers of roofing material. Waterproofing is needed for any base, regardless of its design.
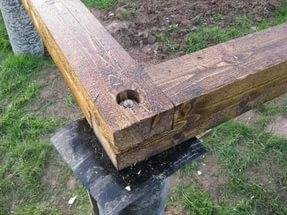
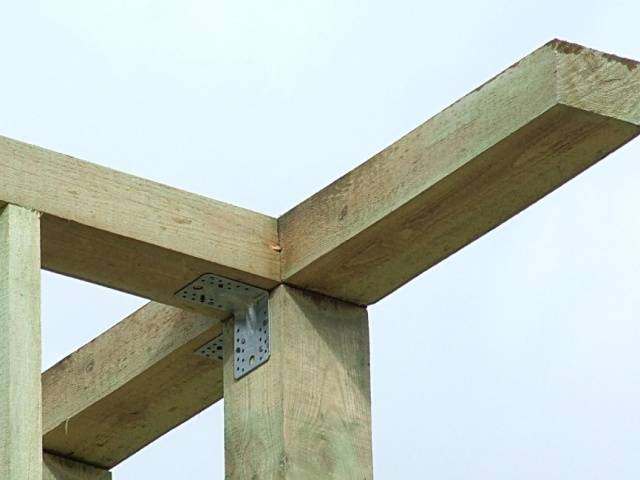
- From a bar with a cross section of at least 100x100 mm, we assemble the frame of the lower strapping. It must be fixed to the foundation. Simply nail the frame to wooden posts obliquely with long nails or fix it with mounting angles. Fix the frame to the concrete base with anchor pins.
- When the frame is securely fixed, proceed to the installation of the lag. For their manufacture, we use a board with a section of 50x100 mm. We fasten the logs using mounting angles in 50 cm increments.
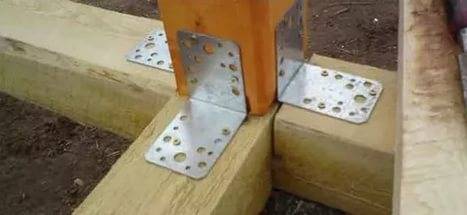
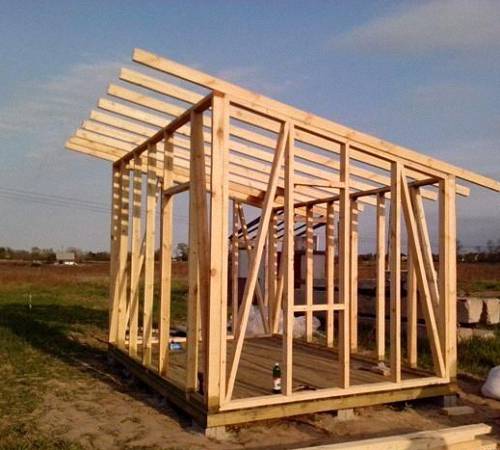
- Now we start making the frame of the barn. We put racks in the corners and perimeter of the frame. To simplify the construction of a pitched roof, we make the front pillars 3 m high, and the rear ones - 2.4 m. This will make it possible to make a slope on the frame. We fasten the racks with the same mounting angles.
- Now let's figure out the step of installing the racks. As far as possible, they are removed from each other at a distance of 1.5 m. You can arrange them in 60 cm steps to get an additional emphasis under each floor beam. At the locations of the doors, install additional racks to which the door frame will be attached. Perform a similar procedure where the windows will be installed. Attach a horizontal lintel on the window openings and on top of the door.
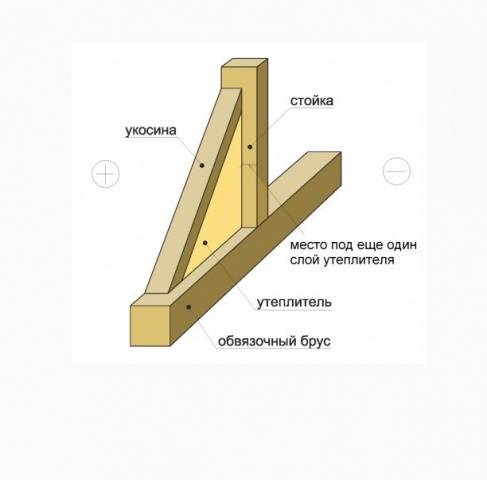
- So that a shed with a pitched roof does not warp over time, the frame must be strengthened. To do this, on all racks, install jibs at an angle of 45about... It is sometimes impossible to maintain such an angle near window and doorways. Here it is allowed to install jibs with a slope of 60about.
- After installing and securing all the racks, we proceed to the upper frame strapping.We make it from a bar of a similar section. The resulting frame will become the base of the pitched roof.
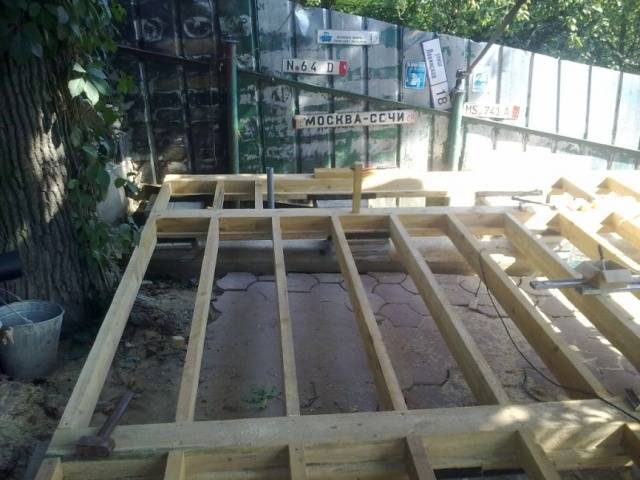
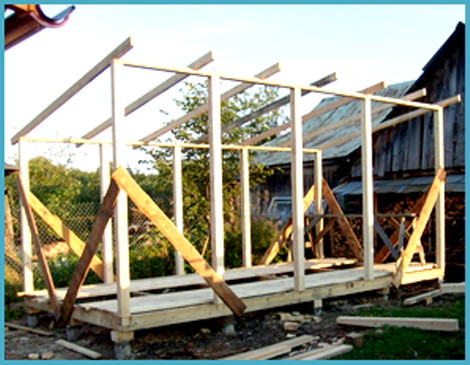
Shed roof frames are easy to manufacture. After fixing the upper strapping, you can start laying the floor beams. The finished frame of a shed with a pitched roof should look like in the presented photo.
Sheathing the walls of the frame is performed with a board, clapboard or OSB. A plank 20-25 mm thick is laid on the floor. If you are building a warm shed with your own hands with a pitched roof, then the floor, ceiling and walls are double clad. Thermal insulation is placed in the resulting gap, for example, mineral wool or foam. But it is still too early to do this, because you still need to install a pitched roof over the shed.
Laying of floor beams and installation of a roof
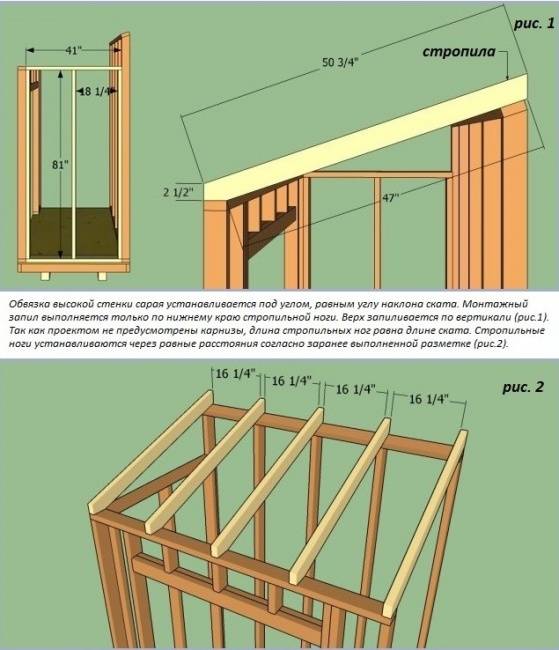
Now we will look at how to make a pitched roof on a frame shed. In order not to make rafters, we went the simple way by making the front and back walls of the frame of different heights.
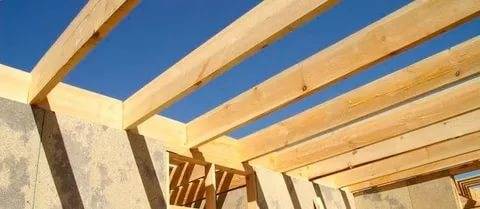
So, for the floor beams, we will use a board with a section of 40x100 mm or 50x100 mm. We calculate the length of each workpiece so that an overhang of about 50 cm wide is obtained at the back and front of the shed. We lay the beams in 60 cm increments. We attach them to the upper strapping with mounting corners.
When all the beams are laid on the shed frame, you can start roofing work. You need to take a board with a thickness of 20 mm and fill the crate from it. Its pitch depends on the rigidity of the roofing material, but for a pitched roof it is better to make it thicker. For a soft roof, in general, a continuous crate is needed, so in order not to suffer with a board, it is easier to nail OSB slabs.
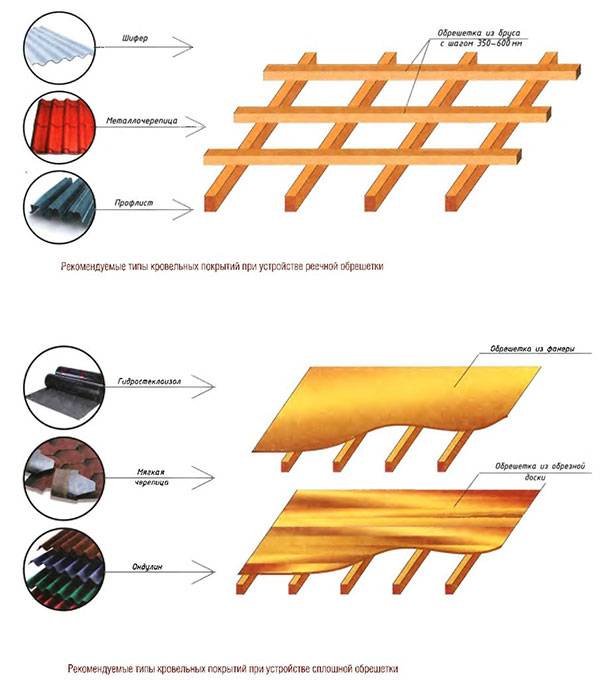
When the pitched roof lathing is ready, you can lay the waterproofing. Usually, roofing material is used for these purposes. In the case of a soft roof, a lining carpet is arranged.
The end of the construction of a pitched roof is the installation of the roofing. For a frame shed, it is better to choose inexpensive materials, for example, slate, ondulin or professional sheet.
The video provides an overview of the shed roof:
Now, after making the roof, you can start wall cladding, insulation and interior arrangement of the frame shed. To prevent rainwater from running under the foundation from the roof slope, fix the gutters, and bring the drain pipe to a drainage well or ravine.


