Content
Most summer cottages are small. To accommodate all the necessary buildings on it, the owner tries to make them small. Suburban buildings No. 1 are a toilet, a barn and shower... Conveniently placing them in a small area allows a compact structure - a utility block. The structure is a multifunctional building, divided into separate rooms. Construction of a utility block for a summer residence with toilet and a shower is no more difficult than building an ordinary barn. To make sure of this, we offer you some interesting projects for review.
Briefly about the design features of the utility block
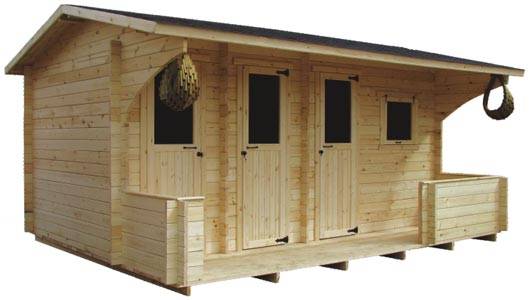
The country house block is a combined building, consisting of several rooms, different in purpose. Typically, a utility block for a summer residence combines a shower and a toilet. The third compartment can be a room set aside for a shed or storage room. If you approach the construction of a summer cottage on a grand scale, then inside you can equip a garage, and even a place to rest. The dimensions of the building are selected individually. It all depends on the wishes of the owner, the number of separate rooms, as well as the availability of free space at the summer cottage.
All the advantages and disadvantages of building a utility block
The advantages of a suburban building are obvious. Hozblok allows you to combine many buildings, saving space as much as possible. However, such a decision is not always appropriate. Let's take a look at the positive and negative aspects of this combined design.
First, let's highlight the main advantages of the utility block:
- Building several objects under one roof is cheaper than building each one separately. First of all, this is due to the saving of building material.
- One large building looks aesthetically pleasing, in contrast to the toilet cubicles, shower cubicles and a free-standing barn scattered around the suburban area.
- In construction, a combined structure is no more difficult than making each booth and shed separately. Therefore, building a utility block for a summer residence with your own hands is available to every person.
- During the construction of a utility block, not only money and materials are saved, but also time. Some operations for the manufacture of a separate part of the structure have to be performed only once.
Now let's find out how the combined building can not please the owner:
- The big disadvantage of the utility block is the toilet. Unpleasant smells of sewage will penetrate into neighboring premises. We'll have to take care of good ventilation and sealing of the bathroom.
- The aesthetics of one large building is not always appropriate, since it is sometimes problematic to place a building conveniently near a residential building.
- Facilities such as shower and toilet are specific. Attaching them to a garage or shed, you will have to face additional difficulties.
After weighing all the positive and negative qualities, you can proceed to the construction of a utility block in the country.
Several projects of summer cottages
Hozblok is a serious structure that requires a project. On paper, you need to draw a diagram showing all the dimensions of the structure, the number of partitions and other important nodes.
To help the summer resident for acquaintance, we suggest considering several interesting projects of the utility block. Maybe one of them and build your structure.
First project
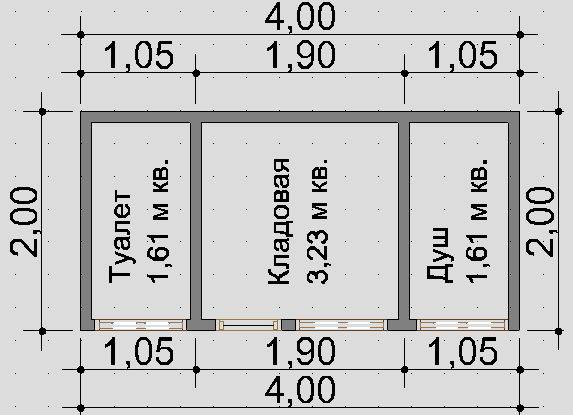
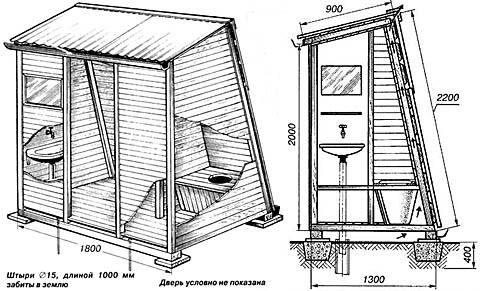
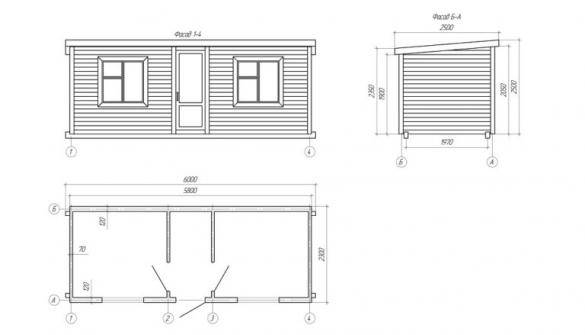
The diagram shows a utility block with dimensions of 2x4 m. The layout is very successful, since the toilet and shower are separated by a third room reserved for the storage room. Thanks to this, unpleasant odors from the toilet will not penetrate into the shower stall, but good ventilation must be made in the pantry. Each compartment has its own door, and the pantry is additionally equipped with a window.
Second project
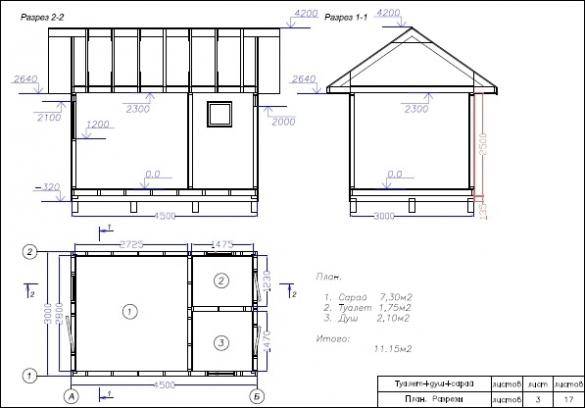
The second project similarly presents a utility block with three compartments. The design difference is the presence of some entrance doors. There are windows on the front wall of the other two rooms. The premises are interconnected by internal walk-through doors. Which of the rooms to give for the shower, shed and toilet is up to the owner to decide. Although it is reasonable to make the middle compartment a barn, it is inconvenient to enter the utility block through a shower or toilet.
Third project
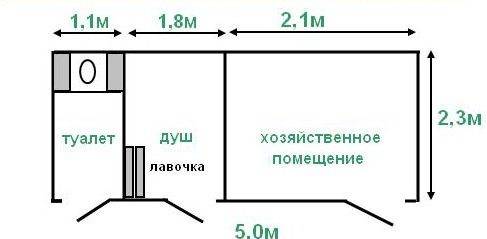
This utility block project is represented by a common box measuring 5x2.3 m. Each compartment has an entrance door. The layout of the rooms is different. The toilet is bordered by a shower, and there are two small rooms reserved for them. Most of the building is given over to a barn.
Fourth project
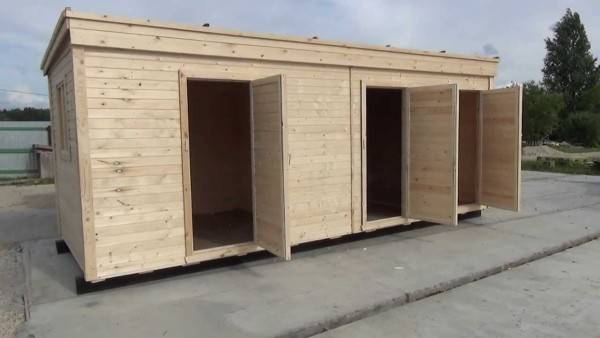
The last of the presented projects is the most difficult, but convenient. The layout is made in such a way that all three compartments are adjacent to each other. Most of the utility block is given over to a barn. Each room has its own door located on different sides of the building.
Self-construction of a utility block
So, the project is ready, we proceed to build a utility block with a shower, a shed and toilet in the country... The building can be erected from any building material. They always try to make dacha buildings cheaper and easier, so we will focus on a wooden structure. A columnar foundation is best suited for such a building, and we will make the roof from corrugated board.
Choosing a place on the site
Despite its compactness, the utility block is still a dimensional structure. It must be successfully located at the summer cottage so that the building is in harmony with the house and the layout of the yard.
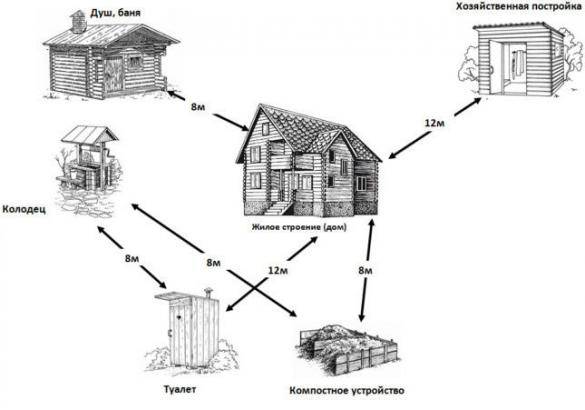
When choosing a place for a utility block, it must be borne in mind that a drain pit will be needed for a toilet and shower. The choice of its location is due to sanitary standards. They take into account the distance to water sources, residential buildings, green spaces, a neighbor's fence, etc. Important parameters that should be observed when choosing a location for installing a utility unit are shown in the photo.
Laying the foundation
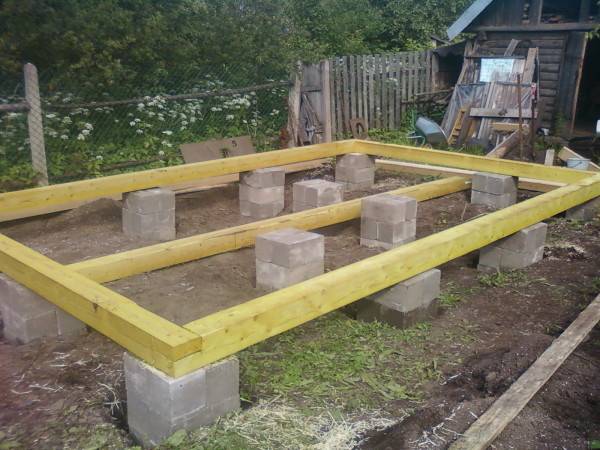
For the construction of a wooden utility block, we settled on a columnar foundation. Before laying it, it is necessary to mark the place of installation of the pillars. It is important to know here that the maximum distance between the supports is 2 m. Each pillar is set at the same level, and the diagonals between adjacent corners are made equal to each other.
Under the supports digging holes... The hozblok is a capital structure, so it is better to take the depth of the holes below the level of soil freezing. For each region, this indicator is different, but not less than 80 cm. The bottom of the pit is covered with a layer of sand and gravel 15 cm thick. The supports can be erected from the available material at hand. As an option, the curbstone is laid out on a cement mortar from a brick or cinder block. It is possible to install asbestos or metal pipes with a diameter of 150-200 mm in the pits, and concrete them. The construction of the frame begins after the concrete has completely hardened.
Assembling the frame
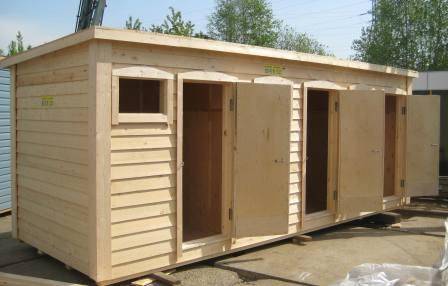
The construction of a wooden utility block with a barn, a toilet and a shower for a summer residence begins with the assembly of the frame:
- From a bar with a section of 100x100 mm, the lower frame of the frame is assembled. The frame will play the role of the base of a wooden house. It is installed on the supports of a columnar foundation, leveling strictly according to the level.
- Vertical racks are attached to the installed frame made of a bar with a section of 100x50 mm. The distance between them should not be more than 400 mm. Be sure to place racks at the corners of the structure, and additional ones - in place of door and window openings.
- From above, the racks are fastened with a strapping from a bar. The frame is made identical to that made for the lower strapping. Racks at the corners are reinforced with struts. They will give stability to the frame.
When the whole box is completely assembled, the roof is made.
Assembling the roof frame

The next stage in the construction of the suburban utility block provides for the arrangement of the roof frame. The best option is a pitched roof. Rafters are made from a bar with a section of 100x50 mm. To do this, a support stand is placed on the front side and a slope is made from it. The rafters on the utility block are installed with a step of 600 mm, so their number can be easily calculated by the length of the building.
Each rafter is attached to the upper frame rail. Between themselves they are knocked down with a board 20 mm thick. This will be the crate to which the corrugated board will be attached. The pitch of the lathing elements is approximately 400 mm, but it all depends on the stiffness of the sheet and the slope of the slope.
Frame cladding and interior work
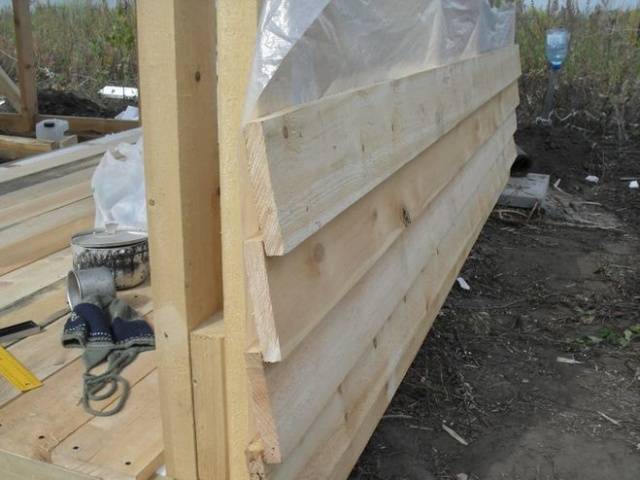
Sheathing of the frame of the utility block begins with roofing work. Roofing material waterproofing is laid on the crate. A corrugated board is laid on top, and each sheet is screwed with galvanized self-tapping screws with a rubber gasket.
The walls of the frame are sheathed with wooden clapboard. The board can be mounted vertically or horizontally at the request of the owner. Inside the compartment of the utility block, set aside for the shed, logs are laid on the floor, and flooring is made from a grooved board. In the toilet, a toilet seat is knocked down, and the floors are similarly covered with a board. The floor of the shower stall can be concreted or installed with an acrylic shower tray with a ready-made drain. The end of the work is the fastening of doors with hinges and installation of windows.
The video tells about the construction of a utility block at the dacha:
Inside, each room of the utility block is finished at its own discretion. The walls in the shower and toilet are optimally sheathed with plastic clapboard. Inside the shed, sheathing can be made of plywood or fiberboard.
Conclusion
We considered the simplest construction option at the dacha of the utility block. There are also projects with terraces, garages and other comfort elements, but they all occupy a large area of the suburban area.


