Content
You can't do without a toilet in the country. The shower is similar to an equally important structure that ensures the comfort of a summer cottage stay. Usually, the owners install separate booths, but they occupy a scarce area in a small area. If the buildings are reduced in size, then the comfort of use decreases, and after all, the changing room must also be located inside the shower. A way out of the situation is a wooden shower for a summer residence, combined with toilet.
What is a 2-in-1 suburban structure, its advantage and design
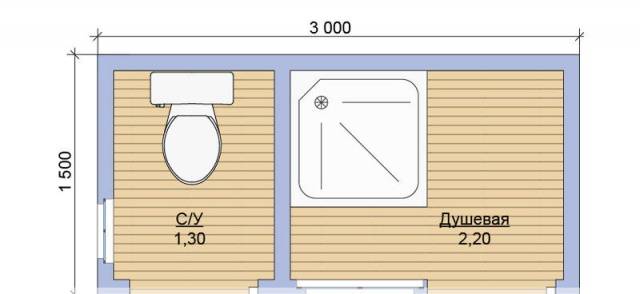
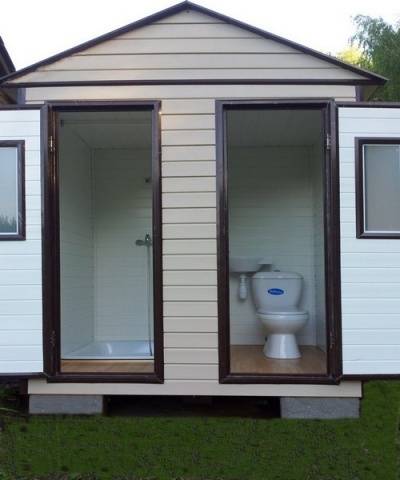
The photo shows a classic scheme of a combined toilet with a shower. In simple words, it is a large wooden booth, divided into two compartments by an internal partition. To build such a structure for a summer cottage made of wood is no more difficult than an ordinary shower or toilet stall.
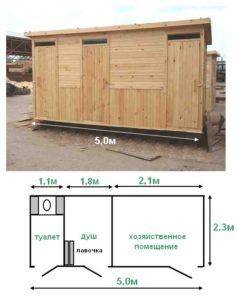
In the next photo you can see the finished structure and diagram of a summer cottage that can accommodate a shower, toilet and utility room. It doesn't matter how many compartments the garden house will be made of, but it is built from a homogeneous material and decorated in the same style. For the construction of such suburban structures with your own hands, a tree is best suited, and the roof is covered with corrugated board.
The main advantage of a combined toilet with a wooden summer shower for a summer cottage is the saving of space and materials. Separate cabins of summer cottages are not scattered chaotically throughout the territory, and building materials are significantly saved on the alignment of walls and roofs.
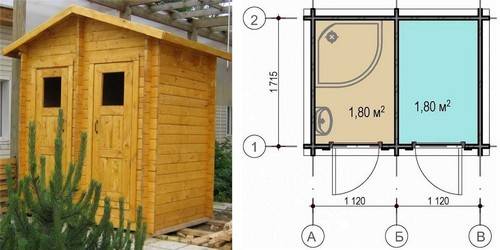
So, we need to design a shower and toilet for the country. The photo shows a finished wooden house with two compartments, as well as its drawing. The dimensions of each room should ensure a comfortable stay for a person. Let us immediately dwell on the height of the suburban building, which is at least 2 m, and the maximum is 2.5 m. The optimal width and depth of each cabin depends on the physique of the owners. The fuller the person, the more spacious the compartment needs to be made. The approximate dimensions of one booth are 2x1.3 m. Here it is time to remember that we need a shower with a changing room at the dacha, so an additional space of about 0.6 m is provided for it.
When a wooden shower with a toilet is designed for a summer residence in the same building, you immediately need to think about sewerage. The simplest option is a cesspool, which will collect sewage from both structures. However, a bad smell will come from such a sewer and penetrate into the shower stall.
You can make a hygienic toilet and abandon the cesspool in the country in two ways:
- Install the powder closet. This type of toilet provides for the collection of waste in a collection container installed under the toilet seat. After each visit, the sewage is sprinkled with peat, where it is eventually processed into compost.
- Install a dry closet. A similar solution to the problem involves the installation of a separate tank where waste is processed using reagents.
And the last important issue when drawing up a project is the supply of water and electricity. For a country shower, you will need to install a container on the roof into which water will be pumped. It is advisable to install lights inside the booths so that you can use the establishments after dark.It is optimal to make a shower for a summer cottage heated by electricity. This will make it possible to take water procedures during the cold time of the day.
Choosing a place to install a country shower and toilet
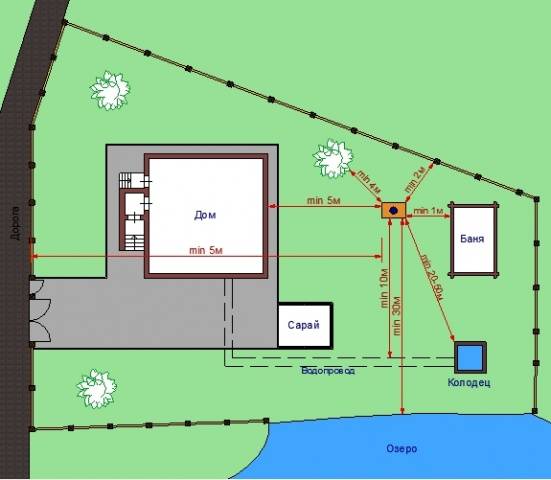
The choice of a place for an outdoor bathroom is stipulated by the rules of SNiP. If drains from the toilet and shower in the country will be collected in a cesspool, then it must be removed from water sources at least 20 m, and from a residential building - at least 5 m. The photo shows a diagram with the specified parameters, in accordance with the requirements of SNiP. If, instead of a cesspool in the country, a system of powder-closets or dry closets is used, then these requirements can not be adhered to due to the lack of contact of sewage with the ground.
Then the building is erected on the highest section of the yard, and a hole is dug in the lowland. This will provide a slope for the pipeline to move sewage by gravity.
Instructions for the construction of a country shower and toilet
So, the project and materials are ready, the place has been chosen, it is time to build a summer cottage structure with your own hands. We have already decided that Summer shower in the country and the toilet will be made of wood. There are no problems with installing a dry closet or powder closet. It is enough to buy a factory bathroom, place it inside the booth, and you can use it. However, we do everything with our own hands, which means that we will consider a summer cottage with a cesspool.
After choosing a place on the site, we proceed to construction work:
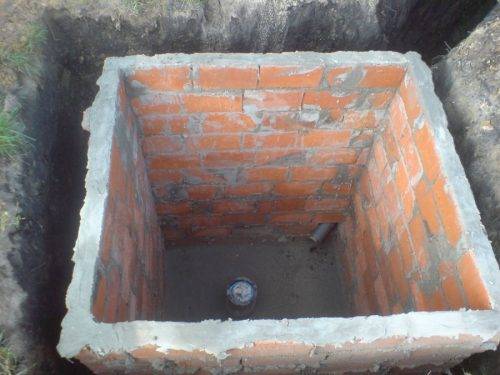
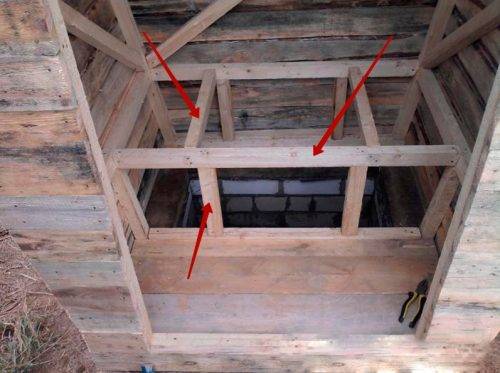
- First thing for country toilet with shower equip a cesspool. The pit is dug up deep from 1.5 to 2 m.The dimensions of the side walls are usually 1x1 m, 1.5x1 m or 1.5x1.5 m.If the toilet for the summer cottage is being built above the cesspool, then it is better to make the pit rectangular with the sides of the walls 1x1.5 m. This will make it possible to organize a hatch behind the house for pumping out sewage.

- Inside a red brick pit dug out with your own hands, walls are laid out on cement mortar. If it is a sealed container, then the bottom is concreted, and the brick walls inside and outside are treated with bitumen. For the drainage pit, brickwork is made with windows for water absorption into the ground. The bottom is covered with a drainage layer of sand and gravel. The total thickness of the filter pad is 500 mm.
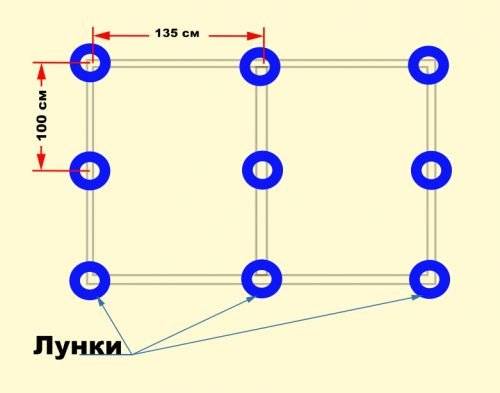
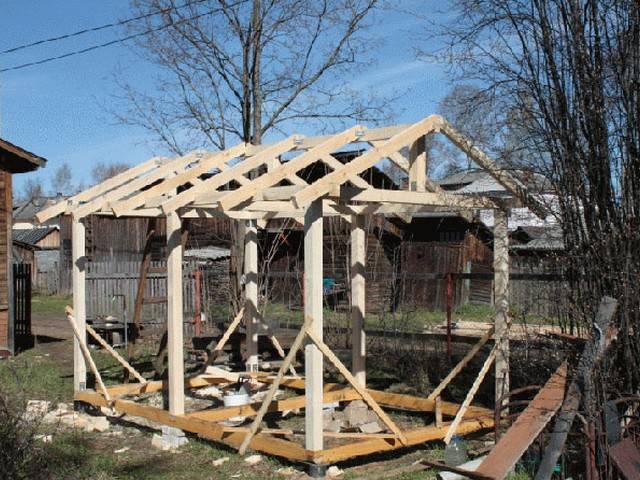
- Now it's time to make a columnar foundation. It should be noted that we are building a country toilet and a shower made of wood in the same house, so we place the holes for the foundation according to the diagram shown in the photo. Thus, the greatest strength of the aboveground structure is ensured.
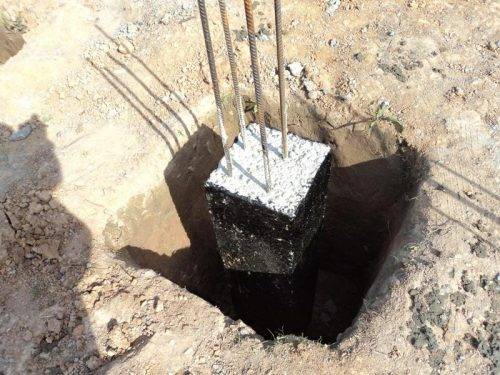
- To install the pillars, dig holes with a diameter of 200 mm and a depth of at least 800 mm. At the bottom of the pits, a layer of sand 100 mm thick is first poured, and then the same layer of rubble. Formwork is made of tin or plywood inside each hole, four reinforcement rods are vertically inserted inside, and then poured with concrete. In height, each post should protrude 300 mm from the ground.
- After the concrete has completely solidified, the formwork is removed, the gaps between the pillars and the walls of the holes are covered with soil. Now all the pillars need to be given one level so that the country house of the toilet with a shower is level. The level is beaten off from the lowest pillar. A mark is placed on high concrete supports, after which the excess part is cut off with a grinder with a diamond wheel.
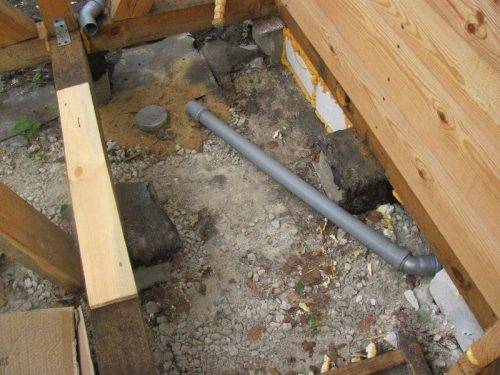
- At the next stage, they make a drain from the dacha shower with their own hands. A plastic pipe with an elbow of 50 mm in diameter is laid on the floor and taken outside the booth into a cesspool.
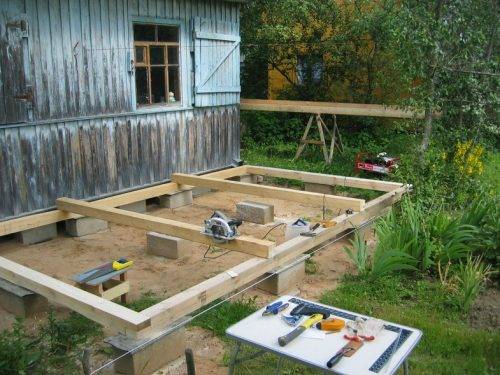
- The construction of the frame of the country house for the shower and toilet begins with the lower strapping. The frame is made by hand from a bar with a section of 100x100 mm, then it is laid on a columnar foundation.If the cesspool is located under the toilet, then it is better to weld the frame from a metal channel.
- The frame of the lower strapping of a country shower with a toilet is level in one plane. Pieces of roofing material are laid between wooden elements and concrete pillars for waterproofing. To prevent the shower and toilet from sliding off the foundation, the frame is fixed to the posts with anchor bolts.
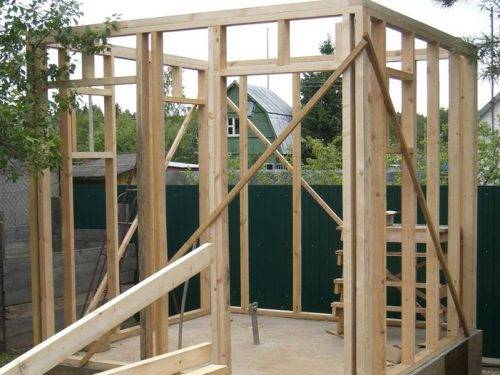
- For the construction of the walls of the country house, it is necessary to install the frame racks. They are made from a bar with a section of 50x100 mm. The racks are installed strictly vertically at the corners of the frame every 400 mm. Additional racks are placed on doorways as well as window openings. They are attached to the lower trim using metal corners and bolts. If the bottom frame of the shower / toilet is made of a channel, one side of the bracket can be welded to it. The distance between the pillars of the doorway is maintained at least 700 mm.
- After installing all the racks, the upper frame strapping is made of a bar with a section of 100x100 mm. For the rigidity of the frame, the vertical struts can be reinforced with slopes.
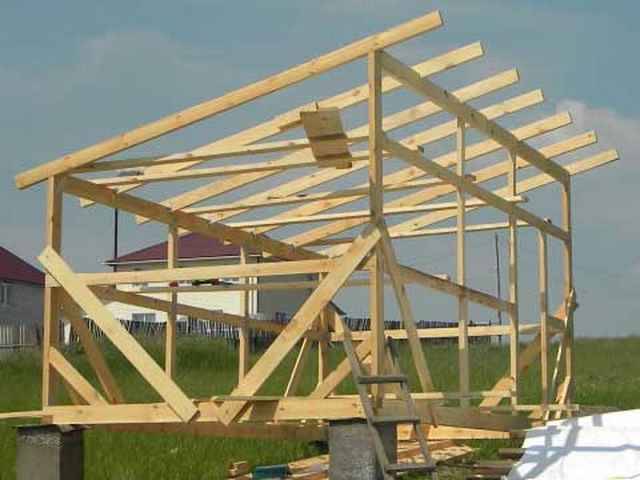
- The roof on a country house with a toilet and shower can be made with a single-slope or a gable. The first option is easier to manufacture, and the shower water tank is easier to fix.
- The gable roof of a country shower with a toilet looks aesthetically pleasing, accumulates less precipitation, but is more difficult to manufacture. With the attachment of the shower tank, things are more complicated due to the construction of additional supports.
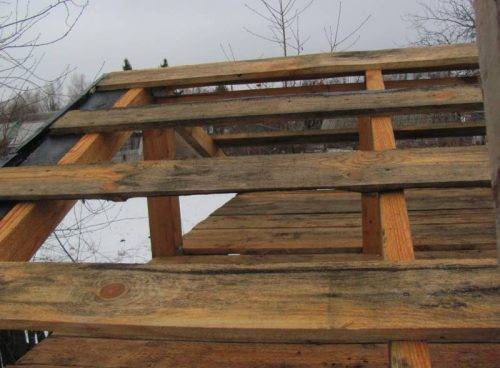
- In any case, for the roof of a summer cottage, you will have to make rafters from a board with a section of 100x40 mm. In length, each foot should protrude 200 mm beyond the house. The finished rafters are attached to the upper harness beam with a 600 mm pitch. Between themselves they are fastened with lathing boards with a step of 300 mm.
- The roof for a country shower with a toilet is made cold. A layer of roofing material is laid on top of the crate and corrugated board is laid. The sheets are fastened with galvanized self-tapping screws with an O-ring. If the gable roof of a country shower with a toilet is covered with corrugated board, a ridge bar is installed on the upper ridge.
- When the roof is ready, the dacha building is not in danger of rain, and you can gradually move on to arranging the floor in the toilet. First, the logs are laid and fastened to the lower frame of the frame. Racks and horizontal jumpers, forming a toilet seat, are attached to the logs from a bar with a section of 50x50 mm. The entire structure and the floor are sheathed with a board 25 mm thick.
- The next stage involves covering the entire country house with a 20 mm thick board. If the shower and toilet are made insulated, then foam plates are inserted from the inside between the vertical racks. You can sew up the insulation from the inside of the toilet with the same board, but in the shower it is better to use PVC lining. It is resistant to moisture and does not rot. The same cladding is done on the ceiling.
- At the end of the outer and inner cladding of the country house, they move on to arranging the floor in the shower. The sewer pipe has already been installed at the stage of foundation construction, now it is time to organize the drain. The soil inside the shower stall is covered with black film. Only a plastic outlet from the sewer pipe should stick out of it, where a drain funnel will be formed.
- From above the film in the shower is covered with a layer of sand, then rubble and concreted. Moreover, the screed is leveled so that a drain is obtained in the direction of the funnel.
- After the concrete screed hardens, the shower floor is treated with waterproofing mastic. A pallet with large slots is knocked down from the rails so that water can penetrate through them to the drain hole. The lattice tray is installed on the floor of the shower stall.


In the final, it remained inside the shower stall to fence off a place for clothes with a polyethylene curtain. This will be the dressing room.
Water supply to the shower stall
The end of the construction of a country shower, combined with a toilet, is the installation of a water tank. On a flat roof, under the container, you can knock down a stand from a bar, and fix it through bolts through the corrugated board to the rafters.
It is difficult to install a tank on a gable roof, so it is better to weld a high stand from the profile near the country shower. For stability, it will have to be concreted in the ground.
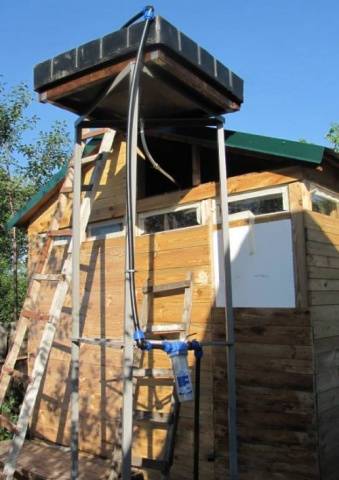
Water and electricity are supplied to the tank to heat the water during the cold time of the day. The heating element and the metal stand itself near the shower are grounded for safety.
The video shows an example of a country shower and toilet:
A country shower with a toilet can be built with your own hands. Let it take more than one day, the main thing is that the building is comfortable and reliable.


