Content
- 1 Choosing the best place for a wooden sandbox
- 2 We solve the issue of making a cover
- 3 Preparing material for a wooden sandbox
- 4 The procedure for making a box
- 5 Edging of the sides
- 6 Installing the box in its permanent place
- 7 Sand filling a wooden sandbox
- 8 A variant of an interesting children's sandbox made of wood
The sandbox is not only a place for a child to play. Making Easter cakes, building locks develops the baby's thinking and hand motor skills. Modern parents are used to buying plastic sandboxes from the store. However, such toys are very expensive and not everyone can afford. In private yards, children's sandboxes made of wood are most often installed, which will not be difficult to make on your own.
Choosing the best place for a wooden sandbox
A wooden sandbox made in the yard should not be hidden far behind buildings. It is better to equip a place for children to play in a visible place. It is advisable to abandon the north side of the yard, otherwise the sand will be constantly wet and cold. It's bad if the sandbox is illuminated by the sun all day. The child will not be able to play in extreme heat. But it is impossible to completely hide the playing place in the shadow. The sand will not warm up well here.
It is optimal to install a wooden sandbox for children in a place half-lit by the sun. The spreading crown of a large tree will be an ideal shelter from the heat. However, some problems may arise here as well. It is impossible to place a children's sandbox under old and fragile trees due to the threat of falling thick branches. Harmful insects and rotten fruits will constantly fall from fruit plantations into the sand.
We prepare a place for installing a wooden box and equip the bottom of the sandbox
According to the principle of use, children's wooden sandboxes are seasonal and all-season. The first structure can be built without a bottom. It is enough to install a small wooden box for the summer period, and in winter, remove it under a canopy. All-season sandboxes for children are installed on an ongoing basis. They stay for the winter, and so that the sand does not turn into mud over time, it is separated by the bottom from the main soil.
By their design, seasonal and all-season wooden sandboxes represent an ordinary box, most often with a lid. They are installed and manufactured in the same way. The only difference can be the bottom structure.
Let's look at the photo of how they prepare a place for a wooden box and equip the bottom:
- Initially, drawings of a wooden sandbox are developed in order to know its dimensions. According to the dimensions of the box, markings are performed on the site. This is easier to do with wooden stakes and construction cord. According to the markings made with a bayonet shovel, the sod layer of soil is removed to a depth of 20 cm. For an all-season wooden sandbox, gravel filling can be made on the sides of the box, which drains water after rain or melting snow. To do this, the sides of the pit are expanded by 30-50 cm.

- The bottom of the excavated recess is leveled with a rake, after which it is lightly rammed. For an all-season wooden sandbox, drainage will be required. The bottom of the pit is covered with a layer of clean sand or mixed with gravel 10 cm thick.If this is a seasonal option, then the bottom of the pit can simply be tamped.
- So, we decided that for any wooden sandbox it is better to make a bottom. To do this, take geotextiles and lay them along the bottom of the pit. You can use dense agrofibre or cut old polypropylene bags. When, in the future, the wooden box is installed in its permanent place, the bottom material should extend beyond the borders of the sides.
- After installing the box of the all-season sandbox, the material is tucked up, after which it is shot with staples to the sides, and the excess is cut off. The seasonal wooden sandbox does not make sense to fix the bottom. The material is simply tucked up to the sides and pressed with soil.

It is by this principle that they prepare a place where a wooden sandbox for children will be installed.
We solve the issue of making a cover
Even if parents overcame their laziness to make a sandbox with their own hands for their child, there is less and less desire to make a cover. Is she needed? Judge for yourself. Sand is a favorite place for yard animals in terms of toilet organization. During the wind, dry sand will be blown out, and various debris will be put into the box. You don't want a child to rummage in such sand, do you? So the cover is needed.
You can use a piece of film as a cover, but you will constantly have to press it with bricks or pieces of wood at night. In order not to engage in this procedure every day, it is better to take another half day of time and make a normal cover for the wooden sandbox.
The simplest cover model
First, let's look at how to make a wooden lid effortlessly. Its construction is an ordinary shield made of 15–20 mm thick boards. From above, the lid is upholstered with linoleum or film so that rainwater does not penetrate through the cracks into the sand. Handles are attached on both sides for easy removal of the shield.
The disadvantage of this design is that the lid cannot be opened independently by children. Even from thin boards, the shield will turn out to be massive. The child may try to pull it to the side by the handle, but there is a risk of injury.
Folding cover model
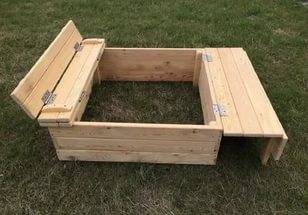
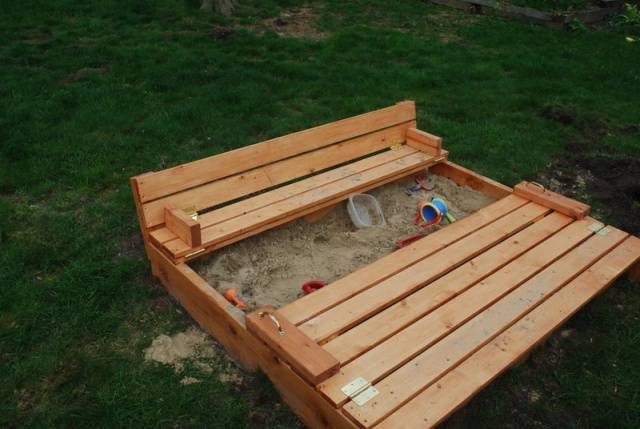
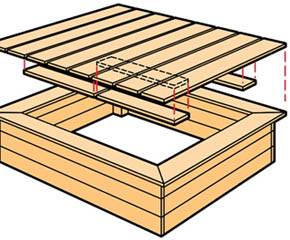
If you make a wooden sandbox with a lid, then it is better to pay attention to the folding model. A photo of a diagram of this design clearly shows how an ordinary shield turns into a comfortable bench.
If the boards are connected with a rubber band, then such a shield can be rolled up. A cover of two halves is attached with hinges to opposite wooden sides, and, if necessary, the segments are opened to the side.
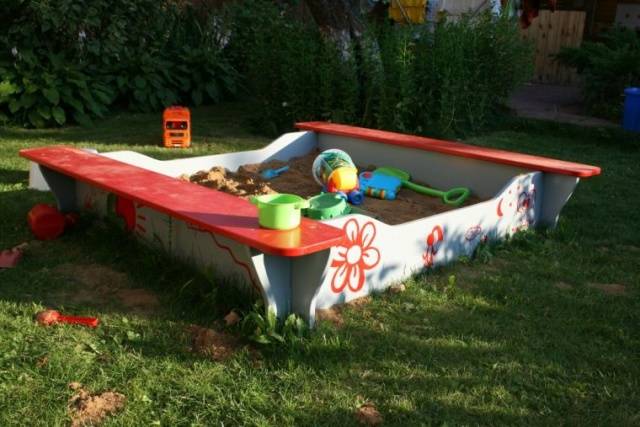
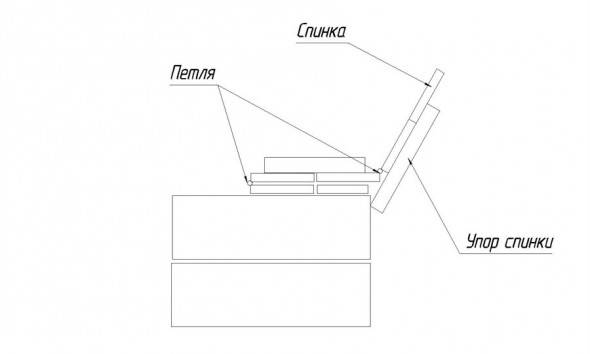
If you want your child's sandbox made of wood to bring real joy to your child, equip it with a folding cover with a bench. For its manufacture, only eight loops are needed, which connect the individual elements. The lid consists of two halves, each containing three boards. One of them is permanently attached to the board of a wooden sandbox, and the other two are connected with loops. Outside and inside, limiters are installed from bars, which are the backrest stop.
Preparing material for a wooden sandbox

If, nevertheless, it is decided to build a sandbox with your own hands from wood, you immediately need to prepare good edged boards. Obapols, old rotten workpieces and other trash for the box will not work. A child can get hurt on such a sandbox and pick up splinters. New boards are taken, preferably from pine. Poplar is short-lived, and oak, larch and other hard species are difficult to process. A grooved board is ideal. A tight connection of the grooves will prevent sand from spilling into the cracks, as well as the ingress of rainwater.
All wooden blanks are polished. The surface is made smooth, without a single burr. To make the wood last longer, it is impregnated with an antiseptic. It is impossible to use working off, and even pure machine oils cannot be used.The structure will acquire an unpleasant odor, in addition, the child will constantly stain his clothes.
When the box is already done, it needs to be painted. It is advisable to pick up multi-colored oil or acrylic paints. A bright sandbox will appeal to the child, and will take on an attractive look.
The procedure for making a box
So, all the materials have been prepared, and it is time to build a wooden sandbox with a lid with your own hands. The box can be made according to the proposed scheme. The sides are assembled from two or three boards so that their height is within 40 cm.The optimal size of the wooden box is 1.5x1.5 m, but the board is taken with a length of 1.8 m.On each side of the workpiece, 15 cm recede, and the grooves are cut out with a hacksaw ... When all the boards are prepared, they are connected by groove to groove, as shown in the diagram. For the reliability of the nodes, a bolted connection or self-tapping screws are used.
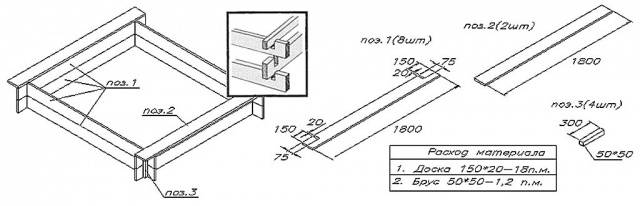
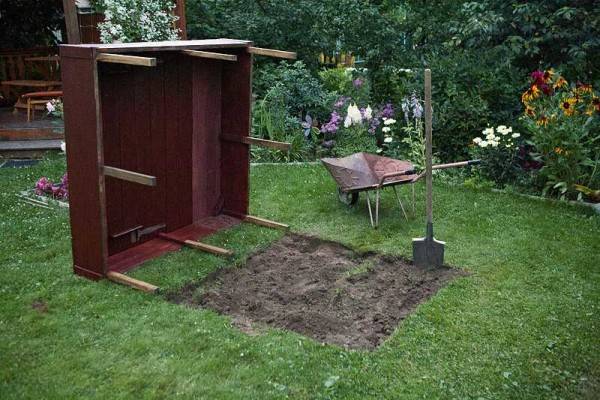
Legs from a bar with a section of 50x50 mm are nailed to the finished wooden box at the corners and center of the sides. The supports protrude down the box, and are needed to fix the sandbox in the ground.
Edging of the sides
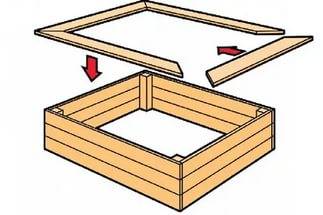
An assembled wood sandbox in the shape of a square box is not considered a complete structure. It's time to remember the lid. It is too early to fix it, but the further refinement of the wooden box depends on the chosen design. If the choice fell on a folding cover, then the ends of the sides only need to be sanded, and nothing else is done with them. After installing the cover on the sides of the box, most of the ends will disappear under the bench.
When making a removable cover from a shield, the child does not have the opportunity to sit. Edging the boards with a flat board will help to make a simple bench. In addition, such a design will hide the uncomfortable thin ends of the box, which the child can hit. Benches are made of four boards, the edges of which are sawn off at an angle of 45about... The mounting scheme of the benches is shown in the photo
Installing the box in its permanent place
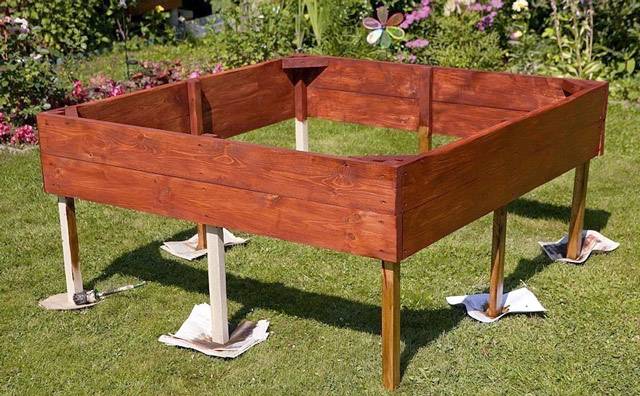
After completing the work on the manufacture of the box, you should get a box with eight legs, as in this photo. The place for its installation has already been prepared, but not quite. You will have to perform a few more steps:
- A knocked-down wooden box with legs is placed on a prepared platform. Moreover, the litter material from the bottom of the pit must be removed for a while. Places for grooves are marked on the ground around the legs.
- The box is removed to the side, where it is treated with an antiseptic. Wooden legs are covered with bitumen mastic. So, the wood will stay in the ground longer. While the structure is drying out, grooves are dug in the marked area.
- The depth of each groove should correspond to the length of the leg, taking into account the fact that the filling is made of sand with crushed stone 10 cm thick. For digging grooves, it is better to use a garden drill with a diameter of 80–100 mm.
- Now is the time to lay the lining in place. The piece is larger than a wooden sandbox, so it will cover all the holes. In these places, neat holes are cut under the legs, after which the box is installed. The edges of the material are tucked up to the sides, where it is fastened or pressed down with soil.
- Around the box was a dug trench 40–50 cm wide. Its bottom should be covered with black agrofibre, and a layer of sand and gravel should be poured on top. Thanks to the resulting backfill, water will not accumulate around the sandbox, and agrofibre will prevent weeds from growing.
On this the base of the wooden sandbox is installed. It remains to fix the folding bench cover, and you can start painting the product.
Sand filling a wooden sandbox
So, the paint has dried, it's time to fill the box with sand and invite the child to the playground. The choice of filler must be taken seriously. For sandboxes, river or quarry sand is used, but not all of it is ideal. Too fine white sand practically does not stick, and when it dries it is very dusty. In windy weather, the baby will not be able to play, as his eyes will clog.Gray quartz filler will not work. There is little dust from it, but it also does not mold, besides, it strongly scratches the delicate skin of the child's hands. There is also orange-colored gully sand. It has a lot of clay impurities, conducive to good sculpting, but it smears hands and clothes a lot. A suitable filler is considered to be white sand with a yellowish tinge, preferably of medium grain size.
The video shows a version of the children's sandbox:
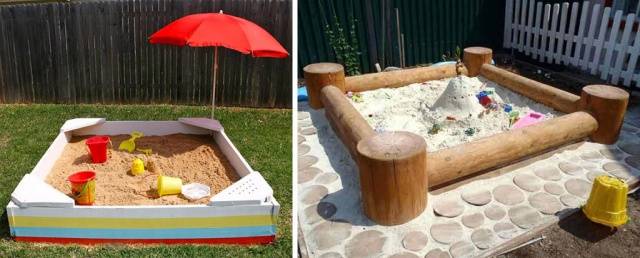
A variant of an interesting children's sandbox made of wood
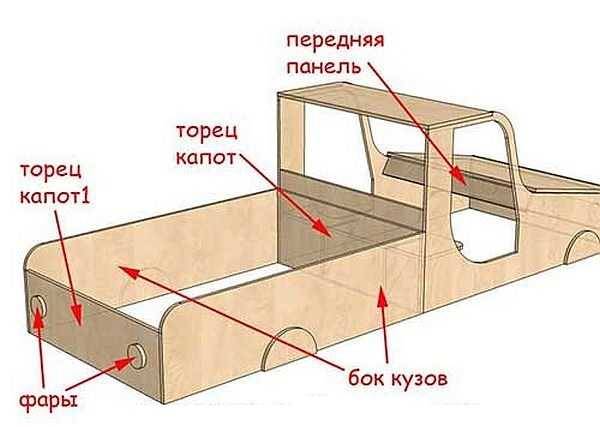
The square wooden sandbox is the classic option. If you want to surprise your child and make him a real playground, the issue will have to be solved creatively. The photo shows a diagram of a sandbox in the form of a car. This is the perfect option for a boy. In addition to playing in the sand, the kid will travel, repair a car, or come up with a lot of other undertakings.
Such entertainment can be made from moisture-resistant plywood or OSB. Fragments of the car are cut out of the sheets, after which they are connected according to the proposed scheme. The finished structure is painted as believably as possible so that it resembles a real truck.
There are many ideas for making wooden sandboxes. The wood is very malleable to processing, and allows you to create real miracles.


