Content
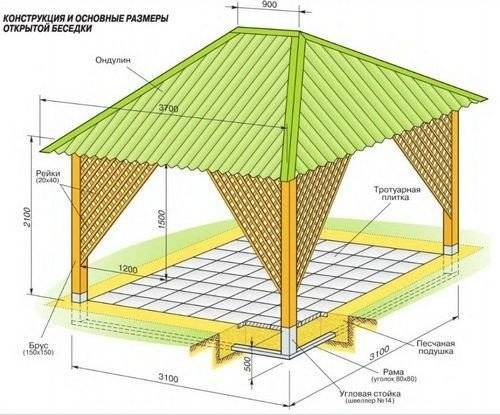
Gazebos have recently become a very frequent occurrence in suburban areas and summer cottages. What kind of forms for their buildings the owners do not come up with in order to organize a comfortable resting place. If there is no desire and means to build an unusual gazebo, there is a classic version in the form of a square or rectangle. The structure is quite simple to build thanks to the uncomplicated roof. We will now talk about how to make a hipped roof for a square and rectangular gazebo with our own hands.
Three types of hipped roof
Before you start building drawings of the future roof, it is necessary to take into account that hipped roofs have three subspecies:
-
The hipped roof structure is often called a pyramidal roof due to its appearance. It consists of four ramps in the form of equal triangles. The hipped roof scheme does not provide for a ridge. The tops of the triangles are connected at one point and form a pyramid. The base of the frame can only be a square, therefore, such a roof is not erected on rectangular arbors.

-
A hip roof is the simplest option for a rectangular gazebo. A design feature is the shape of the slopes. The frame consists of two end triangles of the same size, called hips. The shape of the other two identical slopes is made in the form of a trapezoid. A ridge is formed at the junction point of all four planes.
-
The semi-hip structure is also called the Danish roof. Similar to the hip roof, the half-hip roof consists of two triangular and two trapezoidal slopes, connected by a ridge. A distinctive feature is the triangular hips, fractured at the top. That is, from a large triangle, a trapezoid and a small triangle are obtained.
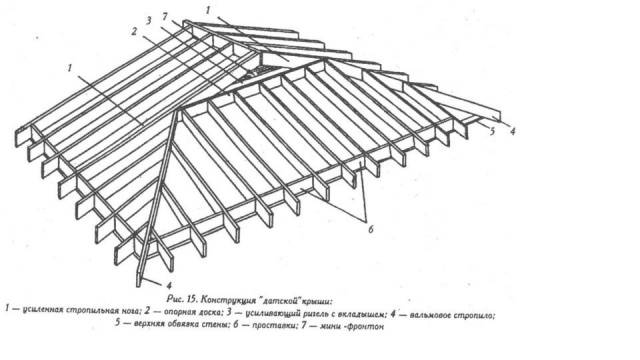
Each hipped roof of the gazebo has its own trump card. The hipped roof is the most common. It is profitable to build it in terms of saving material. The design does not require the manufacture of gables, and short beams are used for the rafters. On a rectangular gazebo, a hip roof is indispensable. If you want to do something amazing, then you can give preference to the Danish version.
Pros and cons of a hipped roof
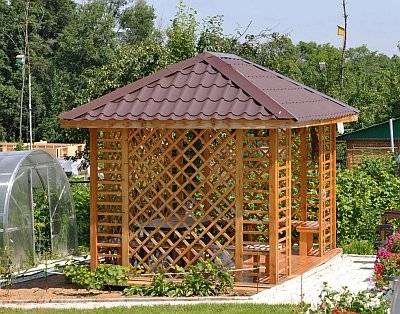
Four-pitched roofs are distinguished by an aesthetic appearance, make it possible to use any type of roofing, do not interfere with a good view from the gazebo. The design is a godsend for lovers of unusual shapes. The four-pitched frame can be made in different styles. For example, if you extend the overhangs and install arcuate corner rafters, you get a beautiful Chinese-style roof.
In terms of strength, hipped roofs benefit in this regard. The design is characterized by low windage, due to which it is resistant to strong wind gusts. If the slope of the slopes was correctly calculated, then in winter a lot of snow will not linger on the roof of the gazebo. Four-slope structures are distinguished by a long service life without frequent repairs.
The disadvantage of a hipped roof can be called a certain complexity of the structure, which requires accurate calculations, drawing up drawings and the correct manufacture of the rafter system. When making a rafter system yourself, at the initial stage, it is advisable to consult with specialists. They will help you calculate all the structural elements and draw an accurate diagram.
What to consider when drawing up a gazebo roof project
Before starting the construction of a hipped roof, you need to prepare drawings, where all structural elements and their dimensions are indicated. Such a scheme will simplify further work, plus it will help to calculate the loads that will affect the rafter system in the future. Since the hip roof is, in terms of the complexity of the structure, something intermediate between the hip and the Danish half-hip roof, we will try to make calculations using its example.
So, the beginning of the calculations consists of taking into account the main indicators:
- calculate the total weight of the roof frame, that is, all the constituent parts of the rafter system;
- take into account the mass of the roofing layer, in particular - coating and waterproofing;
- you can calculate the load of precipitation and wind according to annual observations or find out the data for a certain region in the relevant authorities;
- during construction and repairs, there will be a person on the roof, whose weight must also be taken into account in the calculations;
- the weight of any equipment temporarily or permanently installed on the roof is taken into account.
Having made general calculations of the future roof of the gazebo, they begin to determine the slope of the slopes. This parameter is determined similarly in accordance with the characteristics of the climatic conditions of the region. For example, for windy areas, it is undesirable to make a high roof because of the increased windage. The roofing material can be chosen from bitumen or polycarbonate. If there is a lot of precipitation, then it is reasonable to make the slope of the slopes more, for example, from 45 to 60about, and use metal tiles as a roofing material.
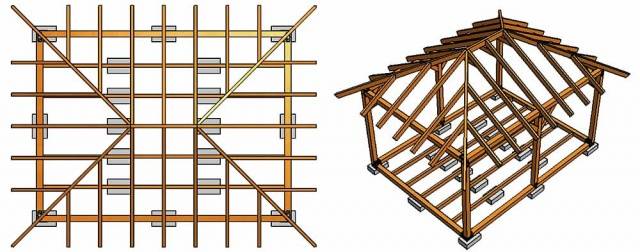
To calculate the total mass of the roof frame, it is necessary to calculate the length of the rafter legs and other elements, as well as determine their cross section. To ensure the strength of the structure, they provide for the installation of struts, as well as puffs. The gazebo roof frame diagram will be considered ready if all assemblies are displayed in it.
The frame of a hip hip roof consists of the following types of rafter legs:
- Oblique double beams are installed at the corners of the roof. They bear the main load. These rafters shape the roof.
- Intermediate beams are installed in the center of the ramp, connecting the ridge to the Mauerlat.
- Narodniks are called short legs of rafters. They are fixed parallel to the intermediate beams. Narodniks connect the beams to the Mauerlat.
To measure the roof of the gazebo, you will need to prepare a flat rail 3 m long.Work is carried out in the following order:
- the center line is found on the Mauerlat, which forms the supporting frame of the roof;
- at the ridge run, half of its length is determined, which will be the center aligned with the center line of the roof frame;
- mark the attachment points on the Mauerlat of the first intermediate beam;
- the measuring rod is shifted, and the attachment points of the second intermediate beam are marked, etc.
Measurements of the attachment points of the rafter legs are performed for each slope separately.
The video shows the construction of a gazebo:
We start installation work
When the walls of the gazebo are already built and the roof drawing is ready, they begin to erect the frame:
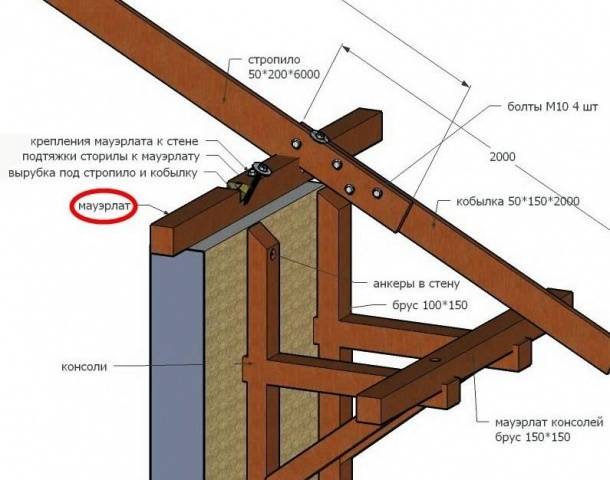
- The first on the walls along the contour of the gazebo is laid the Mauerlat, securing it with anchor bolts. The laid timber forms the supporting frame of the roof.
- The beds are laid on the Mauerlat. Support posts are attached to them in the center of the roof, on top of which a beam with a section of 100X200 mm is laid. This will be the hobbyhorse.
- With the help of a level and a measuring rail, the ridge bar is set strictly in the center of the support frame. For stability, the support posts are reinforced with temporary supports.
-
From the edges of the ridge, inclined rafters are laid on all four corners. For rigidity, each beam is reinforced with a support and a brace.
- When the ridge and inclined rafters are securely fastened, the general outline of the hipped hip roof is already looming. Now it remains to install the beams of the intermediate rafters on all the slopes.
After installing all the frame elements, a crate is sewn from the pine board on top of the rafter legs to fasten the roofing. Its step depends on the type of material selected.
The video shows the installation of the rafters of the hip roof:
If you approach the construction of a four-pitched roof wisely, then there is nothing super complicated in this. But in the final one gets great pleasure from the work done independently.


