Content
Snowy winters together with joy bring many worries associated with snow removal. It is quite difficult to clear a large area with a shovel. Craftsmen immediately found a way out and invented a huge number of homemade products. The advantage of this technique is lower cost compared to factory counterparts. We will now consider how to make a snow blower do it yourself from spare parts available on the farm.
How to make a snowblower with your own hands
Snow blower auger manufacturing process
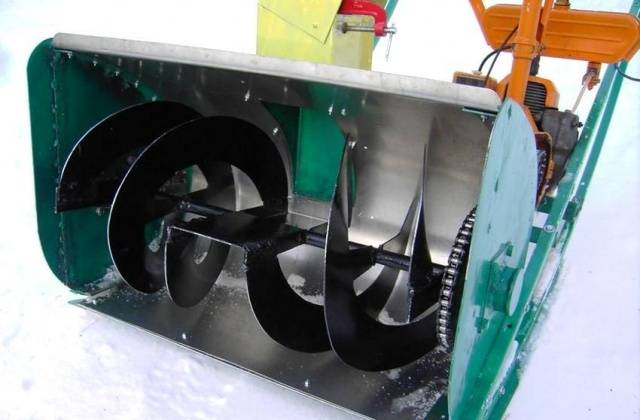
The most effective homemade snowblower for the house with your own hands it will turn out if you equip it with a screw mechanism. Most all factory built snow blowers have a similar design. The principle of operation of the equipment is to capture snow with rotating spiral knives. The snow blower auger consists of two spirals on the sides, and between them metal blades are welded in the center of the shaft. They throw snow into the discharge arm. The snow blower is connected to the traction unit itself through a belt drive.
The assembly of a rotary snow blower begins with the manufacture of the auger. First you need to find material for spiral knives. To get four rings with a diameter of 28 cm, you need to find a 1.5 m conveyor belt 1 cm thick. The auger knives are cut out, leaving petals inside the ring. They are needed for attachment to the working shaft - the rotor. As a result, you should get a blank auger knives, as in the presented photo.
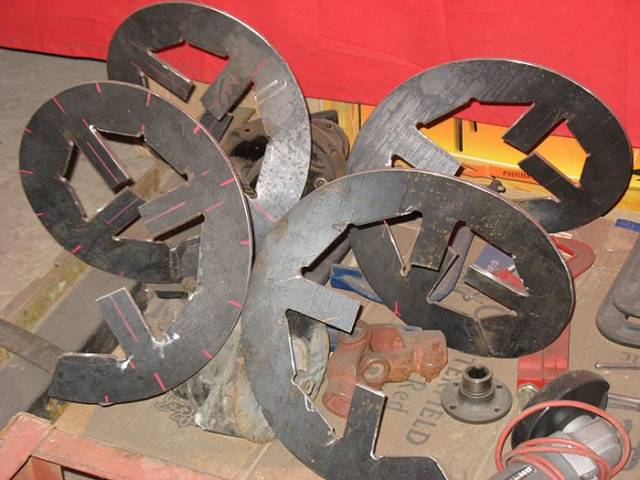
The auger knives made of sheet steel will be stronger. In this case, eight half rings are cut out, which are then welded with a spiral. You can go the other way. Four discs are cut from sheet steel. On the side, each ring is cut with a grinder, after which the edges are pulled in opposite directions.
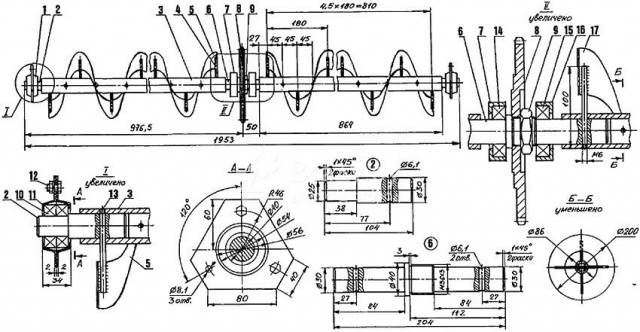
For self-made auger, it is better to use blueprints... If you look at the presented diagram, it will immediately become clear that the spiral knives consist of two parts, and between them there is a blade for throwing snow into the discharge sleeve.
The working shaft of the snow blower auger is made of a steel tube with a diameter of 20 mm and a length of 800 mm. Bearings no. 203 or 205 are put on both ends. But they cannot be stuffed onto the pipe. For the bearings, you will have to grind two trunnions. And one of them is made longer. A belt drive pulley is then mounted on this pivot, from which the rotor will rotate.
In the center of the pipe, two metal blades are welded parallel to each other. The steel blades of the auger are simply welded to the pipe. If they were made from a conveyor belt, then fixing lugs are first fixed to the shaft by welding, and knives are bolted to them.
Now it remains to assemble the body of the snow blower and insert the finished auger inside.For these works, you will need 2 mm thick sheet steel. Fragments of the future body of the snow blower are cut out with a grinder, after which they are welded into a single structure. On the inside, in the center of the side elements of the housing, the bearing seats are fixed, after which the auger is inserted into its permanent place. A belt drive pulley is placed on the trunnion protruding from one side. The body of the snow blower itself is installed on the skis, and a steel strip of a stationary knife is bolted from below with bolts. This element will trim layers of snow.
The video shows a homemade snow blower auger:
For the full implementation of this project, it remains to select a traction unit that will drive the rotary snow blower.
Re-equipment of a walk-behind tractor into a snow-auger machine
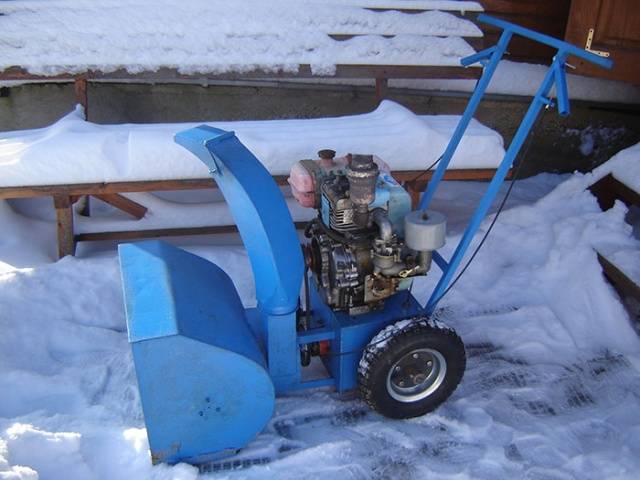
The easiest way is to assemble a snowblower with your own hands if you have a working walk-behind tractor. To implement this project, you will not need to look for additional spare parts. The rotary snow blower is already assembled. There is a traction device. Now it remains to hitch these two units, make a belt drive and the snowblower is ready.
Depending on the brand of the walk-behind tractor, the snow plow is attached to the bracket on the front or rear of the frame. In the second version, the steering wheel will have to be turned 1800... The snowblower will travel at reverse speed. In the case of a front attachment of the hitch, the walk-behind tractor drives in first gear at a speed of no more than 4 km / h.
The drive of a rotary snow blower is easier to make with a belt. If the auger gets stuck, the belts will simply slip on the pulleys. Can be mounted on snow blower and chain drive via sprockets. However, if a large solid object enters the auger, there is a danger of the chain breaking or the teeth on the sprockets.
Snow blower with a chainsaw motor
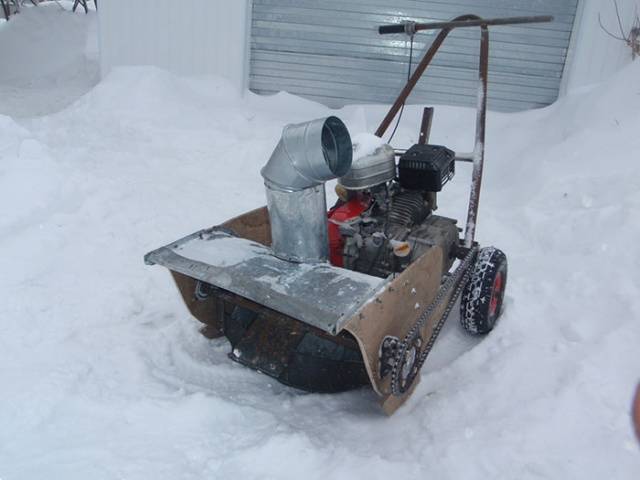
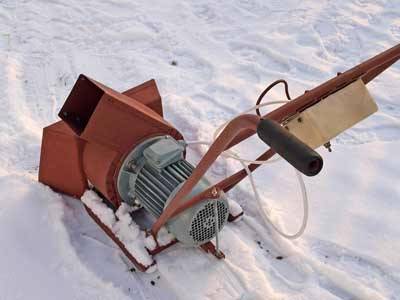
If there is no walk-behind tractor at home, then the simplest snowblower can be assembled with a chainsaw engine. Such a primitive option is suitable for a summer residence, where the snow will not have to be removed very often.
The working mechanism remains the same rotary snow blower. The implementation of this project is aimed at manufacturing a traction device - a machine. The motor is taken from an old powerful chainsaw, for example, "Friendship". To fix it, you need to weld the frame. You don't need to invent anything complicated here. The snowblower will be non-self-propelled, so the frame is welded from four pieces of the channel, and the axle of the wheel pair is fixed from below. The motor itself is bolted from above.
If you want to have a self-propelled snowblower, then you will have to adapt a gearbox to the frame, which will transmit torque from the engine to the wheelset. In this case, you can leave your own asterisk on the chainsaw motor. A similar part is fixed on the axle of the wheelset. Now it remains to put on the chain, and we have a direct drive for the snow blower.
In the final, it remains to weld the handles back to the frame. A coupling with a rotary nozzle is arranged in front. All working bodies of the snow blower are covered with a removable sheet metal casing.
Electric snow blower
To collect homemade do-it-yourself snow blower with an electric motor, work must be started again with the manufacture of the frame. Handles are welded to it. Instead of a wheelset, the snowblower can be put on skis, but in some difficult areas, such equipment will be harder to push.
The rotary snow blower again acts as a nozzle. A set of pulleys is used to transfer torque to the auger. A belt drive is assembled from them, which is hidden under a steel protective casing. It is possible to organize a chain drive of the snow blower through sprockets. However, when the made mechanism is jammed, there is a threat of combustion of the electric motor.
Sometimes craftsmen additionally reinforce the rotary nozzle with a fan. An example of such a snow blower is shown in the photo.The fan blades are located inside a round volute with a branch pipe for ejection of snow, which is tightly connected to the housing of the rotor nozzle. During rotation, the auger rakes up the snow and feeds it with blades into the outlet nozzle. The fan impeller behind it draws in the supplied mass, after which it throws it out with a strong air flow through the outlet sleeve.
It is better to take an electric motor for a screw machine with a three-phase, with a power of at least 1.5 kW. The disadvantage of such a snow blower is the constantly dragging cable and attachment to the electrical panel, where the connection is made.
The video tells about the manufacture of a snow blower from an electric trimmer:
Conclusion
You can assemble a snowblower from almost any home equipment that has an engine. It is only important to remember that snow is water. Electrical homemade products carry a certain risk of electric shock. It is best to give preference to gasoline engines.


