Content
The demand for a snowplow arises at a time when a large area has to be cleared after a snowfall. Prices for such factory-made equipment are quite high, so craftsmen try to make it on their own. The main working mechanism of the snow blower is the auger. To make it, you need precise blueprints. Mistakes in the calculations will result in the snow blower being thrown to the sides during operation. Now we will look at how to make a do-it-yourself auger for a snow blower from steel sheet and a conveyor belt.
Auger design and principle of its operation
It is not difficult to assemble a screw snow blower with your own hands. Here it is important to maintain the same distance between the spiral knives so that the machine does not wobble during operation. In action, such homemade products are driven by an electric motor or a motor from a cultivator, chainsaw and other similar equipment. The auger structure itself can serve as an attachment for a walk-behind tractor.
Auger snow blowers come in two varieties:
- The single-stage snow blower is equipped with a single spiral blade auger. Moreover, they consist of two parts, and between them there are throwing blades. While the machine is moving, the bucket cuts the snow layer, and it falls on the working mechanism. Rotating spiral blades crush the snow and scoop it up to the center of the body. There are rotating blades that push it into the nozzle. The snow throwing distance depends on the auger rotation speed. Typically, this figure is from 4 to 15 m. The auger blades are flat and serrated. The first option is used for loose, freshly fallen snow. In a homemade version, such a mechanism is often made from a conveyor belt. Serrated blades are used for clearing packed and icy snow.
- Two-stage snow blowers are also equipped with an auger. But this is only the first stage of the mechanism, helping to crush and throw out snow. The second stage is the rotor blades. They protrude slightly above the auger and help to grind the snow more thoroughly, and then throw it out through the sleeve.
The easiest way is to assemble a one-stage snow blower with your own hands, and it will be enough to effectively deal with snow in the yard.
Preparation of a scheme and materials for the manufacture of a single-stage snow blower
The diagram shown in the photo will help to correctly assemble the snow blower. On it, the material necessary for work is prepared and blanks are cut out of it. So, let's deal with each design element in order:
- Usually homemade snow blower made with a width of 50 cm.For its effective operation, any engine with a power of at least 1 kW is required.
- The body of the snowplow is bent out of sheet steel with a thickness of 1–2 mm. The sides can be sewn up with 10 mm plywood. However, it must be remembered that this part of the case bears the bulk of the load. The rotor itself with bearings is fixed on the side shelves. It is best of all to make them from metal or thick PCB.
- The auger is based on the axle. For its manufacture, you can take a metal pipe with a diameter of 20 mm. Throwing blades are cut from 5 mm thick sheet steel or a piece of channel. Knives are more reliable from sheet metal with a thickness of 2 mm. Sometimes they are made from a 10 mm conveyor belt or cut from an old car tire. Two trunnions need to be carved onto the axle.Bearings fit No. 203 or 205. Find two hubs for them, which will be bolted to the side shelves of the snow blower body. The auger is driven through a belt or chain. Depending on the choice, you will need a pulley or sprocket. Auger bearings are only suitable for closed type.
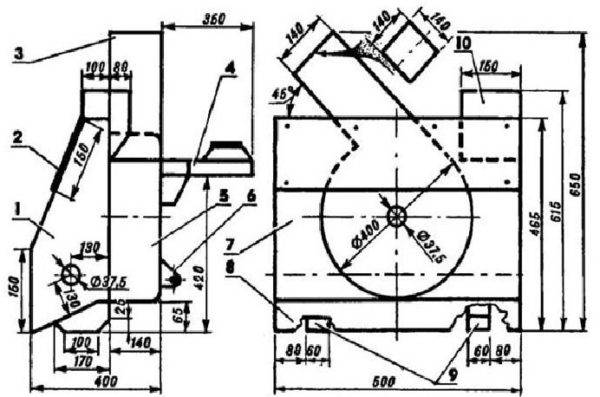
- The snow blower frame is assembled from a metal corner. If the structure is not a hinge for a walk-behind tractor, but acts as a machine, then a place is provided on the frame for installing the engine. The U-shaped handle is bent out of a pipe with a diameter of 15–20 mm.
- The snow removal sleeve can be made of PVC pipes with a diameter of 150 mm or bent out of galvanized steel.
To make the auger snow blower easy to move on the snow, it is placed on skis. They can be made from a metal corner by wrapping the edges up, or by cutting wooden runners from a thick board.
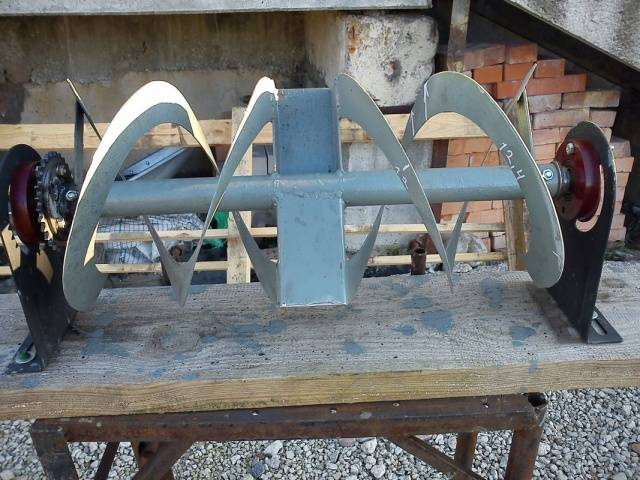
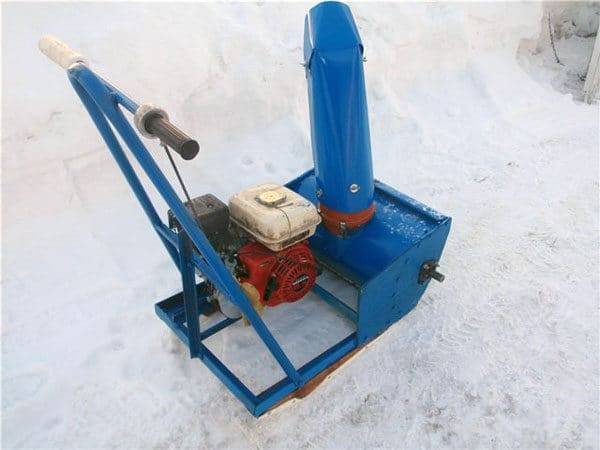
Single Stage Snow Blower Auger and Body Assembly
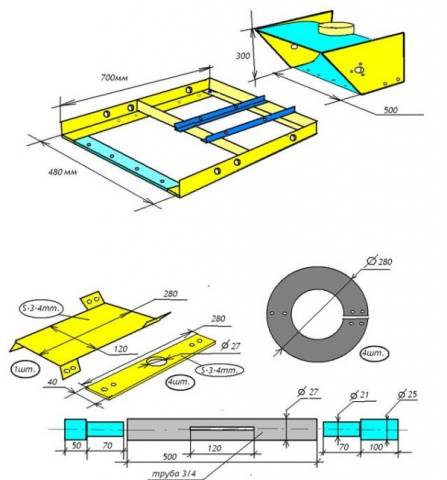
The manufacture of auger snow blower begins with the frame. Its design is reminiscent of a children's sled. If available, they can be used in place of the frame. Only the sleds need steel, not aluminum. A homemade snow blower frame is welded from metal corners. The dimensions of all elements are shown in the diagram. As a result, a construction with dimensions of 700x480 mm should be obtained.
The most difficult thing in making a snow blower is the auger. First, the material for the spiral knives is prepared. Whether it's steel or rubber from a conveyor belt, the process is the same:
- Four discs are cut out of the prepared material with a jigsaw. Their diameter should be less than the semicircle of the snow blower body. According to our scheme, this figure is 280 mm.

The auger blades are made double-sided, and they are set at an angle towards the throwing blades. - A hole is drilled in the center of each disc equal to the thickness of the axis. In our example, a tube with a diameter of 20 mm is taken.
- The resulting rings are cut on one side, after which the edges are stretched in different directions. As a result, you should get four identical spiral elements.
- Now it's time to make a shaft out of the tube. First, two blades are welded strictly in the center. They are placed against each other. Trunnions for bearings are welded to the ends of the pipe.
- The metal auger blades are simply welded to the pipe. For rubber knives, fasteners from metal plates with holes are welded onto the shaft. The elements are connected with bolts.
- Bearings are mounted on the screw journals. One of them should be longer. A pulley or sprocket is placed on this pin, depending on the type of drive.

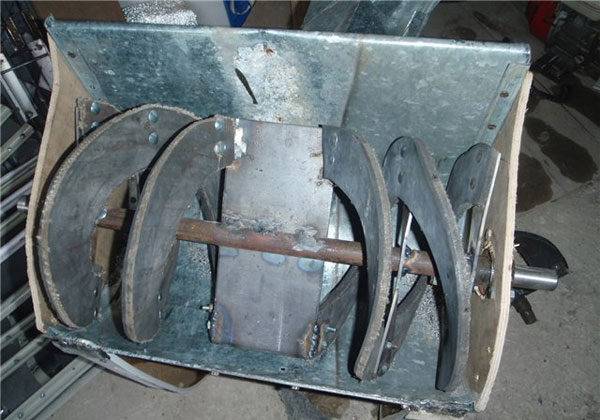
The auger is ready and now is the time to assemble the snow blower body:
- For the main element of the bucket, take a sheet of metal with a width of 500 mm and bend a semicircle from it. In our case, the diameter of the arc of the resulting element should be at least 300 mm. In such a bucket, the auger blades with a diameter of 280 mm will rotate freely.
- Side shelves of the bucket are cut out of metal, plywood or PCB. Bearing hubs are attached in the center.
In the final, it remains to assemble the bucket from the parts and install the auger inside. The blades should rotate freely by hand without engaging the bucket body.
If the snow auger is not an attachment to the walk-behind tractor, then we continue to assemble the structure. First, the engine mounts are fixed to the frame. It is better to make them adjustable to carry out the tension of the belt drive. Skis are attached to the bottom of the frame. If they are wooden, then for better glide, the surface can be upholstered with plastic.
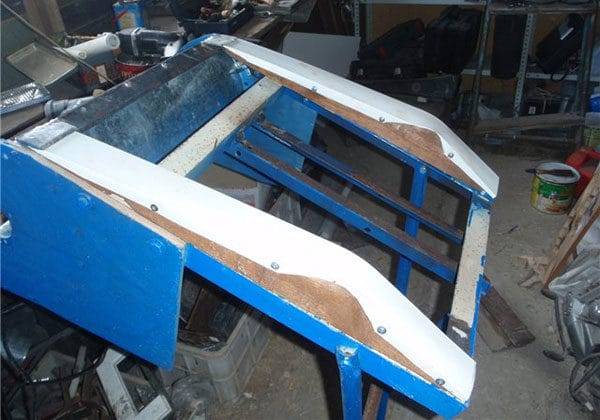
A nozzle is cut out at the top of the center of the snow blower bucket body. The hole must be exactly in line with the position of the throwing vanes. A branch pipe is fixed to the nozzle, and a snow exhaust sleeve is put on it.
The finished snow blower bucket is bolted to the frame with skis. The control handle is welded at the back. The engine is also bolted to the frame. A pulley or an asterisk is put on the working shaft, and a drive with a screw is made. The adjustable motor mounts tension the belt or chain drive.
Before starting, the finished snow blower is turned by the auger or pulley by hand. If everything is spinning normally without snagging, you can try to start the motor.
Manufacturing of a two-stage auger snow blower
The two-stage snow blower is difficult to manufacture. Often such a nozzle is used to work with a walk-behind tractor. Thanks to the rotor with blades, the capture of snow is improved, and the range of its throw through the sleeve increases to 12–15 m.
In the manufacture of a two-stage design, the auger snow blower is first assembled. We have already considered the principle of its manufacture, so we will not repeat ourselves. To refresh your memory, we just suggest looking at the diagram of the auger snow blower in the photo.
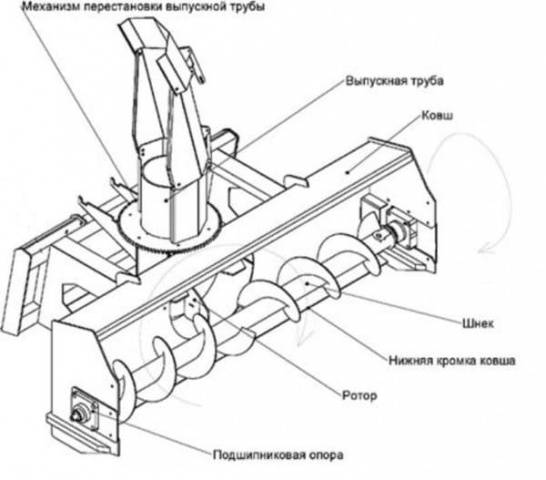
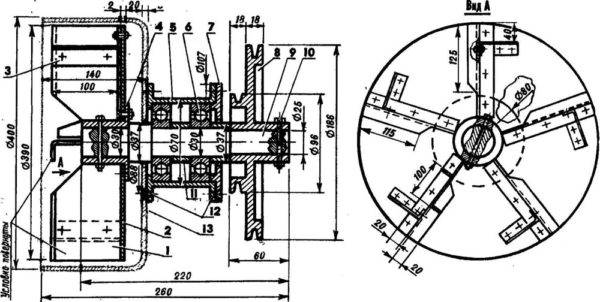
The next photo shows a diagram of a two-stage snow blower. Here, number 1 denotes the auger, and number 2 denotes a rotor with blades.
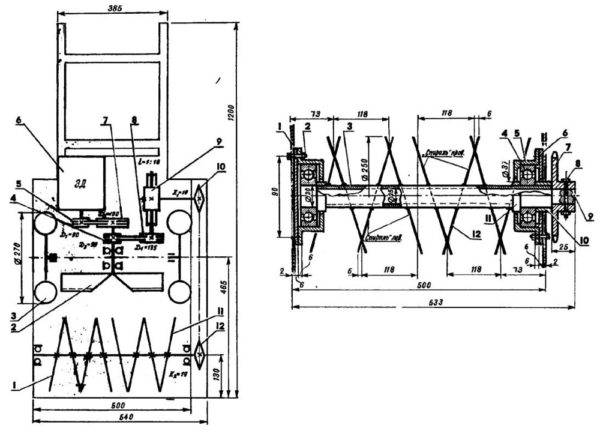
When self-manufacturing a two-stage auger snow blower, you will need accurate drawings of all structural elements. In the photo, we suggest looking at the diagram, which shows a side view.
To make a rotor, you need to find a drum. It can be made from an old gas cylinder or other cylindrical container. This will be the rotor housing. Further, it is connected to the bucket of the auger snow blower where the nozzle is located. The rotor itself is a shaft with bearings, on which an impeller with blades is put on. You can collect it according to the proposed scheme.
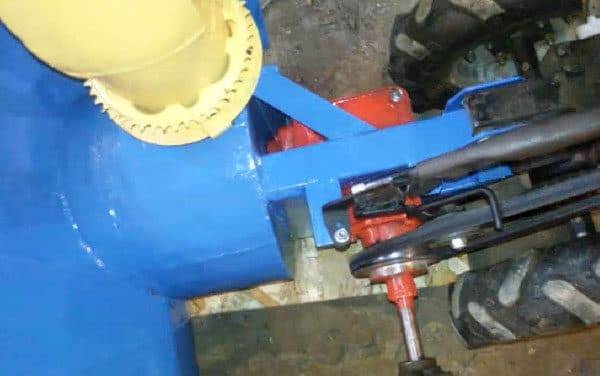
To the walk-behind tractor, the two-stage auger nozzle is attached to the trailed bracket on the frame. The drive is done using belts and pulleys.
When working with a snow blower, the walk-behind tractor moves at a speed of 2 to 4 km / h. The range of snow throwing depends on the speed of rotation of the auger and the rotor impeller.
The video shows the full production cycle of the auger snow blower:
It is reasonable to be engaged in the manufacture of auger snow blower if a large area has to be cleaned annually. The technique is simple in design and practically does not break. You just need to make sure that no large stone or metal object gets into the bucket.


