Content
Gardeners have invented many different devices that make it easier to cultivate the land. Some inventions have already been put on the assembly line and are being released in large quantities. These tools include a miracle shovel that allows you to manually dig up a garden without back pain.
How the miracle tool works
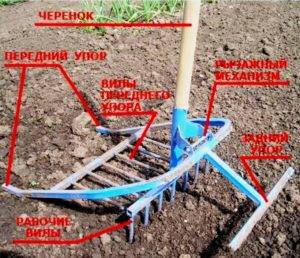
The presented diagram shows which nodes the miracle shovel consists of. Now let's figure out how it works:
- To start digging the garden, the tool handle is placed strictly vertically. Together with it, the teeth of the working forks acquire the same position. A person needs to stand with his foot on the stop or the upper bridge of the working forks and push with his body.
- When the teeth are completely pierced into the ground, the handle of the shovel is pulled back. Through the linkage, the working forks lift the soil layer, pushing it through the teeth of the stationary upper stop. At this time, the soil is loosened.
- Further, the miracle shovel for digging the earth is pushed back to the not yet worked area, and all the actions are repeated.
Summer residents do not always buy such a tool, because it is easy to make it yourself. This project does not require complex drafting. Simply, guided by the diagram, you need to understand the essence of the device of the miracle shovel, and then weld it from metal, selecting the dimensions to suit your requirements.
Varieties of miracle shovels
The device and principle of operation of different miracle shovels are almost the same. There are only a few design modifications. Let's look at a few examples of such a tool:
- The classic soil ripper is a one-segment wonder shovel. The tool consists of a working fork with a rear stop. This shovel allows you to increase labor productivity with minimal fatigue, but it does not completely break up clods of earth due to the absence of a second stationary segment with teeth. After digging, the soil will have to be additionally broken with a rake. The classic tool is suitable for working on constantly cultivated chernozems. In this case, it is desirable that the worker's weight be within 80 kg.

- The classic shovel is imperfect, since when digging out hard clods of earth, they do not loosen them. After some modifications, the instrument now has a second segment. A prime example is a shovel called the Plowman. In fact, it is a soil ripper. The length of the teeth of the working forks does not exceed 25 cm. Usually they are made at 10-15 cm. The working forks raise the upper layer of the earth, breaking it against the teeth of the second stationary segment. The plowman is not intended for digging up virgin soil. The efficiency of the tool is observed with a mass of a working person from 60 kg.
- A similar device has a shovel called the Mole. A distinctive feature is the backrest. If the Plowman has it T-shaped, then the Mole's emphasis is made in the form of an arc. The second stationary segment with teeth is different. The front stop is raised here. The length of the teeth of a mole is at least 25 cm. This allows a deep digging. Due to the great depth of digging, it is difficult to work with the Mole, especially on clayey and grassy lands.
On sale you can find a Tornado shovel or a similar miracle tool without a name. They all have approximately the same drawings and dimensions. They can only differ in the length of the teeth and insignificant modifications of the body.
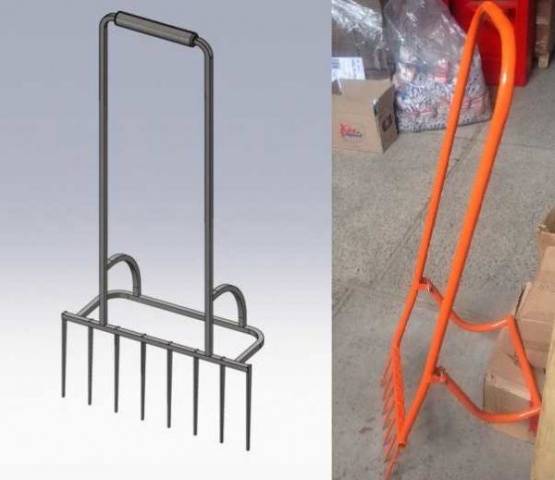
Self-made classic ripper

The photo shows a do-it-yourself drawing of a miracle shovel from one segment. The tool consists of a working pitchfork.Efficiency and ease of operation depends on the distance of the stop. The longer it is, the harder it will be to dig the ground. However, the advance step depends on the length of the stop. The optimal size is considered to be a stop with a length of 15–20 cm, but it all depends on the physical condition of the worker.
The hinge mechanism and the second stationary segment are absent from the shovel. Because of this, the structure is easier to manufacture. Although working with a classic ripper is more difficult than a shovel consisting of two segments.
Making a classic shovel with your own hands is quite simple. Difficult here is only to give the teeth a special shape, as shown in the diagram. Due to these bends, the force is evenly distributed on the pins and it is easier for a person to dig. The teeth are made from hardened steel. It is optimal to use the services of a forge or, in extreme cases, find fittings. The body itself is welded from a round or square pipe. The rod cannot be used for these purposes, since the tool will become unmanageable.
Self-made shovel from two segments

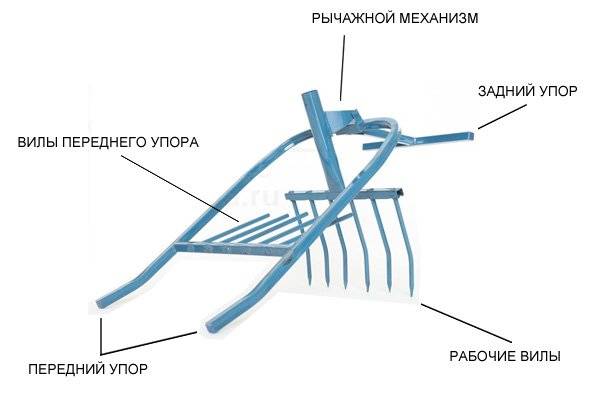
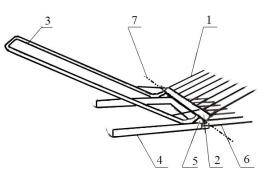
It is more difficult to make a do-it-yourself miracle shovel from two segments. But such a tool is more efficient and easier for them to work with. The structure can be welded according to the scheme of the Plowman or the Mole. This is the personal preference of the owner. All the main parts of the shovel are presented and numbered below in the photo. Guided by this diagram, we will look at how to make a miracle tool at home:
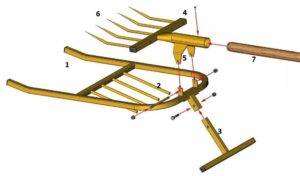
- Let's start with the frame. In width, it does not need to be more than 50 cm. Due to the large capture of the soil area, the speed of digging will decrease due to the quick fatigue of the worker. The optimum width of the working forks is 35–40 cm. It is better to bend the frame out of a square steel tube.
- When bending the frame, remember that the front stop bars are an extension of the frame. In the diagram, they are indicated by the number 1. A cross member is welded to the side elements. The teeth of the second stationary part of the forks, designated by number 2, will be fixed to it. As a result, the main frame is obtained, on which all the shovel assemblies will be assembled.
- The backgauge, designated by the number 3, is welded to the frame at an angle of approximately 100about... It is made a couple of centimeters wider from the working pitchfork. The stop must be strong, since the main load is borne on it when lifting a layer of earth with a pitchfork. The shape of the stop depends on personal preference. You can make a T-shaped structure according to the Mole principle, as shown in the diagram. This option is considered lightweight. If you like the shape of the Plowman's stop, then an arc resembling the letter P is bent out of the pipe.
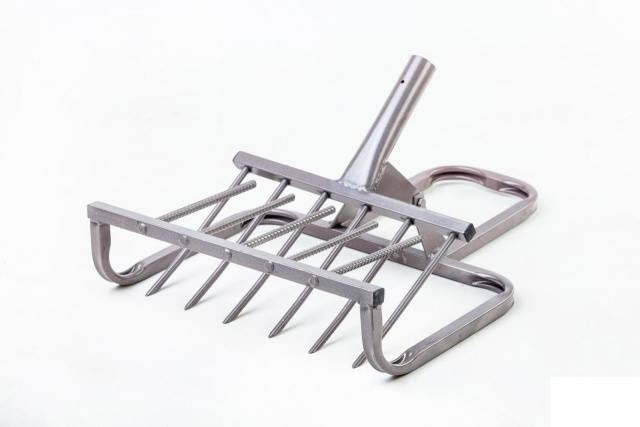
- For the manufacture of working forks, indicated by the number 4, take a piece of square pipe. A piece of round pipe with a diameter of 50 mm is welded in the center for a wooden shank. The working forks are a movable element, therefore they are attached to the common frame with a bracket marked with number 5. The connecting unit consists of two parts: one is welded to the frame and the other to the handle for the handle. For the manufacture of the bracket, sheet steel with a thickness of about 5 mm is used. The two elements are connected with an ordinary bolt, but do not tighten tightly so that the working forks can move.
- For the manufacture of the pins of the working forks, marked with the number 6, hardened steel rods are taken. One end of the teeth is sharpened at an angle of 30about, and the other edge is welded to a square pipe with a connecting movable unit. For better loosening of the soil, the pins are bent at an angle of about 150about... The teeth of the second stationary forks are made of reinforcement. No need to sharpen the edges. The pins are welded to the cross member of the main frame. The teeth of the working forks should be 1 more. The distance between the pins depends on the width of the frame, but not less than 100 mm.
- After connecting the two elements, a wooden handle is inserted into the welded section of the round pipe. Its length should be slightly below the chin of the working person. A T-shaped crossbar is attached to the handle from above. If desired, the handle of the miracle shovel can be made U-shaped.Then, two pieces of a round pipe are welded to the bar of the working forks along the edges. Two cuttings are inserted into them, and from above they are connected with a jumper. In the photo, the U-shaped handle is shown under the number 3.

To make it convenient for different people to work with a homemade miracle shovel, the back stop and the handle must be made with adjustment in length. Here you need to show imagination. You can cut inserts from the pipe, and drill holes for cotter pins.
In the video, see the procedure for making a miracle shovel:
Testimonials
For now, let's read the reviews about this tool.


