Content
Most novice rabbit breeders keep eared pets in single-tier cages. However, such housing is sufficient for a small number of livestock. Animals reproduce quickly and need to be settled somewhere. There is only one way out. It is necessary to increase the number of cells. If you put them in one row, then a large area is required. In this situation, a bunk cage for rabbits of its own production will help out.
Design features and drawing of a bunk cage
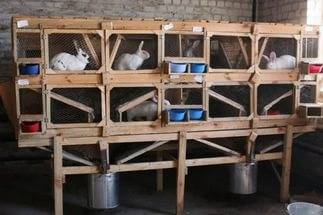
Standard bunk rabbit cages are structures 1.5 m wide and 1.8 to 2.2 m high. The structure is divided into sections. The capacity of animals depends on their number. Usually 2–4 adults live in such a house. As for the dimensions of the section itself, its width is 50 cm, and its height and depth are 60 cm.
The sections are separated by a V-shaped sennik. The width of its upper part is 20 cm. Each compartment is equipped with a feeder, which takes about 10 cm of free space.
On the video Zolotukhin N.I. talks about the construction of his cells:
When developing a cage drawing, it is necessary to provide for a manure removal system. For this, a gap is left between the first and second tier. The pallet will be inserted here. It is made at a slope towards the rear of the structure so that manure does not fall under the feet of the breeder.
If a rabbit with an offspring will be kept in the cage, you need to take care of the queen cell. The floor in this compartment is laid with a solid board. Immediately it is necessary to decide where the drinkers, feeders will be located, to decide on the design of the partitions. There are options when, instead of a sennik, an opening partition is installed inside the cage for the convenience of mating of opposite-sex individuals.
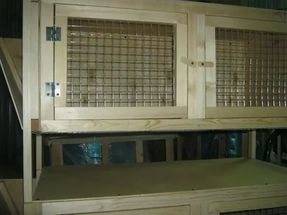
The design of the cage depends on the place of its installation. In the barn, the house is sheathed with a net, and on the street they make solid walls, and they are still insulated for the winter. If the free space allows, then you can build a walk for the young. A mesh aviary is attached to the back of the main house.
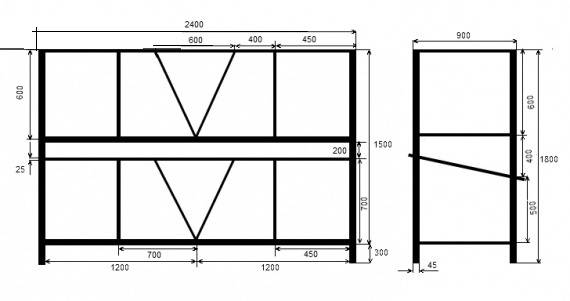
The photo shows a diagram of a two-tier structure. The cage can be made according to the dimensions indicated or you can make your own calculations. In general, the dimensions of housing for rabbits depend on their breed.
Choosing a place to install a two-story cage

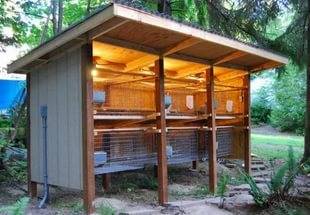
The requirements for choosing a location for installing rabbit cages are the same regardless of their design. On the street, a two-story structure with an aviary is installed where there are no drafts. A slightly shaded area under trees is ideal. Rabbits will be able to walk all day without being overheated in the sun.
It's a good idea to put a two-story structure near the wall of any building. And even better if there is a canopy on top. An additional roof will protect the house from precipitation and scorching sun rays.
When installing cages indoors, you need to take care of the removal of manure.If it accumulates a lot, the animals will breathe in the released harmful gases, which will lead to their death. In addition, the shed needs to be equipped with ventilation, but without drafts.
The video shows a cage for 40 rabbits:
DIY Bunk Cage DIY Guide
Now we will try to consider in detail how to make our own two-story housing for eared pets. For those who have already built single-tier cells, it will not be difficult to make such a structure. The technology remains unchanged, just another top tier is added. Although, there are several nuances and they are associated with the assembly of the frame, as well as the installation of a pallet between floors.
Assembling the frame
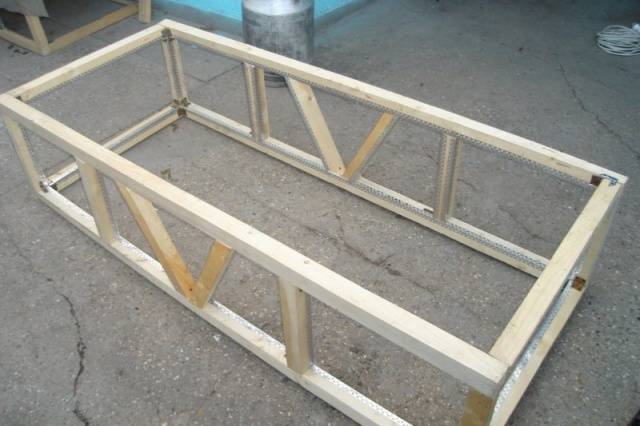
The scaffold is the skeleton of the cell. It is a rectangular structure assembled from frames and fastened with vertical posts. A structure is assembled from a bar with a section of 50x50 mm. The photo shows a single-tier frame option DIY rabbit cageswhere the compartments will be separated by a V-shaped sennik. For a two-story house, two such structures are assembled.
Corner posts are made solid, that is, common. Intermediate racks dividing the compartments set their own for each tier. This is due to the fact that between the first and second floors there is a free space of about 15 cm. A pallet will be installed here in the future. You can dispense with one-piece corner posts and assemble two separate frames. They are stacked on top of each other, but they are provided on the upper structure of the legs to create a gap for the pallet.
The frame of a two-tiered rabbit cage should be durable. It will hold all the elements of the rabbit house: roof, walls, floor, feeders and drinkers with contents. Plus to this you need to add the weight of the pallets with accumulated manure and the weight of the animals themselves. Rabbits sometimes become too active. So that the frame does not loosen during walking or foreplay of animals, the joints of the wooden elements are reinforced with metal mounting plates.
Floor making, wall installation and interior furnishings
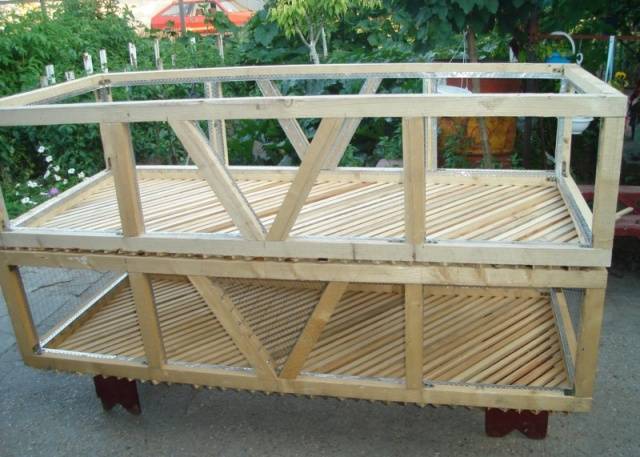
When the frame is ready, proceed to the flooring. For these works, it is optimal to use a wooden batten. It is nailed across the frame to the rear and front beams of the lower frame. If desired, you can nail the rail obliquely, as shown in the photo. There is no significant difference in the position of the rails, the main thing is that there is a gap between them. Through it, the manure will fall onto the pallet.
When the flooring is finished, legs are attached to the bottom of the frame made of a bar with a section of 100x100 mm. On the lower tier, it is better to make them 40 cm long. At this height from the ground, it is convenient to take a rabbit cage for carrying to another place. If the frame of the second tier was built as a separate structure, legs are also attached to the frame from below. Their length is selected so that a gap of 15 cm is obtained between the ceiling of the lower and the floor of the upper cage.
The material for the wall cladding is selected taking into account the location of the cages. If they stand indoors, then a galvanized mesh is shot to the frame with a stapler. It is important to ensure that there are no protruding wires in the places where the mesh is cut. Otherwise, the rabbits may hurt themselves.
When installing cells outdoors, only the front part is sheathed with a net. The side and back walls are made of solid plywood or boards. In regions with severe winters, insulation is additionally placed in the casing. In this case, double walls are made.
At this stage, you still need to install the partitions. A V-shaped sennik is sheathed with a coarse mesh or a lattice is made of steel rods. If the cages contain individuals for mating, then a round or rectangular hole measuring 20x20 cm is cut into the partition and equipped with a shutter.
It is especially important to approach the arrangement of the mother liquor correctly. Rabbits often roll out of the nest. If the baby falls from the second tier of the cage to the ground, he will be crippled.To prevent this from happening, the lower part of the mesh walls in the mother liquor is covered with a board, plywood or strips of flat slate. The same is done with the floor.
Installation of doors and roof
For the manufacture of doors from a bar, rectangular frames are assembled. They are attached to the frame with hinges. There are two positions for opening the sash: sideways and downward. Here, each breeder chooses an option at his own discretion. The fixed frames are sheathed with a net, and a latch, latch or hook is placed on the side opposite to the hinges.
The roof structure depends on the location of the cage. When located outdoors, both tiers are covered with a solid ceiling made of boards or plywood. Beams are attached to the ceiling of the upper tier so that an overhang is obtained at the back and front. It will close the cells from rainfall. A crate is nailed onto the beams from the board, and a non-soaking roof covering, for example, slate, is already attached to it.
If the bunk cage is installed inside, then the ceilings can be sheathed with mesh. The upper tier is covered with any lightweight material. Such a roof will better protect the cage from dust settling.
The video shows a homemade rabbit cage:
When the two-story rabbit house is ready, a galvanized sheet steel pallet is installed between the first and second tier. Now you can install drinkers, feeders and start the animals.


