Content
The beekeeper's house is not just for relaxation. The owners of the apiary of over 100 beehives are building large buildings. The room is divided into useful compartments. Each room is equipped for a specific activity, for example, pumping honey, storing combs, beehives, inventory.
In what cases is it necessary to build an apiary house
There are 2 main reasons pushing the beekeeper to build an apiary:
- The apiary consists of over 50 hives. It takes a long time to maintain a large number of bee colonies. The beekeeper practically lives in the apiary if the number of hives exceeds a hundred. Maintenance requires inventory, tools, equipment. The bees are fed and treated. It is more convenient to store all property in an apiary house. Here honey is pumped out.
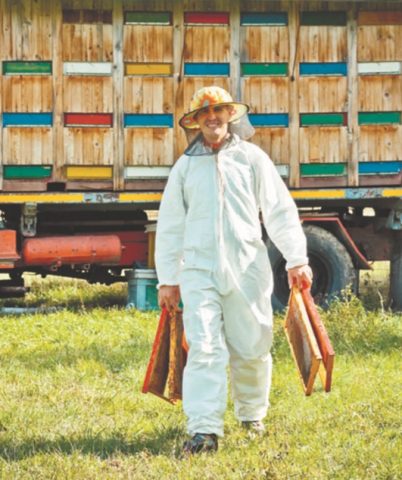
- The apiary is taken out in the spring to the field, and taken home in the fall. In the field, it is good to have a nomadic beekeeper's house, where they store property, rest, pump honey. It is more profitable for a beekeeper to immediately acquire an apiary on wheels. The hives are taken out in the trailer, and then it serves as a barn for household needs.
The design of the beekeeper's house is chosen taking into account the remoteness of the apiary and the expected functionality. If the site is located near honey plants, it makes no sense to take the hive to another place. The apiary house is erected stationary on the foundation. The best option is considered to be combined with Omshanik under the same roof. The apiary carriage on wheels for a mobile apiary is made in size according to the number of beehives.
Varieties of buildings
Owners of small apiaries usually do not build special buildings. They adapt the shed, basement, shed available on the site for the beekeeper's house. In the absence of a free building, an apiary house has to be erected. The size of the stationary structure depends on the number of hives. If the site has just been purchased and there are no barns on it, it is more profitable to build one multifunctional building. For example, when it is supposed to have up to 150 bee colonies, an area of about 170 m is allocated for the construction.2... The interior is divided into the following compartments:
- beekeeper's room - up to 20 m2;
- room for pumping out honey, heating wax, putting on frames - up to 25 m2;
- frame storage - up to 30 m2;
- pantry for inventory - 10 m2;
- shed for storing empty hives, spare parts - up to 20 m2;
- loading and unloading ramp - 25 m2;
- garage - 25 m2;
- summer canopy - 25 m2.
In the beekeeper's room itself, honeycombs can be stored in the summer, and in the fall, the filled frames can be heated before pumping out the honey.
A nomadic apiary is usually made on wheels. Beekeepers adapt old car trailers to it. For a small number of hives, a single-axis model is sufficient. A beekeeper's booth with 4 wheels, which is installed on a large platform, is considered to be a complete one. The frame is taken from a large agricultural trailer. The house of the nomadic booth itself consists of a metal frame. The walls are sewn up with plywood, tin, roofing material, corrugated board are used for the roof.The side walls of the booth are equipped with opening windows, and a door is placed at the end.
A type of nomadic booth is a collapsible beekeeper's house. The structure consists of split frame elements. The walls, roof and floor are ready-made shields. They are bolted to the frame. In a disassembled state, the apiary house is transported from above on the hives. Shields temporarily act as a roof that protects the transported apiary from rain.
The canopy is similar to the category of apiary houses. It's all about its design. Compared to traditional buildings, the apiary has walls. They are made of 4 shields. The front front wall can be removed in summer or made not high so that the bees can fly freely. The roof of the apiary canopy is laid from corrugated board or slate.
How to make a do-it-yourself beekeeper shed
It is necessary to erect an apiary house with your own hands in the form of a barn thoughtfully. If the site already has an Omshanik for wintering, then a small booth will be enough for inventory. Usually the frame is knocked down from a bar or metal is welded. Sheathing of the beekeeper's shed is carried out with a board, plywood, corrugated board.
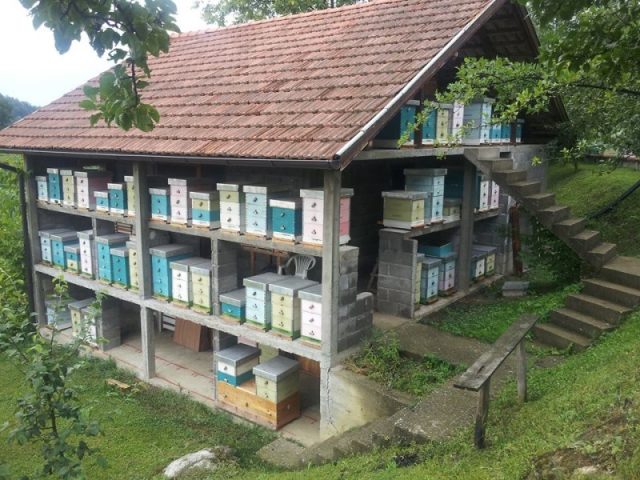
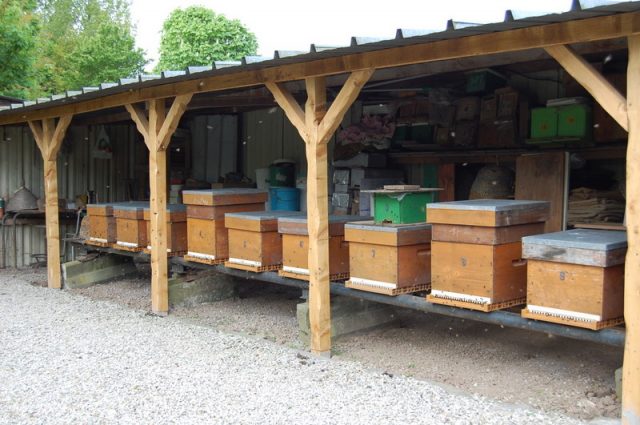
If there is no Omshanik, it is more profitable for the beekeeper to build a stationary pavilion for a non-nomadic apiary. The building will play the role of a barn, an apiary, an Omshanik. The hives will stand in a stationary pavilion all year round. They do not need to be taken out and brought in. An optimal microclimate is constantly maintained inside the pavilion.
The size of a beekeeper shed is similarly dependent on its intended use. The beekeeper chooses the dimensions of the premises for household needs at his discretion. If preference is given to a stationary pavilion, then calculate the free area of 1 m2/ 1 lounger with 32 frames. For other models of hives, the area is determined individually.
Drawings, tools, materials
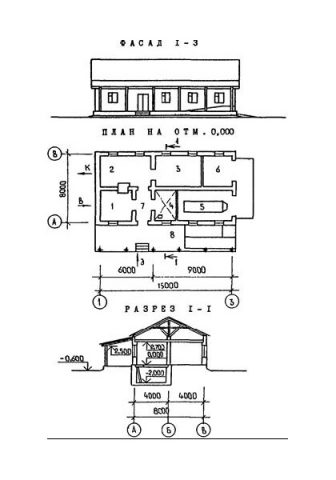
The first drawing is for a large apiary. Under one roof there is a barn, an omshanik, a beekeeper's house, a room for pumping out honey, and a shed.
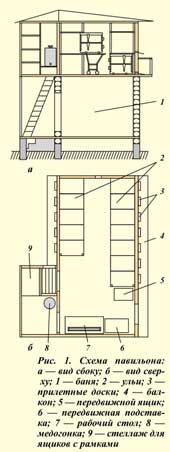
The next drawing of the stationary pavilion. Inside are hives, rooms for the beekeeper, honey pumping, pantry, barn and other needs.
Materials will require timber, boards, plywood, thermal insulation. Woodworking tools are needed: a saw, a plane, a drill, a screwdriver, a hammer, a chisel.
Build process
The beekeeper's shed is usually built from wood. For easy construction, a complex strip foundation is not needed. The shed is placed on a columnar base or piles. The first option is the most common because of the lower costs. A feature of a shed for a beekeeper is that it can be installed on the second floor on any farm building, the main thing is that it is durable. If the beekeeper's shed will play the role of a pavilion where the hives will stand, it will be as far away as possible from neighbors and the roadway.
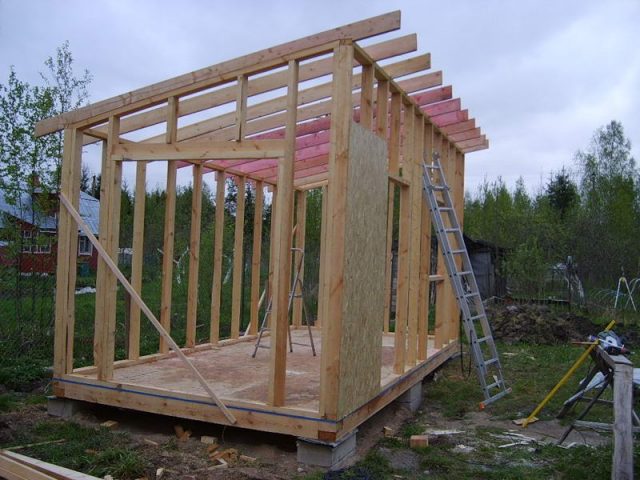
The assembly of the beekeeper's shed begins with a frame. First, the lower frame is assembled. Racks are placed vertically to it in the corners, in the places of formation of window and door openings, along the perimeter in 60 cm increments. The upper strapping is another frame, similar in size to the lower structure. All elements of the frame of the apiary barn are made of timber.
Logs are attached to the lower frame with a step of 60 cm. A board with a section of 100x50 mm is suitable. A floor is laid on the logs from a board with a thickness of 25 mm. The beams of the ceiling of the apiary from a similar board are attached to the upper frame.
It is more profitable to make a gable roof. The beekeeper can additionally use the attic space for storing beekeeping equipment. However, due to the complexity of the design, an apiary shed is often erected with a lean-to roof. Light sheets act as roofing material. Corrugated board, roofing felt, ondulin are suitable.
The walls are sheathed with boards, plywood or OSB boards.Outside, beekeepers advise the tree to be additionally covered with sheet metal if there are hives in the shed. The metal will serve as a shield against electromagnetic radiation. Under such protection, bees behave more calmly.
An important step is the insulation of all elements of the apiary. On the floor under the logs, a board is stuffed, forming a rough flooring. The cells are filled with mineral wool, covered with a vapor barrier. A finished floor board is laid on top of the beams. The ceiling is insulated using a similar system. On the walls after the external cladding, cells remain from the inside of the shed. They are filled with mineral wool and covered with an inner sheathing of plywood or fiberboard.
The windows of the apiary barn are made openable for ventilation. Provide ventilation ducts. If the shed is made for a pavilion, windows are cut out in the walls in front of the entrances of the installed hives for the bees to fly out.
Do-it-yourself collapsible apiary house
When the budget does not allow acquiring a trailer on wheels for a nomadic apiary, the way out of the situation is to make a collapsible beekeeper's house. The structure is made lightweight so that it can be transported in a trailer with hives. To quickly assemble and disassemble the collapsible beekeeper's house, the frame is made of a thin-walled profile or pipe. The connection is only bolted, welding for a collapsible structure will not work.
Drawings, tools, materials
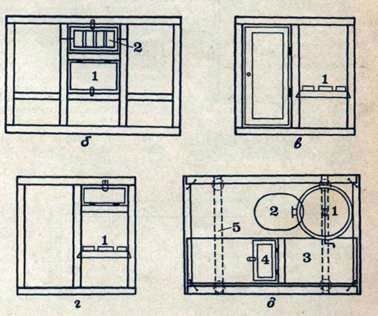
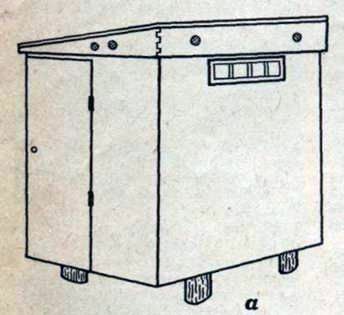
Usually a folding beekeeping house is made in the form of a large box. A complex drawing is not required. On the diagram, they mark the location of the frame elements, indicate the dimensions, the points of the bolted connection.
From materials you will need a pipe or profile, ready-made shields for walls and roofs, M-8 bolts. You can use shalevka or fiberboard. An electric drill, a grinder, a jigsaw, a set of keys for assembling an apiary house are taken from the tool.
Build process
A collapsible apiary house is a non-insulated summer construction. A large booth is not worth building. The design will be wobbly. The optimal dimensions of a collapsible apiary house are 2.5x1.7 m. The height of the walls is 1.8-2 m. The front wall is made 20 cm higher to form a slope of the roof.
First, blanks for the frame are cut from a pipe or profile to the desired size. An electric drill is used to drill holes for a bolt connection. All blanks are connected into a single frame.
Shields are assembled from the shalevka according to the size of the frame. It is advisable to knock down the board from a board with a thickness of at least 20 mm to the floor. Holes for windows are cut in the wall panels. The door is cut out from plywood or a sheet of corrugated board is enclosed in a metal frame. Shields with a frame are similarly bolted. After installing the beekeeper's house in the apiary, the roof is covered with roofing material.
Beekeeper wagon on wheels
It is reasonable for the owner of a nomadic apiary to acquire a mobile beekeeper's house in the form of a trailer on wheels. There are specialized factory-made models, but they are expensive. Beekeepers often convert a car trailer into an apiary wagon.
Benefits of using
With a trailer, you can move through the fields, transporting the apiary closer to the seasonal flowering honey plants. Due to such a trip, bribes increase, the beekeeper gets the opportunity to collect different types of honey. If the apiary carriage is on a large platform, the hives are not unloaded at the place of arrival. They stay on the landing.
How to do it yourself
For the manufacture of an apiary trailer, you will need a trailer, preferably a two-axle one from agricultural equipment. You can convert a single axle car trailer by lengthening the frame and adding a second pair of wheels. The frame of the beekeeper's trailer is optimally welded from a profile or pipe. The wooden structure will loosen with frequent moves.
Drawings, tools, materials
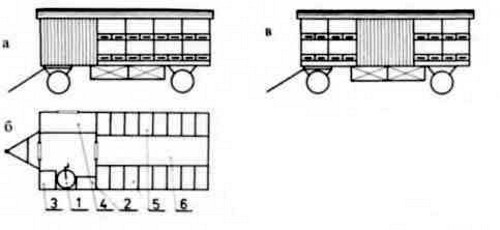
Initially, you will need to develop or find a ready-made drawing. The sizes are calculated individually. Depending on the dimensions of the platform and the carrying capacity, the apiary wagon can transport beehives installed in one or more tiers.The beekeeper's room, compartment for the honey extractor and the printing table are provided at the front near the hitch in order to reduce the load on the rear axle.
From materials you will need pipes, a profile, a corner, boards. The set of tools is standard: grinder, electric drill, screwdriver, wood saw, hammer. To assemble the frame and increase the frame, you need a welding machine.
Build process
The assembly of the apiary wagon begins with the frame. The trailer is freed from the sides. Remains a frame with wheels. If necessary, it is extended by welding a profile or pipe. The next step is to weld the frame. The racks are fixed to the frame, connected by an upper strapping that forms the base of the roof.
The bottom of the trailer is sewn up with a board or sheet metal. From the inside, the locations of the hives are laid out. On a standard platform, there are usually 20 of them in one row. If many hives are supposed to be transported, they are installed in tiers, and a stand from the corner is welded under each.
When the inside of the apiary wagon is equipped, a sheet metal roof is laid. The walls are sheathed with boards. If the hives will not be taken out of the trailer, holes are cut in the walls opposite the entrances. Windows are made with opening vents. Finish the construction of the trailer by painting.
Conclusion
The beekeeper's house is usually made by beekeepers according to an individual layout. The owner himself knows best what and where it is more convenient for him to arrange.


